Nina Phillips

About Phillips, Nina

Chief editor from Voilabits.

7 Best ePub to Mobi Converter for Mac, Online and Windows

ePub, working as one of the most popular format for ebooks, however, it not that kindle-friendly. Therefore, many users prefer to convert their ePub books to Mobi or other kindle formats. And such a conversion requires a converter.

For Mac or Windows users, the best choice for a ePub to Mobi converter is different, even, some users are looking for an online free ePub to Mobi solution. Here is this post, you will find total 7 best ePub to Mobi converter for Mac, for Windows, Online free, even for Android phone and iPhone.

  1. Best ePub to Mobi Converter for Mac/Windows
  2. Convert ePub to Mobi Calibre
  3. Best ePub to Mobi Converter Online Free (3 Tools)
  4. Best ePub to Mobi App for Android
  5. Best ePub to Mobi App for iPhone

Best ePub to Mobi Converter for Mac/Windows

There are so many choices when picking a good ePub to Mobi converter, but the best goes to Epubor Ultimate.

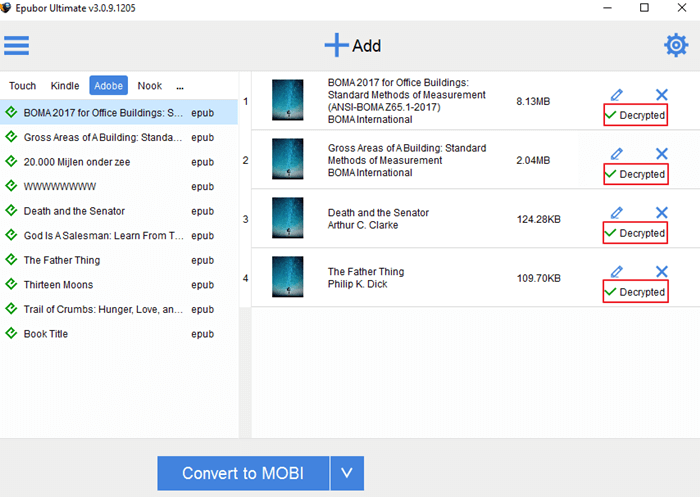
Epubor Ultimate is a powerful ebook tool to edit, convert and decrypt ebooks on Mac and Windows. It is easy to use and able to detect the ebooks in your Kindle or from other ebook readers once connected to your Mac or Windows. Also, it can convert various ebook formats to kindle friendly files, even kindle books to pdf.

Why Epubor Ultimate?

  • Detect eBooks from Kindle or other devices fast;
  • Support input: KFX, EPUB, PDF, AZW, AZW1, AZW3, AZW4, Mobi, PRC, TPZ, Topaz, TXT, and HTML;
  • Support output: EPUB, Mobi, AZW3, TXT and PDF;
  • Convert Mobi back to ePub;
  • Allow batch conversion;
  • Support large ebook files, even 200MB+ epub to Mobi, etc.;
  • Respond fast to upload and convert;
  • Highly retain original file quality;
  • Modify meta data;
  • Easily remove protection from ebooks;

Free Download ePubor Mac
 
Free Download ePubor Win

Steps to Convert ePub to Mobi on Mac with Epubor Ultimate

To demonstrate how to use this best ePub to Mobi converter for Mac/Windows, here we convert several ePub files using the program step by step.

  1. Download and install Epubor Ultimate onto your mac;
    Free Download ePubor Mac
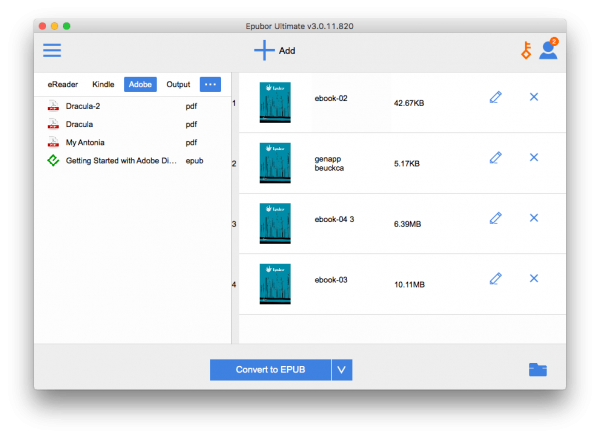
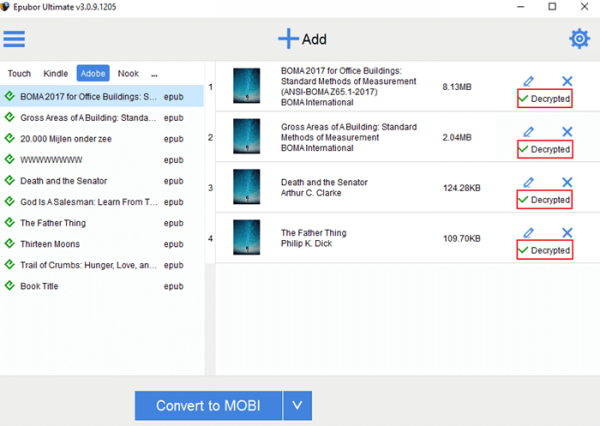
  2. Drag and drop the ePub files into the program. To convert ePub to Mobi for Kindle on Mac, connect your kindle device to Mac with USB first, then your ePubs files will be detected;epub to mobi mac02
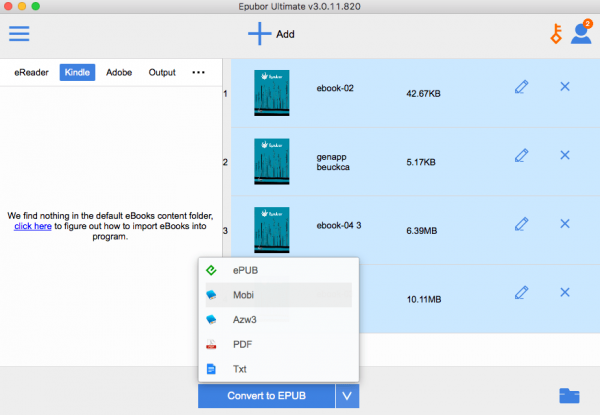
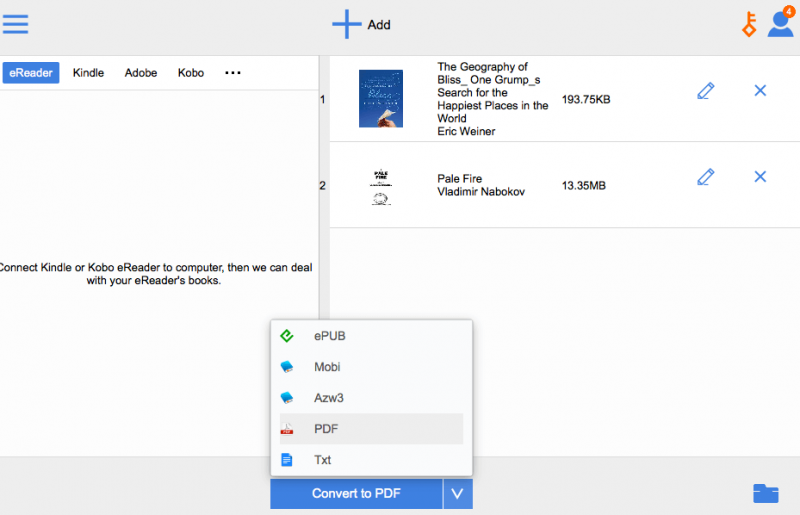
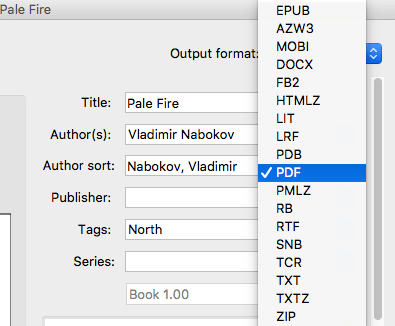
  3. Click on Convert to menu, choose output as Mobi;epub to mobi mac03
  4. Once ready, click Convert to Mobi to save your ePub books as Mobi on your mac;
  5. (Optional). If you want to save the Mobi file to your Kindle or other ereaders, connect your device to mac, then move the Mobi files to your Kindle folder or others as needed.

What if need to convert encrypted epub to Mobi on Mac?

In the case that your ePub files are encrypted, you can still use Epubor Ultimate to save as Mobi. The steps are the same as that to convert a non-encrypted epub file.

  1. Download and install Epubor Ultimate onto your mac;
    Free Download ePubor Mac
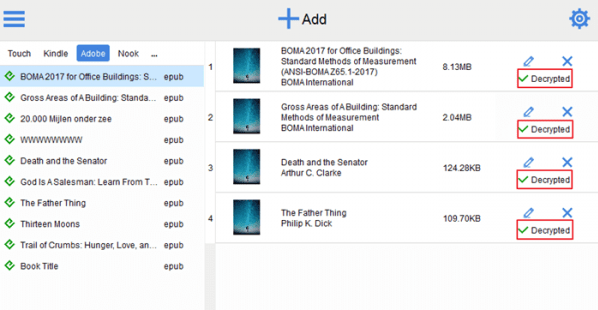
  2. Drag and drop ePub files to the program, Epubor will remove the encryption automatically;epub to mobi mac04
  3. Then choose output as Mobi;
  4. Click Convert to Mobi to start the conversion.

Convert ePub to Mobi Calibre (Mac & Windows)

Speaking of converting and managing ebooks, it is much likely you will be recommended to use Calibre, the free program to read, download, share, backup, edit and convert ebooks easily. Of course, it helps to convert ePub to Mobi, no matter you want to convert single ePub file or ask for a batch conversion. It is available on different platforms, macOS, Windows, Linux, etc.

Steps to Convert ePub to Mobi with Calibre on Mac or Windows PC

  1. Download and install Calibre;
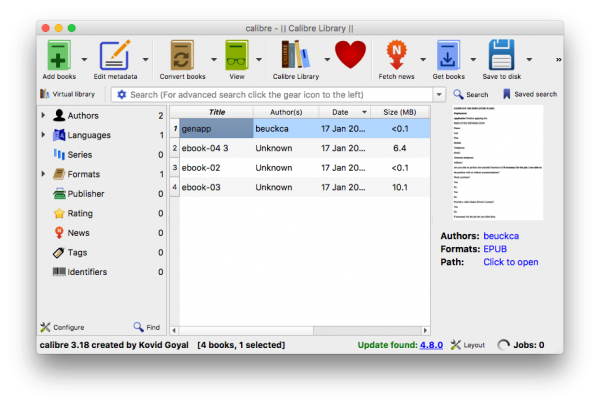
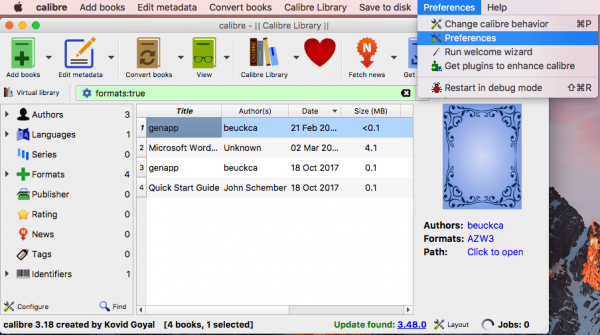
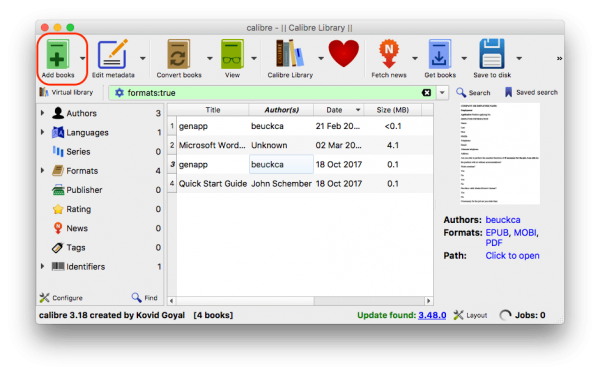
  2. Run the program, drag and drop ePub files to its interface;epub to mobi calibre01
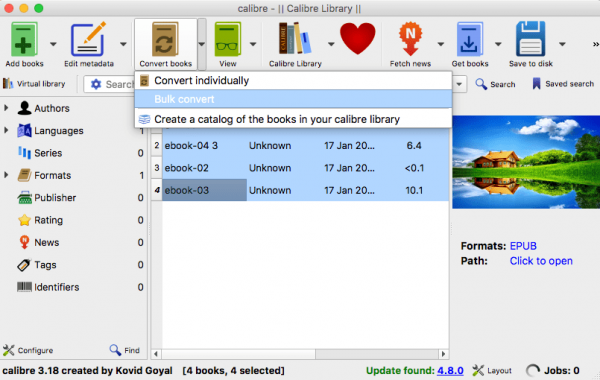
  3. Go to Convert books>Bulk convert or Convert individually according to your need;epub to mobi calibre 02
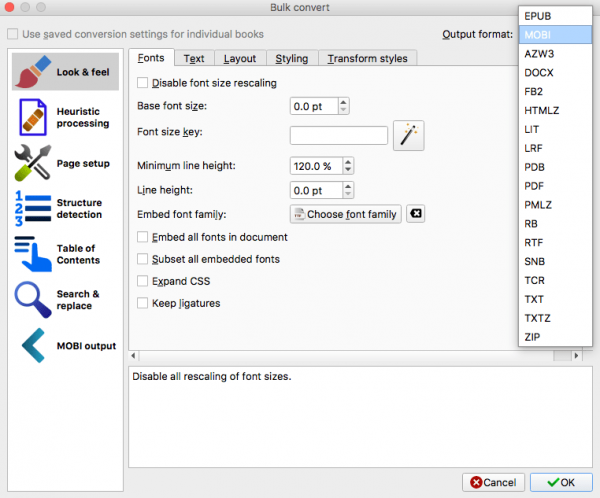
  4. Then choose Mobi in the output menu, also you can tweak the conversion settings if needed; Click OK to start converting ePub to Mobi;epub to mobi calibre 03
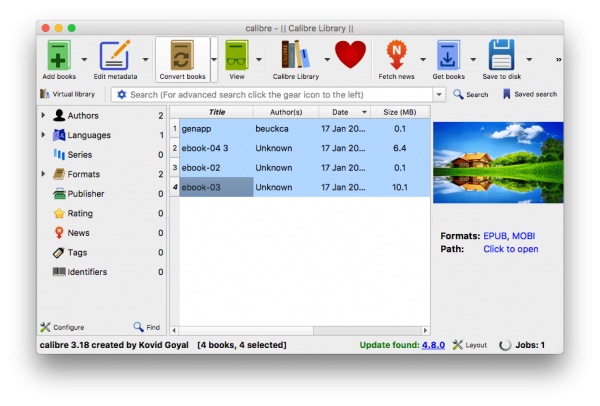
  5. You can click “Jobs” at the bottom of the main interface to check the conversion status or find the Mobi output;epub to mobi calibre04

Best ePub to Mobi Converter Online Free (3 Tools)

Or you just want to convert ePub to Mobi files without installing any software. In this case, an online free ePub to Mobi converter is needed.

There are numerous online free ebook converters, but just several of them can maintain a good formatting, here we pick the best 3 online free ePub to Mobi converters, basing on the simplicity and conversion quality.

#1 Convertio

Convertio is absolutely my favorite tool to convert files online free this year, it does good on the conversion quality, though you may need to manually adjust the output, the conversion quality outperform others.

Not only to convert ebooks, Convertio can help convert videos, audios, images, documents, archives, fonts, even perform OCR on scanned files.

Steps to Convert ePub to Mobi Online Free with Convertio

  1. Go to Convertio ePub to Mobi;
  2. Click “Choose Files” to upload your ePub files;
  3. Then click Convert to change ePub to Mobi online free;
  4. Once ready, click Download to get the Mobi files;convertio epub to mobi

Cons:

  • Potential risk of information leakage;
  • Take time to upload files, especially large file;
  • Need double check and manually adjust formatting sometimes;

#2 Zamzar

Zamzar is quite similar to Convertio, it is also an online free platform to convert a wide variety of files, including ebooks, videos, audios, images, archives and ebooks. In addition, it supports batch convert ePub files.

Steps to Convert ePub to Mobi Online Free with Zamzar

  1. Go to Zamzar ePub to Mobi;
  2. Click “Add Files” to upload single or multiple ePub files;
  3. Choose output as Mobi;
  4. Click Convert Now to turn ePub files to Mobi online free.zamzar epub to mobi

Cons:

  • Potential risk of information leakage;
  • Take time to upload files, especially large file;
  • Unstable conversion quality;

#3 Online-Convert

The 3rd online free tool to convert ePub to Mobi we would like to recommend is Online-Convert. Unlike others, it allows users to customize the ePun file, like change ebook title/author/input encoding, add border, set size.

Steps to Convert ePub to Mobi Online Free with Online-Convert

  1. Go to Online-Convert ePub to Mobi;
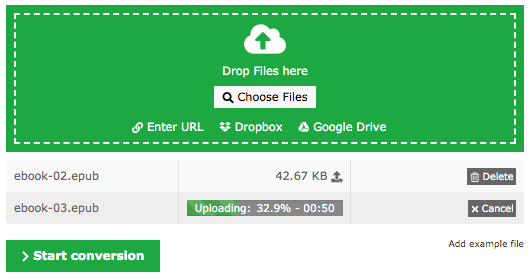
  2. Drag and drop ePub files to the program;
  3. (Optional) Tweak the settings as needed;
  4. Click “Start conversion” to export ePub as Mobi online free;
  5. Once ready, save the ePub files to your device;online convert epub to mobi

Cons:

  • Potential risk of information leakage;
  • Take time to upload files, especially large file;
  • Unstable conversion quality;

Best ePub to Mobi App for Android

To convert ePub to Mobi on Android phone, you may need to find a professional application in Google Play to do the job, while, Ebook Converter is deemed as the best pick for most of the users.

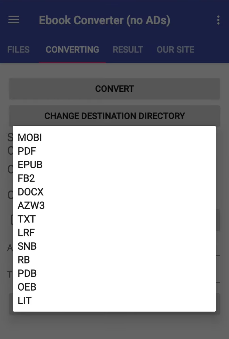
It is capable of converting various ebooks to FB2, AZW3, LRF, TCR, SNB, RB, PML, PDB, OEB, MOBI, LIT and EPUB.

Steps to Convert ePub to Mobi on Android Phone

  1. Download and install Ebook Converter onto your Android phone;
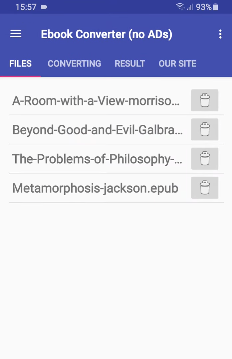
  2. Choose your ePub files from your Android phone;android epub to mobi01
  3. Then go to Converting, choose Mobi as the output;android epub to mobi02
  4. Then click Convert to save ePub as Mobi on your Android phone.

Best ePub to Mobi App for iPhone

To convert ePub to Mobi on iPhone, an iOS application is also needed. Basing on our tests and feedback from users, we here pick The Ebook Converter from SmoothMibile as the best ePub to Mobi App for iPhone.

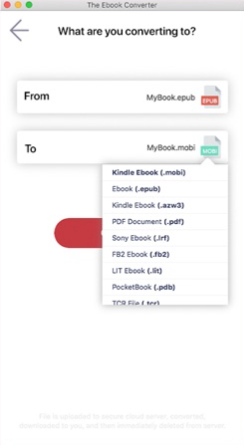
The Ebook Converter can export ebooks, images, text, PDF and various files as epub, mobi, azw3, pdf, lrf, fb2, lit, pdb, tcr, txt. It offers a 7-day free trial and you need pay for 2.49/month if you want a subscription.

Steps to Convert ePub to Mobi on iPhone

  1. Go to AppStore, download and install The Ebook Converter;
  2. Choose your ePub files in the “From” menu;
  3. Then choose Mobi as the output in the “To” menu;
  4. Click “Convert” to turn ePub files to Mobi on iPhone;iphone epub to mobi

Conclusion

When converting ePub to Mobi, many of us try to seek a solution that is easy and free. Yes, you have such a free choice, however the free options basically come along with limited features and poorer conversion quality, if you want to read your Mobi files comfortable, utilize the best ePub to Mobi converter to preserve the original file quality as highly as possible.

Related Post

By |2020-01-19T11:40:39+08:00January 19th, 2020|Tags: , |

Dr.fone Review 2020: Is Dr.fone Safe and Does it Work?

Nowadays, mobile phone is not only a tool for communications. More and more users are using phones to store and process data for study or business. Thus, the needs to manage, transfer, even recover data on phones grow, and this is how Dr.fone comes out. So today, we are going to give a complete and unbiased Dr.fone Review, helping users to find if it is worth a try.

5 Basic Thins You Need to Know about Dr.fone

Before going to the review, there are 5 facts that you should know about Dr.fone. By knowing this, you can keep read the review and take practical tests on this program before a commercial decision.

What is Dr.fone?

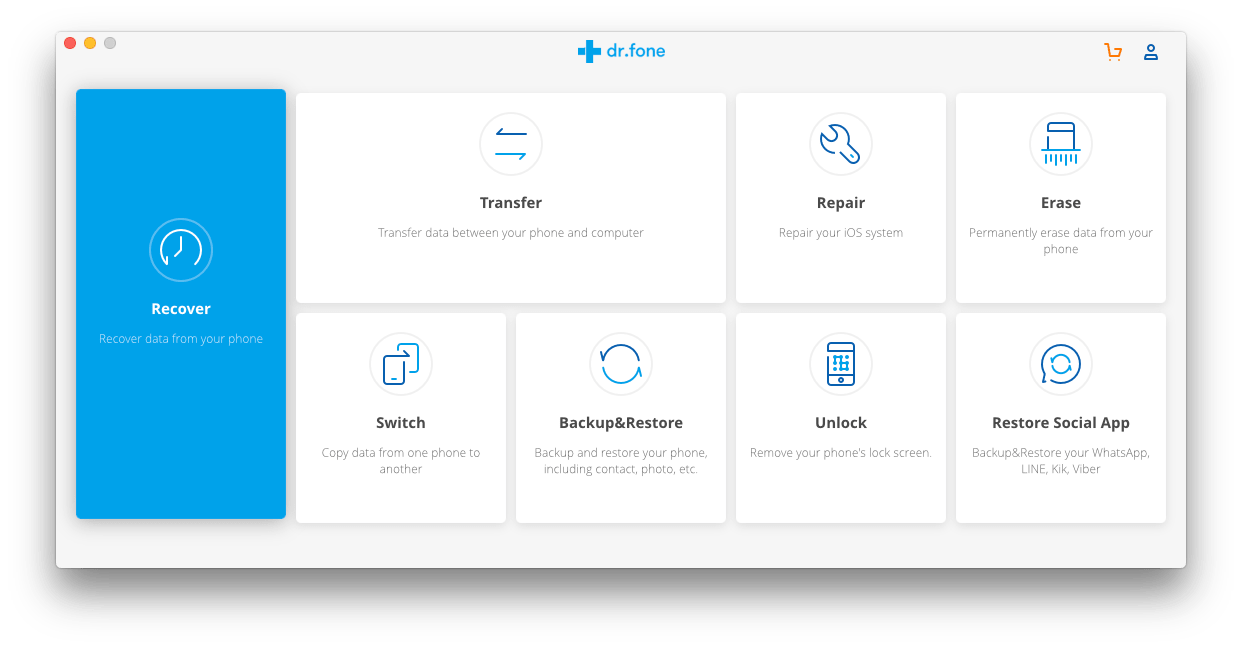
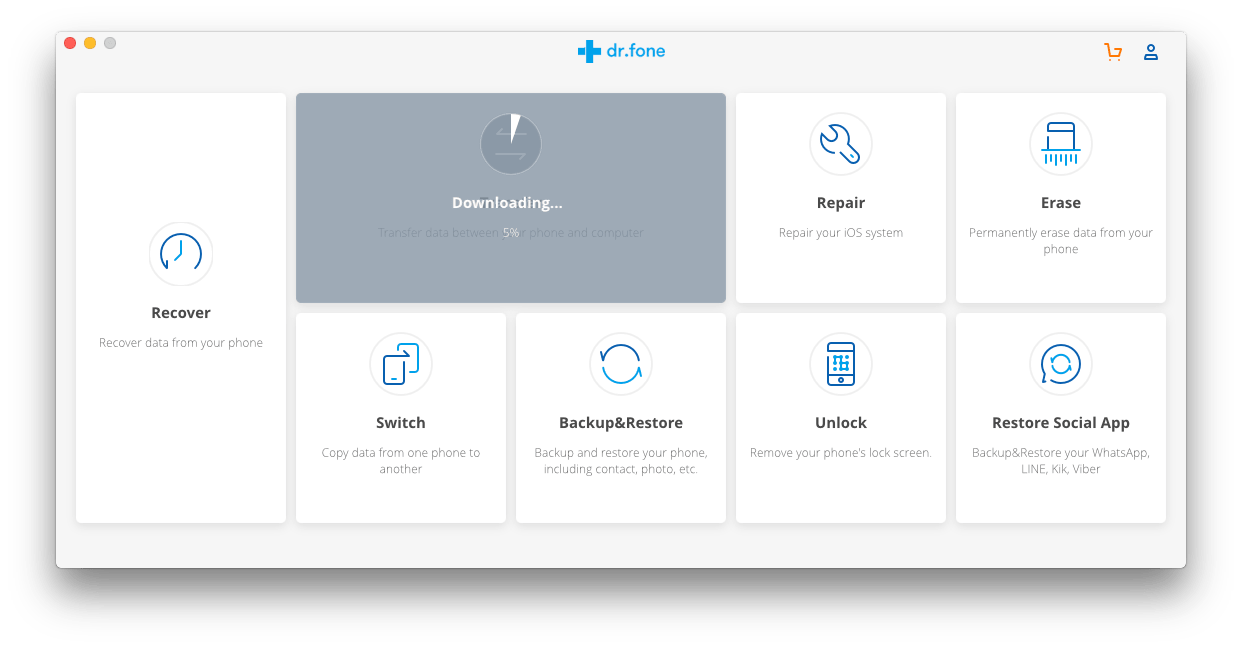
Dr.fone is a toolkit, there are total 8 programs packed in the same kit to manage your phones. That’s to say, when doing a specific task, you need to launch or download the program accordingly, then process under the program. Dr.fone, as it claims, it provides all the tools you need to run your mobile at 100%. It is true, it gives all necessary features to manage your mobile phone:

  • Recover phone data via different recovery modes;
  • Transfer data between mobile phones, computers;
  • Repair system issues;
  • Erase data from mobile devices;
  • Copy data from one phone to another;
  • Backup and restore mobile phone;
  • Remove phone’s lock;
  • Restore social app;

Is Dr.fone a Virus?

Absolutely No!

Wondershare, the developer of Dr.fone, is a leading company to provide professional software and tech solutions for more than 15 years. It focuses on high quality services and won’t bring safety risks, such as virus to its users.

Also, all of Wondershare’s products, including Dr.fone is clean and safe to use, there is no bundled software or malware. Therefore, for 100%, Dr.fone is not a virus.

Is Dr.fone Free?

No, Dr.fone provides free trial, but it is not free.

The free trial of Dr.fone comes with 8 programs, but only 4 of them are ready for free trial, including Recover, Repair, Erase and Unlock. To utilize other programs in the toolkit, you need to download first, all the programs just work under individual interfaces.

As for the free trial of each program, there are limitations. For example, you can scan data on your phone, but if you want to recover, you will need to pay; you can backup data on your iphone, but if you want to export the data, you will need to pay…

That’s to say, the free trial is quite feature-limited, if you want professional services or extended features, you will need to buy the paid edition. While, in most cases, the free trial fall far short of our expectations. Dr.fone offers different version on all platforms, priced from $7.99~$139.95.

Is Dr.fone Root Safe?

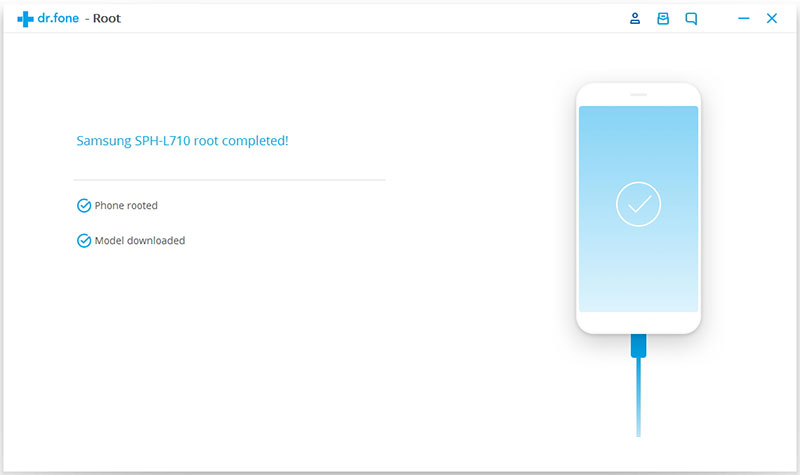
Yes, it is safe to root your Android phone by using Dr.fone.

In my test, I rooted my Huawei phone using this program and everything goes well until now.

Of course, it doesn’t guarantee that all the Root on different mobile phones can be successful. For a safe Root, you need to backup the data first, if anything happens, there is a way back out.

Does Dr.fone Really Work?

Well, this really depends.

When talking about the features to manage phone data, such as data transfer, switch, backup, erase, most of the users deem this program does a good job.

However, when speaking of its data recovery or system repair, there comes a major complaint about its failure to do so.

For more details to check if Dr.fone can work for you, keep reading the following review.

The Dr.fone Review

Quick Review

Pros

  • Easy to use

  • Clean and neat interface

  • Multifunctional (8 great features)

  • Both PC and Mobile Phone version available

Cons

  • Need to pay for each feature

  • Relatively poor performance on data recovery and system repair

  • Too many options for downloading

Short Summary:

Dr.fone does a good job when managing you phone data, such as data transfer, backup or erase, but performs quite ordinarily when speaking of data recovery, no matter recovering from device directly, or from backup, or from social apps.

Download and Installation

You can download the packages on Wondershare official website. But for users who are new to data recovery on mobile phone, it is a little complicate to choose the right version for download.

In term of platforms, Dr.fone provides 4 versions. On its official website, there are Windows version and Mac version, which is designed to recover and manage the data in your mobile phone on Windows or Mac, that is to say, to process data on your iPhone or Android phone, you will need a computer to install and run Dr.fone. Also, Dr.fone offers the iOS and Android version in App Store and Google Play, to process data on your mobile phone directly, totally without a computer.

dr fone pc version

For users who are willing to recover or transfer phone data on PC or Mac, download the Windows or MacOS version accordingly; for users who want to recover or transfer phone data directly on the phone, go to AppStore or Google Play.

dr fone mobile version

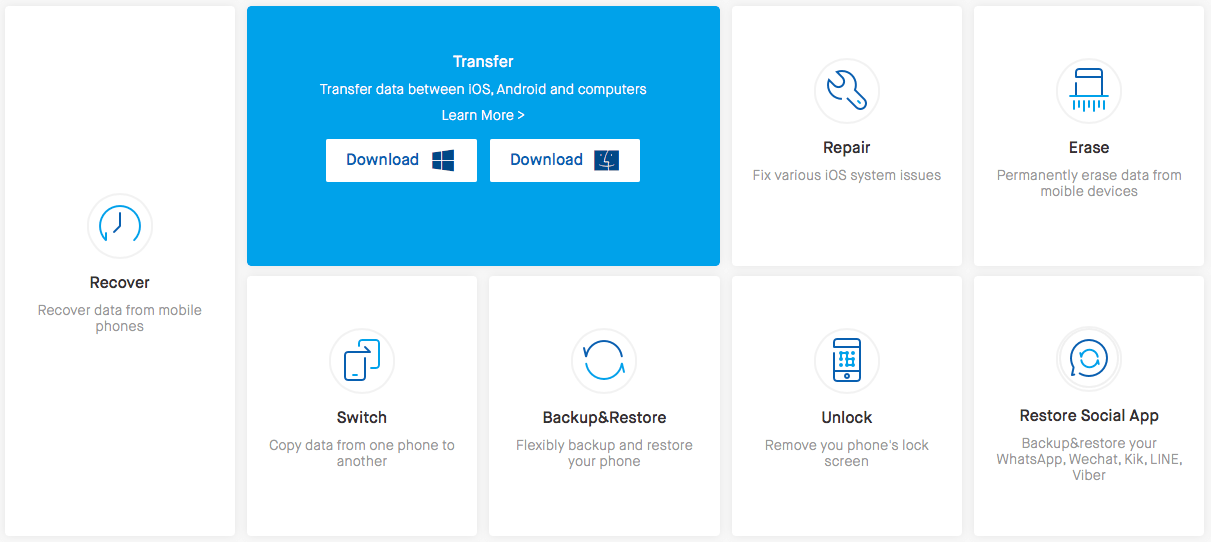
In term of features, Dr.fone allows users to download the full Dr.fone toolkit, or just a single tool. The full Dr.fone version packs all 8 tools in the kit, tools such as Recover, Repair, Erase, Root and Unlock are ready to use, but tools such as Transfer, Switch, Backup&Restore and Restore Social App need to be downloaded within the program if necessary.

dr fone full version

Also, users can choose to download the single tool, such as Dr.fone-Recover, Dr.fone-Repair etc.

dr fone single

The installation is quite easy, just follow the wizard to install the toolkit or single tool.

Interface

Dr.fone offers a clean and neat interface. There lists detailed steps instructing users to use its services.

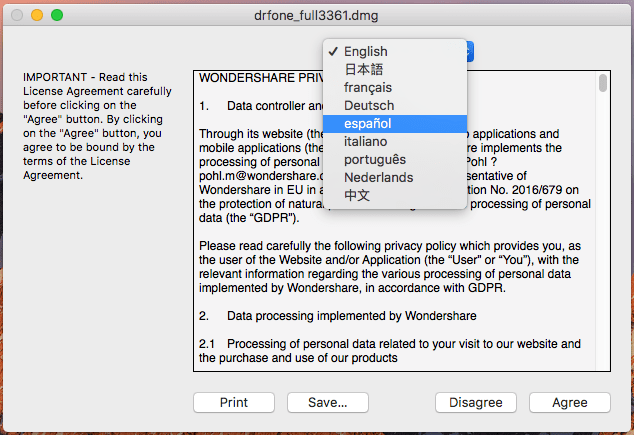
Also, it offers multi-language interface, users can choose any one from its 9 supported languages.

dr phone multi language

Performance

#1 Recover

Rating: 3/5

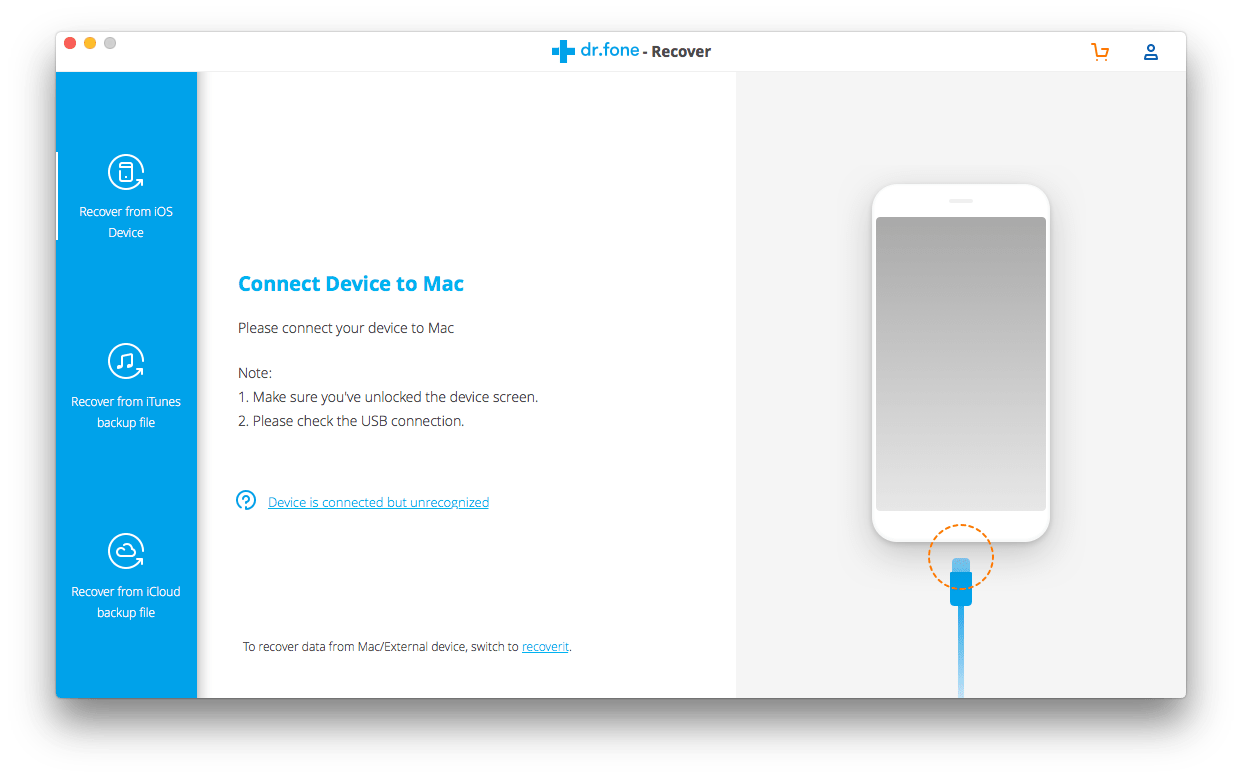
Dr.fone-Recover helps to recover photos, videos, contacts, messages, notes, call logs and others from iPhone or Android phone.

It provides 3 recovery modes:

  1. Recover from iOS device/recover from Android phone
  2. Recover from iTunes backup file/recover from Android sd card
  3. Recover from iCloud backup file/recover from broken Android

dr fone recover

According to my test, Dr.fone does find a lot of files, some of them are hidden deep there that I didn’t even notice. The scanning and recovering process fast, however, 40% of the recovered files cannot be opened, especially the photos and contacts.

#2 Transfer

Rating: 4/5

Dr.fone-Transfer helps to transfer music, videos, photos, apps and other files between PC and mobile phones. The Windows and Mac version vary a little, but both support to manage phone data, such as add, delete, edit, or merge media files/contacts on computers.

In my test, Dr.fone can fast recognize the device and access to the data for management. It supports to transfer various file types, just functions as similarly as iTunes. However, it cannot remember which files have been downloaded and imported, which cause repeated download.

dr fone transfer

#3 Repair

Rating: 3/5

Dr.fone-Repair helps to fix Android system issues or repair iOS/iTunes when your mobile phone keeps crashing, working slow or get stuck…

This is a great feature Dr.fone contains in its kit, however, like its Recover, Dr.fone-Repair does a quite mediocre job to fix system issues. Sometimes, it just helps nothing, the problem keeps occurring.

In my test, I connected my brother’s Samsung phone to a computer, trying to fix the problem of repeated black screen. Everything seemed to be fine when fixing the problem via Dr.fone, but when restarting the phone, nothing happened and nobody could figure out the reasons.

dr fone repair

#4 Erase

Rating: 4/5

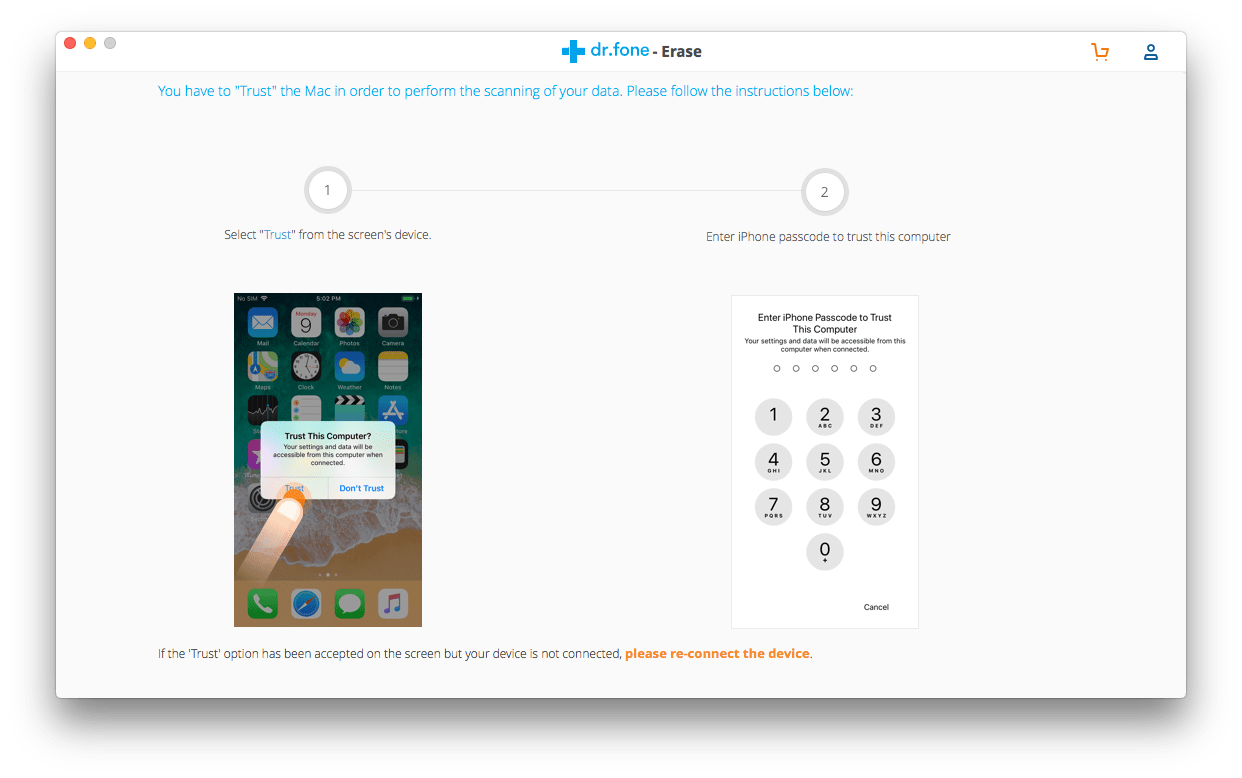
Dr.fone-Erase is truly a good and convenient tool to erase data from mobile phones. With several clicks, you can wipe your mobile phone permanently for sale or for other purposes.

dr fone erase

#5 Switch

Rating: 4/5

Dr.fone-Switch is another useful tool to transfer data between different devices, no matter it is iOS or Android. This is particularly useful when you switch from Android to iPhone, or from iPhone to Android.

The Switch feature recognizes devices fast and can smoothly transfer mobile phone data. However, some of the data may not be transferred successfully due to system compatibility or other unknown reasons.

dr fone switch

#6 Backup & Restore

Rating: 3.5/5

Dr.fone Backup & Restore not only allows users to backup files on mobile phone to computer, but also helps to restore files from backup. As for the Restore feature, it works as similarly as Dr.fone Recover, with 3 same recovery modes.

The backup feature does a good job, while the Restore feature, which requires high on technology, is very common. Same as its Recover feature, the Restore tool fails to recover all files.

backup and restore

#7 Unlock

Rating: 4/5

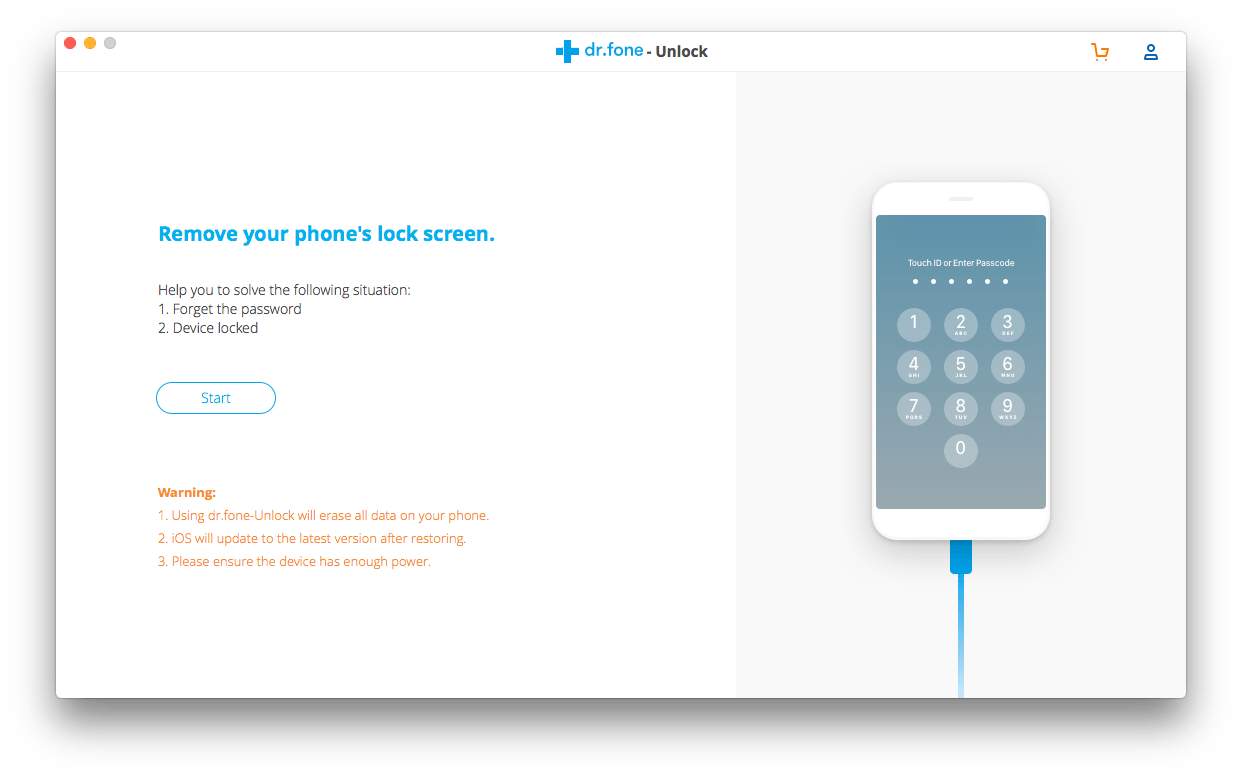
Dr.fone Unlock exists to remove the lock for your mobile phone, when you forget the password or device locked for other legal reasons. However, unlocking a phone via Dr.fone Unlock is risky:

  • All your data will be erased;
  • iOS will auto-update to the latest version;
  • Process stops when power get low and you maybe in nowhere;

Yet, unlocking a phone without password itself is risky. So, take a second thought when trying to using this tool.

dr fone unlock

#8 Restore Social App

Rating: 3/5

Dr.fone Restore Social App supports to transfer, backup and restore messages, chat history or attachments in WhatsApp, Line, KIK and Viber. This is quite useful when you accidentally uninstall an App and want the data back.

However, when talking about the Restore feature, no matter restoring files or social app, Dr.fone cannot yield the best results, either fails to find the deleted files or cannot open the recovered files.

dr fone restore social app

Dr.fone for PC VS Dr.fone for Mobile

As we mentioned above, Dr.fone provides both PC and mobile versions that allows users to use these tools directly on the phone or by connecting to a computer.

After testing these versions myself and read comments on different platforms, I realized that, the PC versions do a better job that the mobile version, basing on following facts:

  • Mobile versions get low ratings from users due to poor performance and limited features;
  • Dr.fone toolkit itself takes space on the device, while a computer leaves more space to run the toolkit;
  • The Recover process is relatively complicate, both the scanning and recovering procedure require high on device performance;

So, if possible, put the PC versions as your 1st choice to save further troubles. Conclusion Anyway, Dr.fone is safe and clean to use. Though its Recovery feature needs improvements, it is worth a try. By knowing Dr.fone is a tool kit for iPhone or Android phones, users can download and install a specific tool as needed, instead of paying for the whole toolkit with a high price.

Conclusion

Anyway, Dr.fone is safe and clean to use. Though its Recovery feature needs improvements, it is worth a try. By knowing Dr.fone is a tool kit for iPhone or Android phones, users can download and install a specific tool as needed, instead of paying for the whole toolkit with a high price.

Related Post

By |2020-01-19T10:45:59+08:00January 18th, 2020|

6 Ways to Remove Background Noise from Video (Mac, Windows, Online, Phone)

A video mixed with background noise will greatly sacrifice the video quality. However, it is inevitable, because a perfect place cannot be always guaranteed when you need to shoot videos. Then, how to remove background noise from video on Mac, Windows PC, on iPhone or Android phone, or is there any way to remove background noise from video online free?

The answer is YES. But, just as we need a video player to watch videos, we also need a video tool help on this, there is no shortcut, while the choice on such a video tool will depend on which device you are using. Here we offer 6 ways/applications to remove background noise from video, no matter you need to do this on a Mac, Windows PC, Online or mobile phones.

  • #1 Best Way to Remove Background Noise from Video (Mac & Windows)
  • #2 Remove Background Noise from Video Mac iMovie
  • #3 Remove Background Noise from Video Online
  • #4 If You Have Installed Adobe Premiere
  • #5 Remove Background Noise from Video Android
  • #6 Remove Background Noise from Video iPhone

#1 Best Way to Remove Background Noise from Video (Mac & Windows)

It is true that there are so many options to remove background noise from a video. However, if you want to make this simple while retain original video quality, a professional video editor will be the best choice, like Filmora.

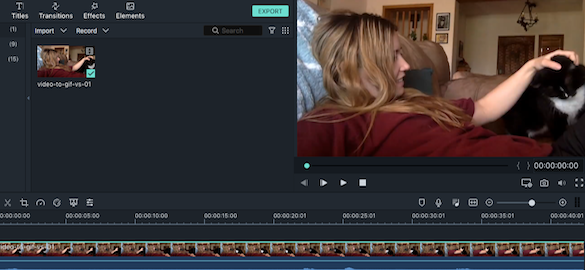
Filmora, its current version is 9, also called as Filmora 9 is a powerful video editing software, allowing users to trim, rotate, crop, add background/watermark/subtitle/effects/templates, tune, adjust video and audio or others in an easy way.

Main Features of Filmora

  • Basic editing: trim, split, rotate, crop, join, adjust, mute, detach, add texts/image;
  • Add effects: filters and overlays, elements/transitions/sound;
  • Advanced editing: pan & zoom, stabilize video, reverse video, record screen, tune color, PTP, create green screen, split screen, detect scene, offer power tools;
  • Action cam editing: instant cutter, edit action cam videos;
  • Export and share videos;
  • Remover watermark;
  • Support editing video, audio and image;
  • Available for macOS and Windows;

Steps to Remove Background Noise from Video in Filmora

  1. Download and install Filmora on your Mac or Windows PC;
    Free Download Windows Filmora
     
    Free Download Mac Filmora
  2. Then drag and drop the video to Filmora Timeline as following;filmora remove background noise from video 01
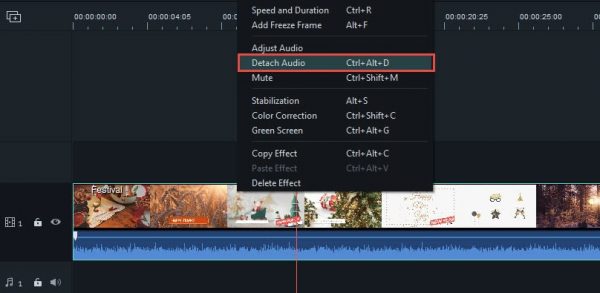
  3. Go to Detach Audio;filmora remove background noise from video 02
  4. Double click on the audio track, go to “Remove background noise”;filmora remove background noise from video 03
  5. (Optional) Edit the video as needed, then preview;
  6. Go to Export to save the video with background noise removed.

#2 Remove Background Noise from Video Mac iMovie

Speaking of editing videos on Mac, you cannot miss iMovie. iMovie is a free Mac video editing software to edit and customize videos, it offers virtually all basic editing features. But for more advanced or effects/templates, you may need to a professional tool, like Filmora.

Steps to Remove Background Noise from Video Mac iMovie

  1. Go to Finder>Applications, launch iMovie;
  2. Then drag and drop the video to iMovie Timeline; remove background noise from video imovie
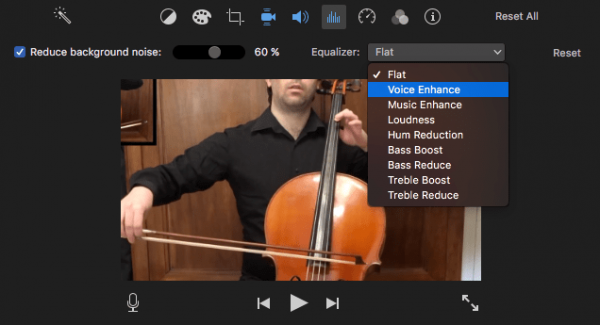
  3. Click on the “Noise reduction and equalizer” icon; Check before “Reduce background noise” and “adjust the amount of background noise reduction” according to your need. Also, you can utilize the Equalizer to enhance video voice or others.remove background noise from video imovie02
  4. Then go to File>Share>File, to save the video with background noise reduced;

#3 Remove Background Noise from Video Online

Well, as you can imagine, the tools to remove background noise from video online free is quite small in quantity, since it is not easy to edit videos online. However, if you want to remove background noise from video online free, there is one way out.

I have tried 5 online tools to remove the background noise from a video, 4 of them failed right from the first step, you have no way to upload the video successfully for background noise removal. The only one that can processed the video successfully, is Kapwing, even this online free program cannot directly remove the background noise directly, it can only mute the audio, you will need to add another background audio to this video. However, if this is acceptable, you can utilize Kapwing to remove background noise from video online free.

Steps to Remove Background Noise from Video Online

  1. Go to Kapwing;
  2. Click “Upload” to add your video for background noise removal;remove video background noise online01
  3. Once imported, click “Create!” to start muting your video;
  4. Then click “Download” to save the video after background noise removal;remove video background noise online02
  5. (Optional) Add background audio to your video with another online free “Add audio to video” program or offline video editing program.

#4 If You Have Installed Adobe Premiere Pro

In the case that you have installed Adobe Premiere on your Mac or Windows PC, you can definitely remove the background noise from video in Adobe Premiere.

Steps to Remove Background Noise from Video in Adobe Premiere Pro

  1. Run Adobe Premiere Pro;
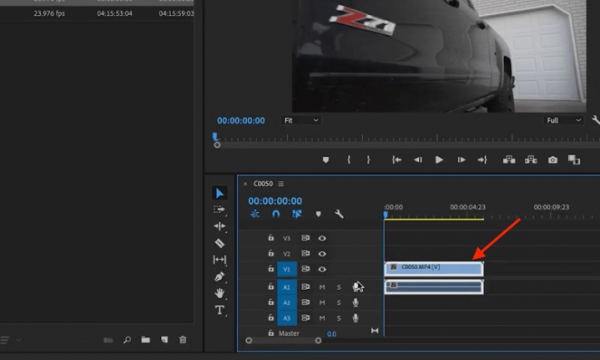
  2. Drag and drop the video to Adobe Premiere Timeline and select the clips you want to remove background noise;remove background noise adobe01
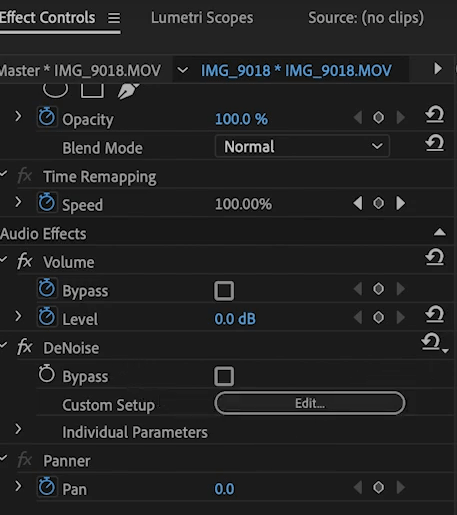
  3. Then go to Effects panel, input DeNoise, drag and drop the DeNoise effects to selected clips;remove background noise adobe02
  4. Then click on the Edit button on Effects Controls menu;remove background noise adobe03
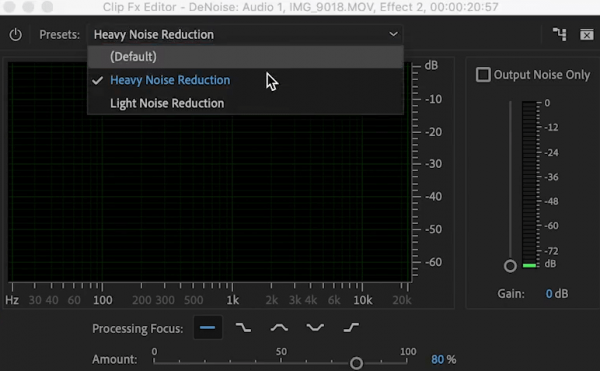
  5. You can choose Heavy Noise Reduction or Light Noise Reduction, or tweak other settings as needed;remove background noise adobe04
  6. Preview the video after removing background noise, then save the video.

#5 Remove Background Noise from Video Android

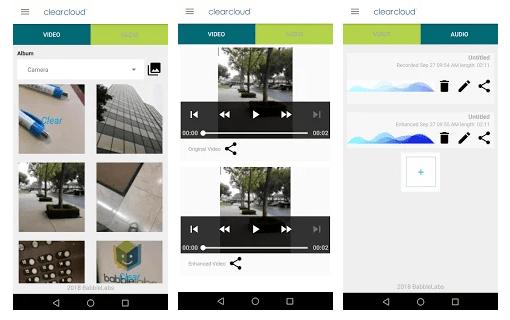
Nowadays, the user experience to shoot and watch videos on mobile phones is greatly enhanced, most of our users prefer to deal with videos on their Android phone or iPhone. In the case you want to remove background noise from video on Android phone, you will need an application to do this. BabbleLabs Clear Cloud is such a professional application to remove background noise, including traffic, sirens, wind, music, equipment, machinery, conversations, crying, dog barking, etc. It supports dealing with wav, mp3, m4a, aac, aiff, mp4 and mov files.

Steps to Remove Background Noise from Video on Android Phone

  1. Go to Google Play, download and install BabbleLabs Clear Cloud onto your Android phone;
  2. Find and select the video;
  3. Click the Edit button to remove background noise;
  4. Once ready, preview and save the video;remove background noise from video android

#6 Remove Background Noise from Video iPhone

While, the app we recommend to remove background noise from video on iPhone is AudioFix. It helps to automatically boost or clean audio in your videos, also it allows users to mute, resize even extract audios. There are 12 filer choices offered to remove background noise from video on iPhone.

Steps to Remove Background Noise from Video on iPhone

  1. Go to AppStore, download and install AudioFix;
  2. Find and select the video;
  3. Choose a filter that meets your needs to remove the background noise from your video;
  4. Apply the filter and start removing background noise on iPhone;
  5. Then save the video on your iPhone.remove background noise from video iphone

Conclusion

As you can see, no matter on which device you want to remove background noise from a video, you will need an application. There are quite few tools available to remove background noise from videos online free, you are always recommended to use a desktop one, it processes the background noise removal fast and offers a lot of editing features to customize your videos, just like Filmora.

Free Download Windows Filmora
 
Free Download Mac Filmora

Related Post

By |2019-12-26T10:35:36+08:00December 26th, 2019|Tags: |

Top 9 Best VFX Visual Effects Software for Beginners and Pros

Here’s a list of the best visual effects software for beginners and professionals, including paid and free ones.

Visual effects (or VFX) is the process of creating and manipulating computer-generated imagery. VFX is already an important part of filmmaking and is becoming more and more important these days. There are several types of visual effects such as modeling, animation, compositing and rotoscoping. Thanks to visual effects software, things can be a lot easier.


The best VFX software for beginners

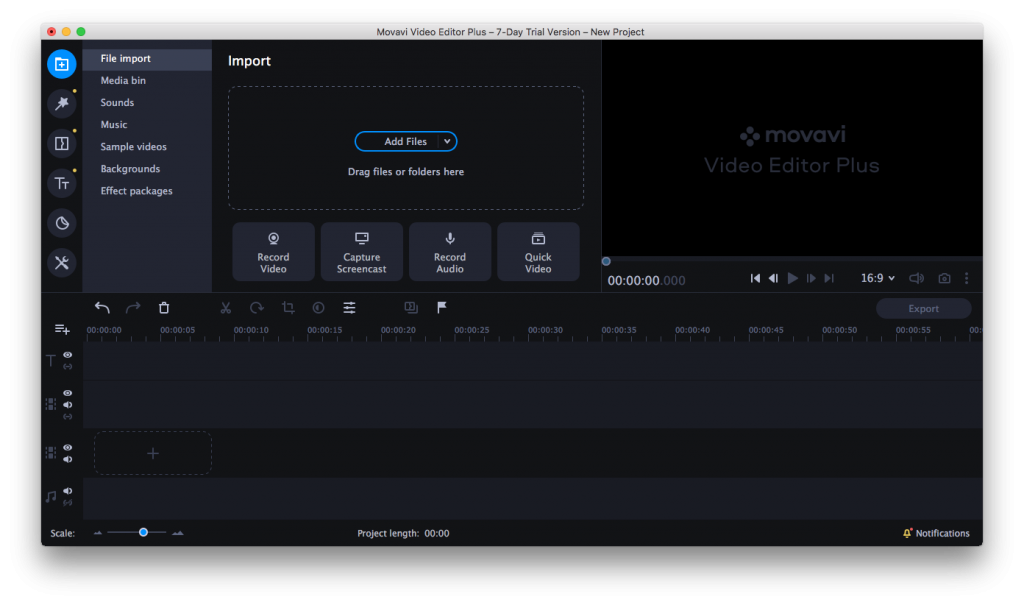
If you are looking for an easy-to-use video editor with special effects that allows you to do some basic VFX, then Movavi Video Editor Plus can be the best choice. Movavi Video Editor Plus comes with over 200 built-in effects, not to mention the professional visual effect sets and packages offered by its Movavi Effects Store. With them, even beginners can create amazing videos. It’s available for both PC (Windows 7 or later) and Mac (macOS 10.10 or later).

Easy for beginners

Many visual effects software programs used in the production of Hollywood blockbusters are node based. Unlike them, Movavi Video Editor Plus is layer based, which makes it’s easy to get started. Its interface is simple, intuitive and easy to navigate. Novices can benefit from its mild learning curve, and advanced users can efficiently achieve the effects they want with high flexibility.

Tons of visual effects available for instant use

Sometimes, things can be as easy as drag-and-drop. Before diving into something more advanced, let’s take a look at the video effects that are already available for use. The said VFX video editing software provides categories of effects for different scenarios. I think there will be always one fit for you.

  • LAVA
  • FANY INSTAGRAM STORIES
  • TRAVEL
  • MAGIC WORLD
  • VLOGGER ESSENTIALS
  • BRUSH AND PAINT
  • FUNKY VIBES
  • WEDDING
  • SPARKLING AND SNOWFLAKES
  • MILAN CHIC
  • ALCHEMY OF CRYSTALS
  • KIDS’ TIME
  • HEALTH
  • ETHNIC MOTIFS
  • SCI-FI
  • PARLS STYLE
  • AND MORE…

Use it for compositing

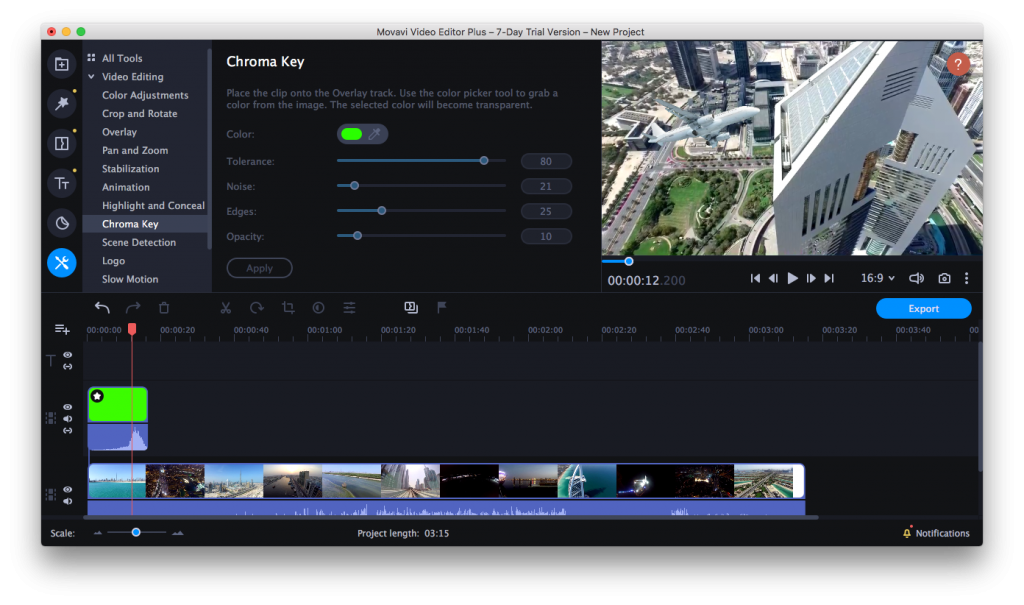
As the best VFX software for beginners, it allows you to easily do green screen compositing. Drag the green screen video and your background footage into the program, then select the Overlap mode by clicking More Tools to make the foreground video completely cover the background video. Find and click the Chroma Key, move your mouse cursor over the player and click on the green color. Tweak the setting until you are happy with the result. It’s that easy to key out green screen. If needed, you can crop out the unwanted part of the green screen video using the Crop feature.

You can also use it to easily layer your video, get picture-in-picture effect and add lens flares and light leaks to your video, among other things.

Use it for animation

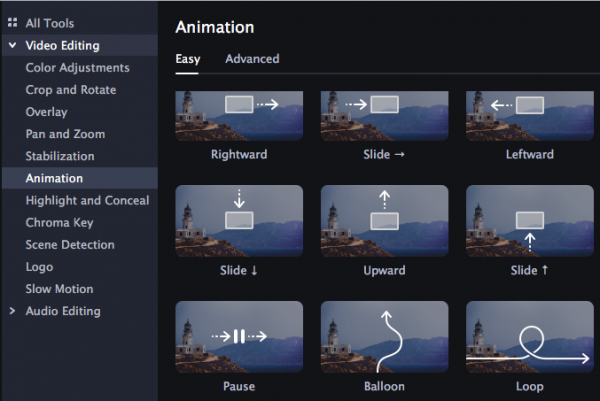
This program also offers a set of powerful animation tools. There are preset animation effects, which you can directly drop into your footage. You can either select Easy Animation (Rightward, Vortex, Curl etc.) or Advanced Animation to set up the time and length of the animation using key frame.

What can Movavi Video Editor Plus do?

  • Do visual effects such as green screen compositing
  • Super easy and quickly to edit your video
  • Provide embracing built-in materials with music, short films and stickers
  • Trim, crop, rotate, layer and enhance the quality of the video
  • Support all popular video, audio and image formats
  • Add text, subtitles and audios
  • Add motion graphics
  • Apply filters, transitions and titles
  • Do video stabilization, speed control and audio separation
  • And much more…

Free Download Movavi Windows
 
Free Download Movavi Mac


Top 5 commercial visual effects software

#1 Autodesk Maya

OS: Windows, Mac, and Linux

Price: $195/month, $1,545/year, or $4170/3 years

Commonly known as Maya, it can be the best VFX software for Mac, Windows and Linux. It is widely used in the production of movies, TV series, video games and other works. Coming with a rich array of features, this VFX software program is great for 3D modeling, animation, rendering, motion graphics and more. It does a good job of allowing users to add details, lighting, colors and other effects to 3D models. The user interface is intuitive, allowing users to create and manipulate models in an efficient approach.

visual effects software maya

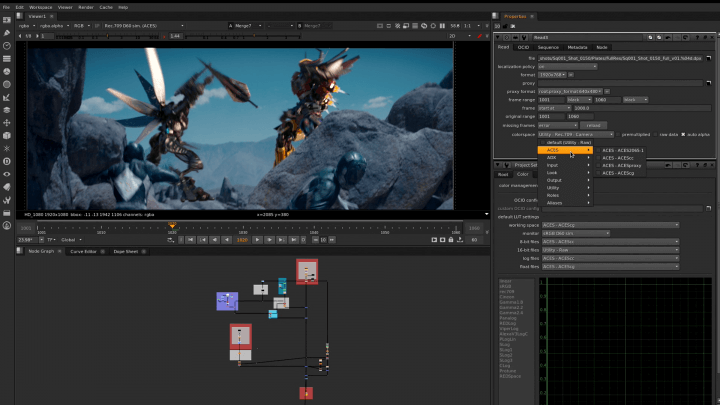
#2 NUKE

OS: Windows, Mac, and Linux

Price: $4,758 for NUKE, $8,853 for NUKE X and $10,248 for NUKE Studio

It is a VFX and compositing software program available for multiple platforms. There are three editions: NUKE, NUKE X and NUKE Studio. It’s a powerful tool coming with great tools for compositing, rotoscoping, particle effects and more. The industry standard compositing software has support for 2D and 3D. Professionals will benefit from its considerable amount of visual effects capabilities. NUKE is node based, which makes it very efficient especially make it comes to big projects.

visual effects software nuke

#3 Autodesk 3ds Max

OS: Windows

Price: $195/month, $1,545/year, or $4170/3 years

This powerful versatile visual effect software tool is designed for 3D modeling, animation, and rendering and is widely used in industries like architecture, design and video games. It excels at 3D modeling for both characters and objects and offers high performance when it comes to rendering. With it, users can expect high level of reality and detail of their works. For new users, it can be a bit difficult to learn. As one gets more experienced, one can explore endless possibility and make the most of this tool.

autodesk 3ds max

#4 Cinema 4D

OS: Windows, Mac, and Linux

Price: $59/month, billed annually

As one of the most popular visual effects software programs, Cinema 4D is widely used for organic and non-organic modeling, animation, rendering and other VFX tasks. It is commonly used in design, graphic design, animation, broadcast and other industries and is easily one of the best providers of 3D modeling and rendering solutions. In addition, it’s also good at creating animations with impressive textures. Compared with some other VFX software, this one is very easy to learn. It offers a lot of useful plugins, which can make your work easy.

vfx software cinema 4d

#5 Houdini

OS: Windows, Mac, and Linux

Price: Free and commercial versions

When it comes to visual effect software, we can’t ignore Houdini. It is used by many big VFX companies such as Pixar and DreamWorks Animation. There are six versions, which makes the pricing a bit complicated. The free version is called Houdini Apprentice. It’s free for non-commercial use only. Designed to be a visual effects and 3D animation tool, Houdini has been widely used in filmmaking video games production. The node-word workflow makes it popular among VFX professionals.

visual effects software houdini


3 free open-source visual effects software

Commercial VFX software often comes with high price. The good news is that there are also some free, open-source alternatives.

#1 Blender

OS: Windows, macOS, Linux, FreeBSD, OpenBSD, NetBSD, DragonFly BSD and Haiku

Despite being free, Blender is powerful and versatile. It provides rich sets of tools for visual effects, 3D modeling, ragging, simulation, compositing, vide editing and match moving other tasks. It offers a complete set of tools for any type of 3D tasks. One of the great things is that you can download templates online and use them for your projects in Blender. Compared to most other VFX software, it’s relatively small and lightweight. In addition, it’s very customizable and flexible.

free open source vfx software blender

#2 Blackmagic Fusion

OS: Linux, macOS, Windows

This VFX compositing software program has a free version and a commercial version. It has been used in the productions of tons of Hollywood big movies such as Iron Man and 2012. Despite being free, the free version allows you to use it for commercial projects. It excels at visual effects, virtual reality and motion graphic tasks. Just like some similar visual effects software, it’s node based, which allows high flexibility.

top free visual effects software blackmagic fusion

#3 Natron

OS: Linux, macOS, FreeBSD, Windows

Free, open-source and node-based, this freeware visual effects tool is easily accessible and easy to use. If you are a Nuke user, you will find its interface very similar to that of Nuke. It offers a number of functionalities for video tracking, keying, rotoscoping and keyframe animation. In addition, you will also find basic tools for image editing and painting.

free software for visual effects natron


Conclusion

If you are new to VFX and want to create a video or short film full of cool effects with the least efforts, you can use Movavi Video Editor Plus, the best video editor with special effects. You can do amazing video editing and compositing without leaving the app. It offers a great number of basic and advanced features and tools for all users. Most visual effects software programs are powerful, versatile and expensive. Thanks to the free open-source alternatives, everyone can have the opportunity to dive into the world of VFX.

Related Post

By |2020-08-06T09:03:24+08:00December 11th, 2019|

8 Ways to Convert Kindle Books to PDF (Mac, Android, iOS, Windows)

It is much likely that each avid reader have a Kindle device, since Kindle offers the most comfortable reading experience to view online publications. However, there are some occasions we need to read Kindle books on PC or mobile device that doesn’t support certain Kindle formats. Then, we need to convert kindle book to PDF.

Here we give a full guide to convert your Kindle books to PDF, no matter the books are saved in your Kindle device, or need to be downloaded as PDF, no matter you are using Windows PC, Mac, iPad or Android, even looking for online free Kindle book to PDF solutions. Also we share some extended knowledge or tips on converting Kindle books to PDF under other situations.

  • Kindle Formats
  • Convert Kindle Book to PDF Directly from Kindle
  • Download Kindle Books to PDF
  • Online Free Kindle Book to PDF Converters
  • What if Converting Rented Kindle Book to PDF?

Kindle Formats

A Kindle book can be saved in different formats, but the most Kindle-friendly format is AZW. That’s to say, if you have downloaded a Kindle book, it is highly possible that it is an AZW file.

When talking about different generations of Kindle device, variance does exist on the supported formats. But on the whole, most of the Kindle device read AZW, AZW3, TXT, PDF, MOBI, PRC, HTML, DOC, DOCX, JPEG, GIF, PNG and BMP ebook files.

So, the solution we utilize to convert Kindle to PDF should be applicable both on converting Kindle AZW and converting other Kindle formats to PDF.

Convert Kindle Book to PDF Directly from Kindle

You may want to convert a Kindle book saved in your Kindle device directly to PDF. In this case, you will need some tools that can import files from your Kindle device for conversion, and here is a list of recommended tools for different platforms.

#1 Kindle Book to PDF with Epubor Ultimate (Mac, Windows)

Epubor Ultimate is a program designed to convert virtually all kinds of Kindle books from different sources to PDF, ePub, Mobi, AZW3 and Text. It can detect the files in your Kindle device for fast PDF conversion. Even, it allows removing DRM from Kindle books. There are 2 version of Epubor Ultimate available, macOS and Windows.

Steps to Convert Kindle Book to PDF with Epubor on Mac or Windows

  • Step 1. Download and install Epubor Ultimate on your computer.
    Free Download ePubor Mac
     
    Free Download ePubor Win
  • Step 2. Connect your Kindle device to the computer.
  • Step 3. Run Epubor Ultimate, it will detect all the books in your Kindle device.
  • Step 4. Drag and drop the Kindle books to the right panel.

  • Step 5. Choose output as PDF, then click “Convert to PDF” to start the Kindle Book to PDF conversion.

#2 Kindle Book to PDF with PDFMate eBook Converter Pro (Windows)

PDFMate eBook Converter Pro is another program helping users to convert Kindle books, but only available for Windows users. It can remove DRM from Kindle books and convert 24 eBook formats into PDF, ePub, Mobi, AZW and Txt.

Steps to Convert Kindle Book to PDF on Windows

  • Step 1. Download and install PDFMate eBook Converter Pro on your computer.
  • Step 2. Connect your Kindle device to the computer.
  • Step 3. Run PDFMate eBook Converter Pro, click on “Kindle”, it will detect all the books in your Kindle device and display on the interface.

  • Step 4. Drag and drop the Kindle books to the right panel.
  • Step 5. Choose output as PDF, and click “Convert to PDF” to save Kindle book as PDF on Windows.

#3 Kindle Book to PDF on iPad or Android

Since iPad and Android phone cannot connect to the Kindle device, users won’t allow converting books from Kindle directly to PDF on iOS or Android devices. But if you have a computer, you can do this on your computer by referring to above-mentioned tutorial, then send the PDF file to your iPad or Android device using following methods:

Option #1 Transfer PDF files to iPad or Android phone via USB cable;

Option #2 Sync PDFs converted from Kindle books from Mac to iPad via Airdrop, iTunes, iCloud, for Android users, use cloud storage service accordingly;

Option #3 Send the PDF files from your computer to your email box, then open on your mobile device

Option #4 Utilize an app capable of transferring files between computer and mobile device;

Also, if you would like to use an iOS or Android Kindle book to PDF application, you can refer to the methods to convert Kindle book to PDF on iOS or Android directly in the following part “Step 2. Convert Kindle book to PDF”.

Download Kindle Books to PDF

If you don’t have a Kindle device or have to obtain some Kindle books from other resource, you will need to download them fist before converting Kindle books to PDF. To make this, 2 steps are required.

Step 1. Download Kindle Books First

There are several options to download Kindle books, no matter they are saved in AWZ format or other Kindle-supported formats.

Option #1 Use Your Amazon Account Login into your Amazon account, go to Your Account>Manage Your Content and Devices>Show>Books>Download, then the Kindle books saved in your Kindle device will be transferred to your PC.

Option #2 Download Online There are websites offering free or paid Kindle books, such as Book Lending, Project Gutenberg, ManyBooks, users can download various Kindle books to their storage service or device.

Option #3 Download Using Software Also, there are applications available allowing users to download Kindle books, such as Calibre, users can search or get Kindle books from other stores.

Step 2. Convert Kindle Books to PDF

Now that the Kindle book has been downloaded to your device, it is time to convert them to PDF by using a Kindle to PDF converter. Here is a list of good programs to convert Kindle to PDF easily with high quality.

Option #1 Convert Kindle Book to PDF Free with Calibre (Windows, MacOS, Linux)

Calibre is an open source program helping users to manage Kindle and other ebooks easily. It allows editing, converting, viewing, downloading and sharing Kindle books.

Steps to Convert Kindle Book to PDF with Calibre

  • Step 1. Download and install Calibre on your computer.
  • Step 2. Click “Add books” to import downloaded Kindle books to Calibre.

  • Step 3. Select the Kindle books you want to save as PDF, click “Convert books” and choose output as PDF. Also, you can tweak the settings to customize the PDF output.

  • Step 4. Click “OK” to start Kindle-to-PDF conversion, and then find the converted files in output folder.

Option #2 Convert Kindle Book to PDF on iPad/iPhone

The Ebook Converter is an iOS application enabling users to convert nearly all documents, including Kindle books to various formats, such as ePub, Mobi, AZW3, PDF, LIT, PDB, TXT, FB2, TCR, etc.

  • Step 1. Download and install The Ebook Converter on your iPad.
  • Step 2. Select your kindle books.

  • Step 3. Choose output as PDF and start converting Kindle book to PDF on iOS device.

Option #3 Kindle Book to PDF on Android

The All File Converter from Google Play is a popular app turning virtually all kinds of files into different formats, it can convert Kindle books to PDF and other document type, convert documents, images, audios and videos, even archives conversions can be processed.

  • Step 1. Download and install All File Converter on your Android device.
  • Step 2. Choose eBook Converter.

  • Step 3. Import Kindle books to the app, you can add files from different resource.

  • Step 4. Choose “convert-to-pdf”, then click “Convert” to change Kindle books to PDF on your Android phone.

Online Free Kindle to PDF Converters

For users don’t need to do Kindle-to-PDF conversion very often, online free Kindle to PDF converters is good choice, though the conversion quality disappoints users sometimes.

Option #1 EPUB Converter

There builds a Kindle to PDF Converter in EPUB Converter, it allows users to convert mobi, azw, azw 1, azw 3, azw 4 to PDF. Also, if you have Kindle books in other formats, you can utilize its other tools to perform the conversion as needed. It processes conversions very fast, but no batch conversion is supported.

Steps to Convert Kindle Book to PDF Online Free with EPUB

  • Step 1. Go to EPUB Converter.
  • Step 2. Choose Kindle to PDF Converter under Kindle Converter.
  • Step 3. Add Kindle books to the program.
  • Step 4. Upload the Kindle books by clicking “Start Upload”.

  • Step 5. Once the Kindle book to PDF conversion finishes, download the PDF output.

Pros:

  • Free to use;
  • Batch convert Kindle book to PDF;
  • Support convert various Kindle book format to PDF, including epub, mobi, azw/1/2/3/4;

Cons:

  • Need to download PDF output one by one;
  • Unstable conversion quality, blank pages appear in the output;
  • Potential risk of information leakage after file uploading;

Option #2 ONLINE-CONVERT Ebook Converter

ONLINE-CONVERT online services cover 7 types of conversion, including archive, audio, document, ebook, image, video and webservice. Its Ebook Converter can convert Kindle AZW, Mobi, LIT, LRF, ePub, Text and others to PDF, also to other popular formats.

Steps to Convert Kindle Book to PDF Online Free Online-Convert

  • Step 1. Go to ONLINE-CONVERT, choose “Convert to PDF” under Ebook converter.
  • Step 2. Add Kindle books to the program, you can import from computers/Dropbox/Google Drive, or via URL.
  • Step 3. Click “Start Conversion” and change Kindle books to PDF online free.

  • Step 4. Then download the PDF output one by one or as zip file.

Pros:

  • Free to use;
  • Upload file from local computer or online Cloud storage;
  • Batch convert Kindle book to PDF;
  • Allow customized settings;
  • Allow downloading all PDF output as Zip;

Cons:

  • Unstable conversion quality, formatting will be scarified to some extent;
  • Potential risk of information leakage after file uploading;

What if Converting Rented Kindle Book to PDF?

If you get a rented Kindle book that is encrypted, you will need to remove the DRM before converting Kindle to PDF. DRM refers to Digital rights management, it is a systematic method to protect digital media copyright.

To convert rented Kindle to PDF, we just need to find a Kindle to PDF converter featured a DRM removal. In fact, the Epubor Ultimate we mentioned in the 1st part is also capable of auto removing DRM and then converting Kindle books to PDF. This tool is now available for both Windows and MacOS.

Steps to Convert Rented Kindle Book to PDF on Mac or Windows

  • Step 1. Download and install Epubor Ultimate on your computer.
    Free Download ePubor Mac
     
    Free Download ePubor Win
  • Step 2. Connect your Kindle device to the computer if you have.
  • Step 3. Run Epubor Ultimate, it will detect all the books in your Kindle device. Also, it can find Kindle files on your computers.
  • Step 4. Drag and drop the Kindle books to the right panel, and the DRM will be automatically removed when importing files to Epubor Ultimate for conversion.

  • Step 5. Choose output as PDF to convert rented Kindle books to PDF.

It may bring a lot of convenience to save a rented Kindle book as PDF, but we should aware that such a DRM removal can be never done for illegal or commercial use.

Conclusion

There are more ways to convert Kindle books to PDF for users to explore, but if you have saved the Kindle books in your device, find some tools that can import file from your device for conversion, otherwise, you will need to download Kindle books first, then utilize a Kindle Book to PDF converter. Also, take a second thought before using an online Kindle to PDF converter, due to the backward of safety, conversion quality and user experience.

Related Posts

By |2019-12-06T15:07:02+08:00December 6th, 2019|

8 Video Stabilization Tools to Stabilize Shaky Video Easily (2019-2020)

When recording videos or footages with camera, regardless of how scrupulous we are acting, any tiny movements of camera can still result in shaky videos. While, a video that shakes and wobbles won’t look professional and hence cannot meet the original expectation for a video sharing.

But never mind, here we will introduce top 8 video stabilization tools to stabilize your shaky videos easily, no matter you are a Mac or Windows PC user, no matter you want to stabilize videos online free or on your mobile device (iOS and Android).

Table of Contents

  • Method 1 Stabilize Videos in Premiere (Pro & CC)
  • Method 2 Stabilize Shaky Videos in Adobe After Effects
  • Method 3 iMovie—Mac Free Video Stabilization Tool
  • Method 4 Best and Most Affordable Video Stabilization Tool: Filmora
  • Method 5 How to Stabilize Videos Online Free?
  • Method 6 Stabilize Shaky Videos on Mobile Phone (iPhone & Android)

Method 1. Stabilize Videos in Premiere Pro

Speaking of editing and processing videos, Adobe Premiere Pro is always picked as the most professional program to do such a task. If you have installed Premiere Pro, you can stabilize your shaky videos, even beatify them in a creative way in Premiere Pro.

For the current version Adobe Premiere Pro CC, no matter you are using 2019, 2018 or 2017, the steps to stabilize videos are of no difference, you can refer to following steps to start video stabilization.

Steps to Stabilize Videos in Premiere Pro (Including CC 2019)

  1. Launch Adobe Premiere Pro CC;
  2. Drag your shaky videos into the Timeline;stabilize video in premiere 01
  3. Go to Effects Tab, then search Warp Stabilizer from the Effects menu;stabilize video premiere 02
  4. Then drag and drop “Warp Stabilizer” to the video you need to stabilize, then the analyzing will start;stabilize video in premiere 03
  5. Once ready, save the video or edit if needed.

Method 2. Stabilize Shaky Videos in Adobe After Effects

You may also have realized that Premiere Pro is not the only program from Adobe to edit and process videos, there is another option, Adobe After Effects. What’s more, the steps to stabilize video with Adobe After Effects Warp Stabilizer are virtually the same as that with Adobe Premiere Pro. Therefore, here we will introduce a different way to stabilize video without Warp Stabilizer in Adobe After Effects.

Steps to Stabilize Shaky Video in Adobe After Effects without Warp Stabilizer

  • Step 1. Open the shaky video with Adobe After Effects;
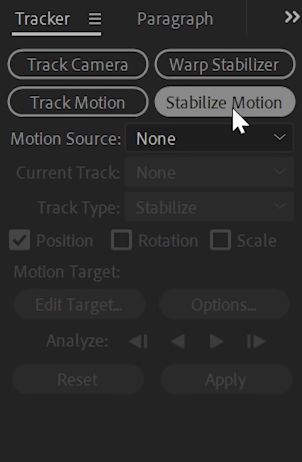
  • Step 2. Go to Tracker Windows, click on Stabilize Motion;  stabilize video after effects
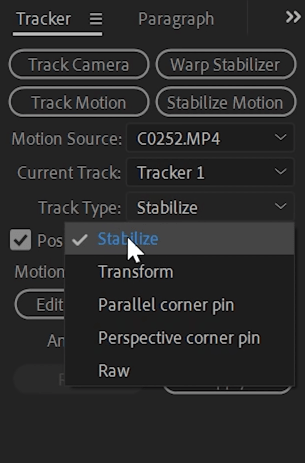
  • Step 3. Configure the settings (your motion source, current track and track type, check before Position only) as following;stabilize video after effects00
  • Step 4. Then set the tracking point, the small box defines the element we are going to track, the large box defines the area we are going to use to track. So, it will make sure the camera is sticking to the tracking point;stabilize video after effects01
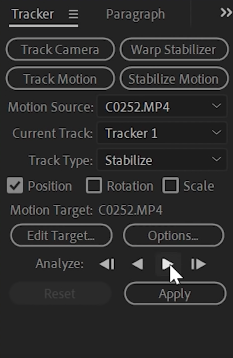
  • Step 5. Then click the Analyze Forward button and Adobe After Effects will process stabilization by following the tracking point frame by frame;stabilize video after effects02
  • Step 6. Click “Apply” in the Tracker Windows, choose X and Y as Dimensions, continue with OK.stabilize video after effects03

Method 3. iMovie—Mac Free Video Stabilization Tool

If you are a mac user, it would be much easier to stabilize a shaky video, for the reason that all Mac users are allowed to use iMovie—free yet powerful video editing software.

Steps to Stabilize Shaky Video Free with Mac iMovie

  • Step 1. Go to Finder>Applications, launch iMovie;
  • Step 2. Drag and drop the shaky video to iMovie Timeline;

stabilize video imovie01

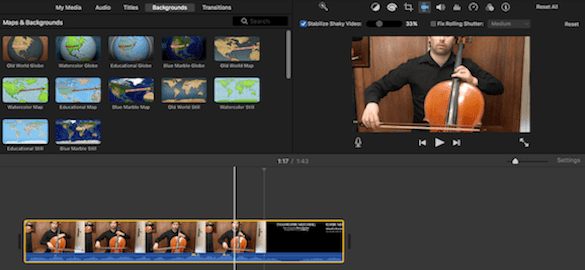
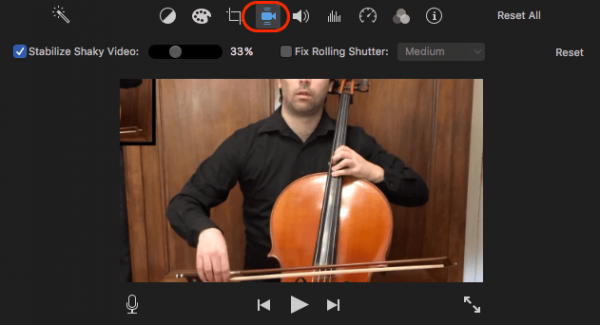
  • Step 3. Then click on the Stabilization icon, check before “Stabilize Shaky Video” to start the stabilization process;stabilize video imovie 02
  • Step 4. Once the stabilization finishes, go to File>Share, save or upload the stabilized video;

Method 4. Best and Most Affordable Video Stabilization Tool: Filmora9

It is true that Adobe and iMovie do a good job on video editing, but still a lot of users won’t pick them as the first options to stabilize a shaky video, for the reason that Adobe is too expensive while iMovie offers quite ordinary stabilization result. Maybe you need a professional but affordable program to deal with a shaky video, like Filmora9.

Filmora9 is a simple-to-use yet efficient video-editing program that has attracted global attentions in recent 2 years. It helps a lot to create both personal and professional videos, by providing basic editing tools like trim, rotate, crop, add watermark/background/subtitle, also allowing users to finish advanced editing tasks, like add dozens of media layers, add wonderful effects, customize videos with stylish templates, tune your media by fixing shaky videos, etc.

With a price $49.99, you can get the Filmora9 for 1 year, and the program is available on both macOS and Windows.

Steps to Stabilize Shaky Video with Filmora (Mac & Windows)

  1. Download and install Filmora9;
    Free Download Windows Filmora
     
    Free Download Mac Filmora
  2. Import the shaky video to Filmora Media Library by dragging and dropping;stabilize video filmora01
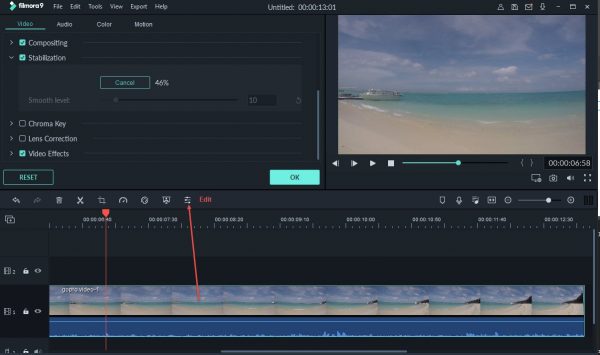
  3. Then drag and drop the imported shaky video to Timeline, double click on the shaky video to bring up the Edit pane, choose “Stabilization” to start stabilization process;stabilize video filmora 02
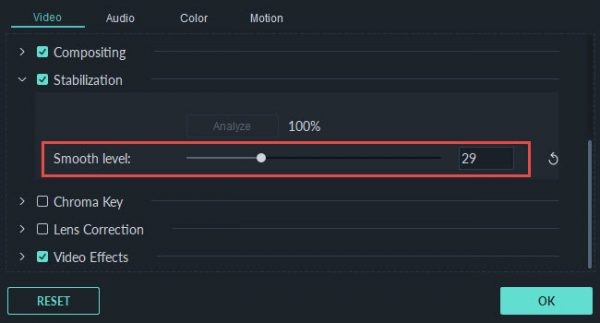
  4. Click on Play button to preview the video and configure the Stabilization settings if needed;stabilize video filmora 03
  5. Click OK to apply the changes and save the stabilized video.

Method 5. How to Stabilize Videos Online Free?

As long as there are online free video editors, you can find an online free video stabilizer to do the task. However, according to my tests on 8 tools, only 3 of them can stabilize the videos successfully, and here we list 2 of them, you can have a try.

Things You Need to Know about Online Free Video Stabilizer:

  • The stabilization process takes time, including the video uploading and downloading process;
  • Video uploading failure may occur, you need to repeat the process until the video is uploaded successfully;
  • Stabilization quality is not stable;
  • Require high on Internet connection;
  • Potential risk of information leakage;

#1. ezgif Video Stabilizer

ezgif is an online free video editor allowing users to convert, resize, crop, split, add effects, stabilize and so on. It is easy to use, and allows previewing before downloading the videos after process.

Steps to Stabilize Videos Online Free with ezgif

  1. Go to ezgif video stabilizer;
  2. Click “Choose File” to import shaky video, then click on “Upload video”;stabilize video online free 01
  3. After the stabilization, download the video.

#2 mp4compress Video Stabilizer

Another online free video stabilizer can stabilize shaky videos successfully online free is mp4compress, however it supports stabilizing MP4 videos only. Also, you are not allowed to preview the video after stabilization.

Steps to stabilize videos online free with mp4compress

  1. Go to mp4compress video stabilizer
  2. Click ‘Select File” to import shaky video, then click “Upload Video File”;stabilize video online free02
  3. After the stabilization, download the video.

Method 6. Stabilize Shaky Videos on Mobile Phone (iPhone & Android)

It’s much likely that you will shoot a video with the camera on your mobile phone, then how to stabilize shaky videos on iOS or Android phone? Here are the solutions.

Stabilize Shaky Videos on iPhone

The tool we use to stabilize shaky videos on iPhone is Emulsio by Creaceed, it is a professional iOS video stabilizer, offering different tools to stabilize the video to meet your requirements.

Steps to Stabilize Shaky Videos on iPhone

  1. Download and install Emulsio from AppStore;
  2. Run Emulsio and import the shaky video;
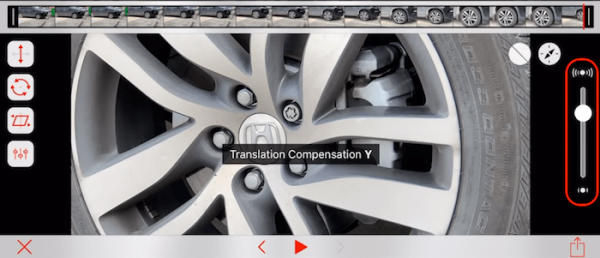
  3. Then adjust the Stabilization tool and check the result;stabilize video iphone
  4. Once OK, you can save or export the video

Stabilize Shaky Videos on Android Phone

While, the most popular video stabilizer for Android phone is Google Photos, an efficient application to back and share both videos and photos for free.

Steps to Stabilize Shaky Videos on Android Phone

  1. Go to Google Play, download and install Google Photos;
  2. Open the shaky video with Google Photos;
  3. Then tap on Edit button and choose Stabilise;stabilize video android
  4. Wait for the stabilization to finish, then save the video.

Conclusion

For different users, the method to stabilize a shaky video may be different, but the key is always to find a professional tool. Online free video stabilizer tools are worth a try, but the result may fall far short of your expectation. So, why not starting with a dedicated yet affordable video stabilizer?

Related Post

By |2019-12-05T11:13:45+08:00December 5th, 2019|Tags: |

How to Add Subtitles in iMovie on Mac, iPhone and iPad

This article will provide step-by-step instructions on how to add subtitles in iMovie along with some useful tips.

Developed by Apple, iMovie is a simple-to-use, versatile video editing software app available for macOS and iOS. It comes with an array of options and enables you to easily edit and manipulate your video clips. Can you add subtitles and captions to your videos in iMovie? The answer is yes. And this guide will show you how.


FAQ: Things to know about adding subtitles in iMovie

Before we talk about how to add subtitles in iMovie, let’s take a look at these frequently asked questions, which will help you understand what you can and can’t do in iMovie when it comes to adding subtitles.

Can you add subtitles in iMovie without fade?

It’s easy to add subtitles in iMovie, but there is a downside. Subtitle will fade in and fade out, and there is no option to disable the fade effect. In many cases, iMovie users want the subtitles to just appear and disappear with no fade. The good news is you can add subtitles to your video without fade using Filmora, an easy-to-use video editor with a rich set of basic and advanced features.

Can you add background to subtitles in iMovie?

iMovie offers a few options for users to make subtitles more visible and easier to read. You can change subtitle font, size and color. You can also add a black border around the text. However, these options are sometimes not enough.

To create complete separation between subtitles and the footage, the best solution is to add black background to subtitles. Unfortunately, iMovie doesn’t allow you to do so. To easily add black background to subtitles, you can use the above-mentioned Filmora. There’s a preset for all the subtitle effects it provides. Filmora’s Subtitles 1 effect, for example, comes with black background that users can easily delete or resize it.

Can you add closed captions in iMovie?

Let’s start with another question. What are the differences between subtitles, open captions and closed captions?

  • Subtitles are used when the audience of your video can hear the audio. And they may still want the dialogue displayed on screen. Or, they don’t understand the language and want the translation provided.
  • If you add captions in iMovie, you assume that the viewer can’t hear anything and needs a text description. Captions can include dialogue, sound effects and more.
  • Closed captions exist as a separate track. Viewers can turn them off and on.
  • Open captions are burned directly into the video. And you can’t turn them off.

iMovie allows users to add both subtitles and captions using its Titles tool. How to add closed captions in iMovie? Unfortunately, iMovie currently doesn’t support closed captions.

How do I add SRT files to iMovie?

SRT (or SubRip Subtitle) files are used to store video subtitle information. iMovie doesn’t support SRT. Users can’t add subtitles in iMovie by importing a SRT file.

Note: iMovie does a good job of providing users with a couple of options for creating subtitles. But there are limits. To add subtitles to videos with more flexibility and options, you can check out this part of the article: An easier way to add subtitles to your video.


How to add subtitles in iMovie 10, 9, 8 and 7

When you add subtitles in iMovie, the steps may vary depending on the iMovie version you use.

How to add subtitles in iMovie 10

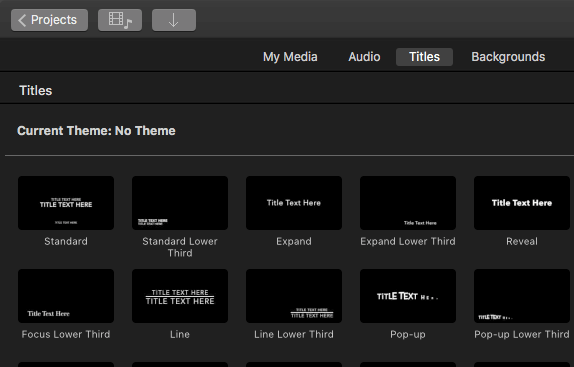
Step 1. In iMovie, choose the Titles tab. There are a number of title effects such as like Standard Lower Third, Reveal and Focus. Grab your favorite effect and drop it down on top of your video layer.

Titles tab

Step 2. Now you are able to edit the text on the title effect. You can choose to type your subtitles or captions into iMovie word by word manually. Or, you can copy and paste text from a document or an SRT file available.

With the text layer selected, you will be presented with options to change font, color and formatting of your subtitles.

type or paste your subtitles

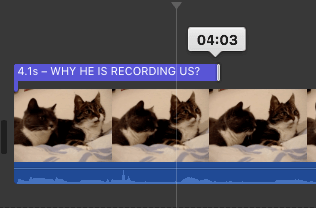
Step 3. It’s important to make your subtitles or captions synced up with the audio. To do so, you can change subtitle duration by dragging the edges of the text layer in the timeline.

change subtitle duration

Step 4. Now you’ve probably finished inserting the first sentence of the subtitles and tweaked the text settings based on your need. You need to add subtitles in iMovie sentence by sentence. Here’s a tip that can help.

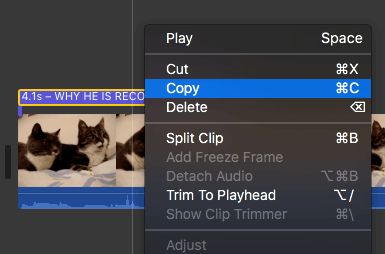
Tip: Select the text layer, control-click and select Copy. Paste it where you like. This will paste the same iMovie title effect with the same formatting. As a result, you don’t have to go back and redo it all. All you need to do is to edit text and adjust duration.

Copy

These steps apply to iMovie 10 and later, including iMovie 10.1.11, the latest version of March 2019.

How to add subtitles in iMovie ’08 (7.0), iMovie ’09 (8.0) and iMovie ’11 (9.0)

Step 1. In iMovie, open your project. Highlight a section of the footage. Click the T icon in the menu bar (below the Viewer window). You can find title effects like Lower Third 1, Upper Third, etc. To preview an effect, just hover your mouse over it.

click the T icon

Step 2. Select and drag the title effect of your choice to the timeline over the top of your clip.

Step 3. In the Viewer, you are able to type your subtitle. To change the text color, size or font, select Show Fonts > Change Fonts. Note that you need to highlight the text to be able to apply the changes.

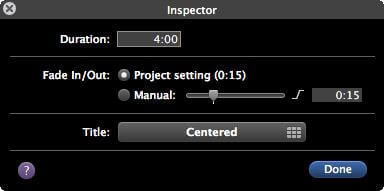
Step 4. When you add subtitles in iMovie, if you want to change subtitle duration, double-click the text layer, which will bring up the Inspector window. There, you can edit the duration. You can also change the fade time.

the Inspector window

How to add subtitles in iMovie on iPad or iPhone

If you’d like to do it on your iPhone or iPad, you can follow the following steps.

Step 1. Open the iMovie app for iOS on your mobile device.

Step 2. In your iMovie project, play the video clip. When the first sentence in the audio ends, tap the pause button. Select Action > Split. Repeat the same thing with the rest sentences.

Step 3. Tap the Titles button at the bottom of the screen and choose the title effect you need. Type the subtitles. Reposition subtitles if needed.

add subtitles in iMovie on iPhone

Step 4. When you finish adding subtitles or captions, tap Done in the top left corner of the screen.


An easier way to add subtitles to your video

If you have no idea how to subtitles in iMovie, the instructions above can help. As a matter of fact, there is a more efficient way to add subtitles to videos. With video editor Filmora, things can be even easier.

  • Offer more 100+ title and text effects for subtitles adding and customizing
  • Offer both basic & advanced video editing features
  • Support all common video, audio and image formats
  • Support up to 100 media layers
  • Come with full 4K support
  • Provide a rich selection of effects, templates and more with regular updates
  • Allow special effects such as split-screen, green-screen and face-off
  • Export videos optimized for uploading to YouTube, Vimeo, etc.

Free Download Windows Filmora
 
Free Download Mac Filmora

Below is how to add subtitles and captions using this video editor.

Step 1. In the said video editor, open your project. Choose Titles.
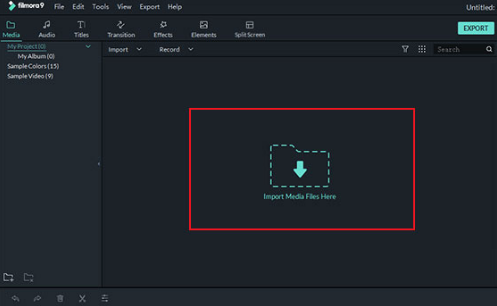
In the upper left part of the window, you can find lists of effects. Select Included > Subtitles. You can find the preset for all the subtitle effects.
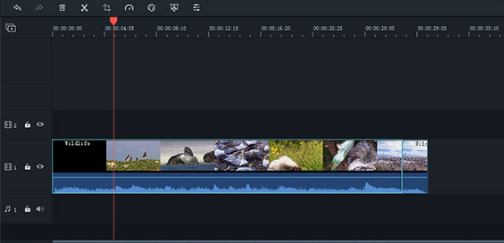
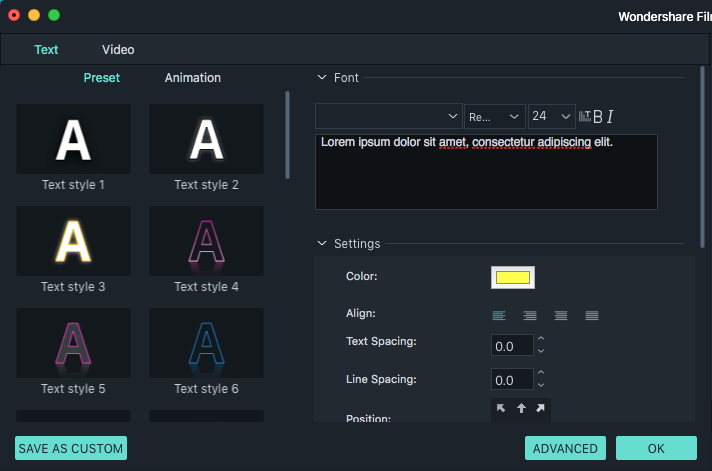
Step 2. Select an effect and drag it to the timeline. Double-click the subtitle layer, which will bring up a new window. Type or paste your subtitle there. You can select the text style and animation on the left of the window, select the subtitle font, size, bold and italic on the top of the window.

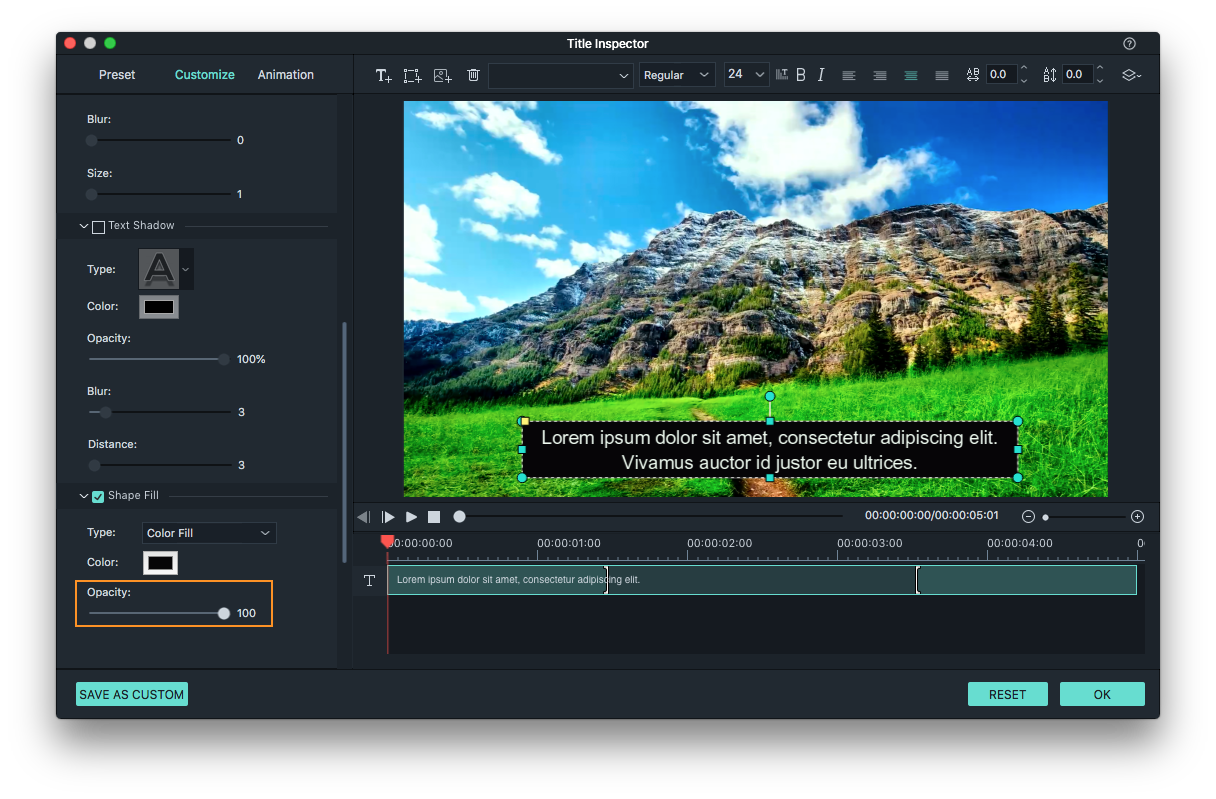
Tip: If you need to remove the black background with the subtitles, click the Advanced button in the aforesaid window, navigate to Shape Fill, adjust Opacity value to zero.

Step 3. In the timeline, find the right position for when a dialogue begins and move the subtitle player to make sure they sync up properly.

As mentioned above, you can make it much easier to add subtitles by copying and pasting the first subtitle layer you have created. This way, you don’t have to set text formatting over and over again with each subtitle line you add.


Conclusion

This article talks about the best way on how to add subtitles in iMovie on Mac, iPad and iPhone. If iMovie doesn’t meet your need, other video editing software with more functions and options can help. Filmora is among the best of them. With it, you can effortlessly insert subtitles in videos in desired ways without limit and do other cool stuff.

Related Post

By |2020-11-06T17:28:15+08:00November 6th, 2019|Tags: |

4 Ways to Rotate a Video on YouTube for 2020

YouTube offers the most convenient way for us to share and watch videos online, so we can talk to the world in term of videos. But occasionally, we need to rotate a video on YouTube when uploading or while watching, so the video can be viewed in a good angle that accords with our habit.

Then how to rotate a video on YouTube? Today, we collect 4 solutions to rotate a YouTube video that proved to be feasible in 2020.

Can YouTube’s Video Editor Rotate Videos?

No, it doesn’t support rotating videos on YouTube anymore.

You may have your own YouTube Channel and know that YouTube has its own video editor to edit videos before or after the uploading. Yes, it is true that YouTube Video Editor used to support rotating video on YouTube, but now, it doesn’t support any more, neither the YouTube Studio Beta or Classic Creator Studio support doing orientation changes on YouTube.

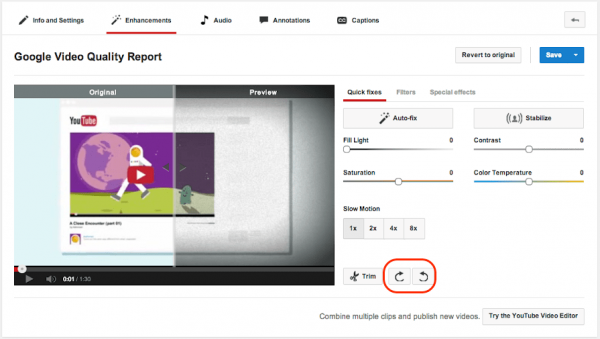
Here is the screenshot of earlier YouTube Studio version, there was a rotate feature located by the side of Trim button.

creator youtube studio

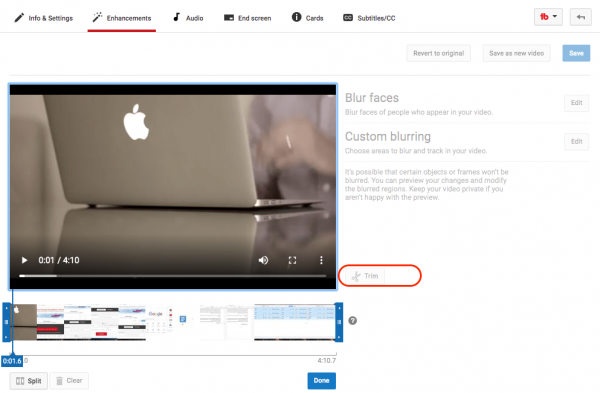
But now in the latest YouTube Video Editor, this Rotate feature is removed, you are not allowed to rotate videos on YouTube directly.

latest youtube studio

But never mind, here we will introduce 4 ways to rotate YouTube videos that are uploaded by yourself or by others, no matter you are using Mac or Windows PC.

4 Ways to Rotate a Video on YouTube

#1 The Best Way to Rotate YouTube Video

(For Mac & Windows users, for videos uploaded by yourself)

The best and easiest way to rotate a video on YouTube is always using a professional video editor, even it allows you to customize your video beyond your imaginations, like Filmora 9.

Filmora 9 is a dedicated video editing software to create and edit videos without limits, it is easy to use but powerful to build in various editing features. Also, it is available both for mac and windows users.

Main Feature of Filmora 9:

  • Allow editing video, audio and image;
  • Offer basic editing feature: crop, trim, rotate, add text & titles, etc.;
  • Add effects;
  • Support advanced editing: color tuning, pan & zoom, reverse, stabilize video, record screen, split screen, video snapshot, etc.;
  • Support action cam editing;
  • Remove watermark from videos;
  • Export videos as various formats after editing;
  • Share video online

Steps to Rotate YouTube Video with Filmora

  1. Go to Filmora 9 page, download and install the program;
    Free Download Windows Filmora
     
    Free Download Mac Filmora
  2. Launch the program, drag and drop your YouTube video to the program;import youtube filmora
  3. Then drag and drop the YouTube video to timeline as following;rotate in filmora 02
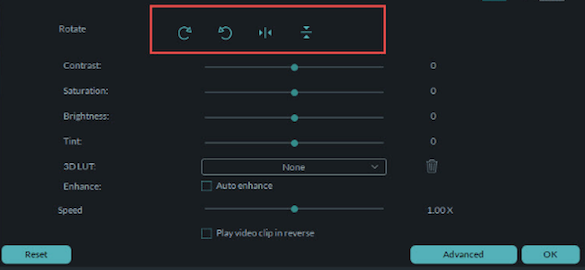
  4. Double click on the video in the timeline area, then the editing panel will appear, choose the buttons for Rotate, you can now rotate the video in 90, 180 and 270 degrees. And don’t forget to click “OK” to save the orientation changes.rotate filmora 03
  5. Go to Export, select a video format to save the rotated video.

In the case you want to edit YouTube videos shared by others, you need to download the YouTube videos with online YouTube Downloader first (refer to the method 2), then use this program to rotate.

#2 Rotate YouTube Video Online Free

(For Mac & Windows users, for videos uploaded by yourself and others)

Also, you can rotate YouTube video online free. The greatest benefit of rotating YouTube videos online lies in its capability to rotate both videos that uploaded by yourself or others. To rotate a video on YouTube from others for offline watching, you need to download the YouTube video first by using an online tool, then use another online video editor to finish the rotating.

If you need to rotate YouTube video from others, we recommend downloading the YouTube video with y2mate, it is an online free YouTube Downloader allowing users to download videos from YouTube in different resolutions (1080p, 720p, 360p, etc.), even you can utilize this tool to export YouTube videos as MP3 format. While for the online video editor to rotate this YouTube video, ezgif video editor is always a good option to do the rotation.

Steps to Rotate YouTube Video Online Free

(For users who just need to rotate their own YouTube videos, please go ahead to the step 2.)

  1. Go to y2mate, input the YouTube URL into the program and download it;y2mate
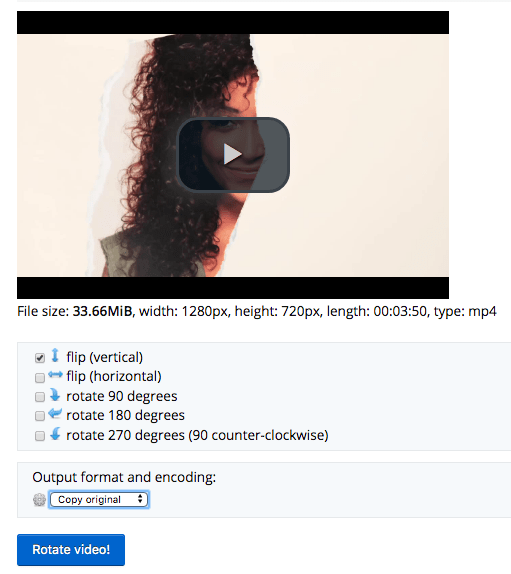
  2. Go to ezgif rotate video, click “Choose File” and choose the YouTube you have downloaded or saved on your computer, then click “Upload Video”;rotate video online free
  3. Then choose to rotate video 90, 180 or 270 degrees, also select the output format. Click the “Rotate Video” to start the rotation;rotate video online free 03
  4. Finally, you need to click the “Save” button to download the rotated video to your device;

#3 Rotate YouTube Video in iMovie (Free)

(For Mac users, for videos created by yourself)

If you are a mac user, you can use the macOS built-in program—iMovie to rotate the YouTube videos on mac free. iMovie allows users to create videos from image, add image/audio to video, add transitions, crop, clip, rotate, stabilize, trim, adjust colors, etc. It offers all basic editing features to create a video as needed.

Steps to Rotate YouTube Video in iMovie

  1. Go to Finder>Applications>iMovie, launch iMovie;
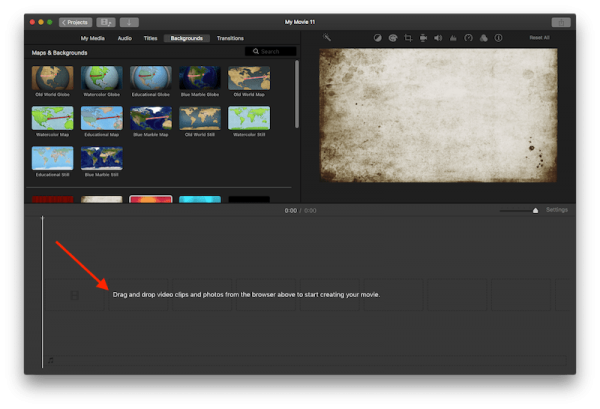
  2. Then drag and drop the video you want to upload to YouTube to the timeline as following;add youtube videos
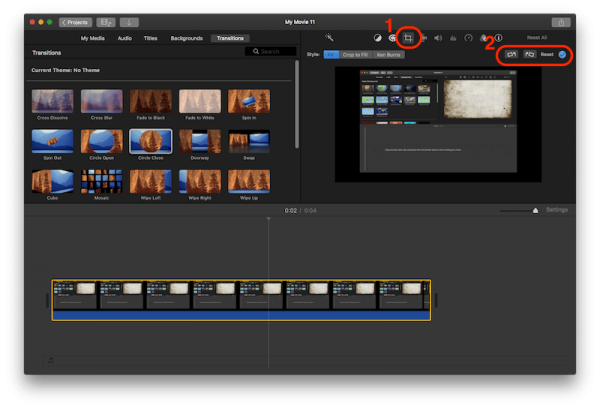
  3. Then select the video you added to timeline, you will be able to edit the file. Click on the Cropping icon, you will be allowed to rotate clockwise or counterclockwise;rotate youtube imovie
  4. After the rotating, go to File>Share>YouTube, to share the rotated video directly to YouTube, or you can save as file according to your need.

Note: If you want to rotate a YouTube video that is uploaded by others, you need to download the YouTube video (recommend using iFunia YouTube Downloader) first, then rotate the video in iMovie.

#4 Rotate Video on YouTube with Windows Movie Maker (Free)

(For Windows users, for videos created by yourself)

If you are a Windows user and work on OS earlier than Windows 10, you can utilize Windows Movie Maker to rotate YouTube videos. But it is pitiful that it is not available anymore, you will have no chance to download the official Windows Movie Maker from Microsoft today. Though Microsoft offers a new program called Photos app to view and edit videos, the “Rotate” feature is only enabled when you are editing photos. So, in conclusion, you can utilize Windows Movie Maker to rotate videos if you have installed, but if you don’t, you also lose the chance to utilize a free Windows-bundled program to rotate videos, you will need to search within the Microsoft Store.

Steps to Rotate YouTube Videos in Windows

  1. Launch Windows Movie Maker;
  2. Go to File>Add videos and photos, choose your YouTube video to import;rotate video in movie maker 01
  3. Then click on the Rotate buttons to rotate left or right;rotate movie maker 02
  4. Once ready, go to File>Save Movie to export the rotated video.

Note: If you want to rotate a YouTube video that is uploaded by others, you need to download the YouTube video (recommend using y2mate or Winx YouTube Downloader) first, then rotate the video in iMovie.

Conclusion

It is true that there are so many software or services available to rotate a video on YouTube, if you want to make this quite easy but still require high on editing features, Filmora, the best video editing software is absolutely the best choice. If rotating a video on YouTube is just a one-off matter, you can try those online or free programs already installed on your device.

Related Post

By |2021-03-16T09:53:16+08:00October 24th, 2019|Tags: |

How to Convert iBook to PDF on Windows and Mac

Can I convert iBook to PDF? The answer is yes. And this article will show you how.

iBooks, now known as Apple Books, is an ebook reading and store app developed and released by Apple. It works on macOS and iOS and is currently available in 33 languages. You can get an iBook from the iBooks Store, create an iBook using the iBooks Author tool, or add your own EPUB or PDF files to read in iBooks. This article shows you how to convert iBook to PDF to make the ebook compatible with more devices.

Apple iBooks supported formats

Before getting started to convert iBook to PDF, let’s check out the Apple iBooks compatible formats.

Format File extension Detail
EPUB .epub The ebooks, including the free ones, you get from the iBooks Store are in EPUB with DRM protection. Also, you can open and read your own EPUB files with the iBooks app.
PDF .pdf One can also read PDFs in iBooks.
IBA .iba This EPUB-based iBook format is generated with the iBooks Author app.
IBOOKS .ibooks You can create such an iBook using iBooks Author.

This article will cover how to convert to PDF from:

  • IBA or IBOOKS
  • EPUB, without or with DRM

#1 How to convert .iba or .ibooks iBook to PDF

Applies to: macOS

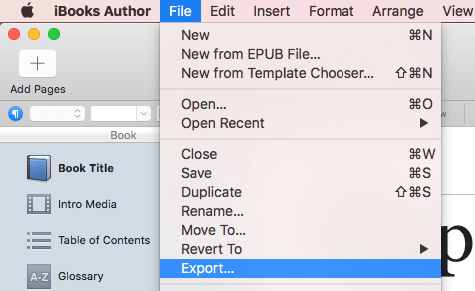
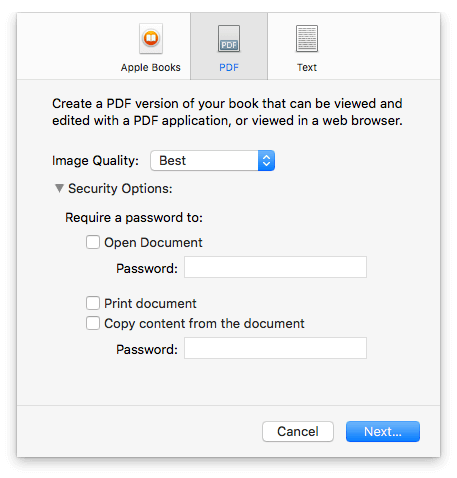
This part talks about how to convert iBook to PDF if the ebook has .iba or .ibooks extension. It requires the installation of the iBooks Author app which is only available for macOS. It won’t be possible if you want to convert such an iBook to PDF on Windows PC, iPhone or iPad.

Both types of iBooks can only be created using iBooks Author app. And you can only read them with the iBooks app on macOS or iOS. By converting iBook to PDF, you can make it easily readable by almost all ebook reader apps on various platforms.

Step 1. Download and install iBooks Author from the Mac App Store. It’s free and requires OS X 10.11 or later.

Step 2. Open the iBook with iBooks Author. From the menu bar at the top of the screen, select File > Export, which will bring up a new window.

click Export

There are three export formats available: Apple Books, PDF and Text.

Step 3. Click PDF. It lets you have control over the image quality in the PDF file. Click the Image Quality dropdown list and choose from the three options: Good, Better and Best. You can also choose to password protect the PDF ebook.

expor to PDF

Step 4. Click Next. Choose a location to save the export PDF. Rename the ebook if needed. Click Export to convert iBook to PDF.

#2 How to convert EPUB iBook to PDF

Applies to: macOS, Windows

There are generally two types of EPUB iBooks that you can find in your Apple iBooks library.

  1. The iBooks you buy and download from the iBooks Store are in EPUB. They are DRM protected, which means you can’t edit them, or convert them, or view them using any other app other than the iBooks (or Apple Books). DRM (digital rights management) are the technologies to limit the access or use of copyrighted works. Apple has its own DRM technology called Fair Play.
  2. Another type of the iBooks EPUB files is the ones you add to your iBook library.

Before we convert iBook to PDF, there is a question that we need the answers to. What is the best iBook to PDF converter?

It’s recommended to use the Epubor Ultimate app to convert EPUB iBook to PDF.

Epubor Ultimate main features:

  • Remove DRM protection from ebooks in 2 clicks
  • Convert ebooks purchased from Kindle Store, Kobo, Nook, Sony and other stores
  • Support 13 input ebook formats and 5 output formats
  • Allow batch conversion
  • Allow meta data modification
  • Automatically detect your device and load books from it
  • Available for Windows and Mac

Free Download ePubor Mac
 
Free Download ePubor Win

remove drm from epub with epubor

Epubor Ultimate does a good job of removing DRM from ebooks purchased from most ebook stores and converting them to PDF. It currently doesn’t support DRM protected iBooks, but there’s an easy workaround. The steps below show you how to convert EPUB iBook to PDF on Windows and Mac, with or without DRM.

Step 1. Download and install DRM removal tool Requiem for PC or Mac. Launch it. It will remove the DRM restrictions from purchased iBook EPUB files.

remove DRM from iBook using Requiem

Step 2. Open Epubor Ultimate. Drag the now DRM-free iBooks into the app. Alternatively, you can also add them by clicking the Add button at the top of the interface.

choose PDF as the output format

Step 3. Click the Convert to button at the bottom of the interface and choose PDF as the output format. Now click the Convert to PDF button to convert iBook to PDF.

Once the conversion is completed, you can click the folder icon to open the folder where the output PDF files are stored. The original formatting, hyperlinks and other elements will be well retained.

One can also convert DRM-free iBooks with Calibre. Note that Calibre doesn’t support .iba or .ibooks files.

Step 1. Download and install Calibre. Open this app.

Step 2. Drag your iBooks into this tool. From the toolbar, click Convert books, which will bring up a new window.

Step 3. In the top right corner of the window, click the Output format dropdown list and select PDF.

convert ibooks with calibre

Step 4. Click OK.

It’s also possible to convert iBook to PDF online for free with the premise that it’s EPUB iBook without DRM. If you are looking for high quality conversion, this method is not recommended.

Conclusion

Above are the common ways to convert iBook to PDF on Windows and PC. Mac users can use iBooks Author to effortlessly convert .iba and .ibooks to PDF. To transform DRM iBook to PDF, you will need to use DRM removal tool and EPUB to PDF converter like Epubor Ultimate which can convert ebooks purchased from almost all popular ebook outlets.

Related Post

By |2020-04-16T08:21:19+08:00October 10th, 2019|Tags: |

2 Steps to Convert ACSM to ePub

If you are new to ACSM, it would be a little complicate for you to convert ACSM to ePub for easy reading on different devices, it involves 2 steps: get the ePub file from the ACSM first, then remove the DRM from ePub for easy reading.

But no worries, you will find the detailed steps to convert ACSM to ePub with free or professional tools.

First Thing First, What is ACSM?

ACSM, the full name is Adobe Content Server Message, it is a XML-based file containing information that communicates with Adobe Content servers, it is something like a certificate or proof to inform Adobe that you have legally purchased an eBook and will be allowed to download the real eBook after authorization. This is useful and convenient when you need to read the eBook on different device within Adobe.

In conclusion, ACSM is not an eBook itself, it cannot be opened or managed by an eBook reader, you have to authorize via Adobe Digital Edition or use other tips to open and then get the ePub downloads. Also, the ePub downloads you get from ACSM files are DRM protected.

Step 1. Open or Export ACSM as ePub format

To open and export an ePub from the ACSM file, there are 2 ways, with or without Adobe Digital Editions.

Method #1 Convert ACSM to ePub with Adobe

Adobe Digital Editions is a free eReader to reader books across different devices, also it allows users to download and purchase digital content. After the purchase, you will get a ACSM file which allows you to download the ePub file later.

  • Step 1. Download and install Adobe Digital Editions.download adobe digital editions
  • Step 2. For first-time user, go to Help>Authorize Computer.authorize computer
  • Step 3. Input your Adobe ID for purchasing the eBook.input adobe id
  • Step 4. Then right click on the ACSM file and choose to open with Adobe Digital Editions.
  • Step 5. You will notice that an ePub is being automatically downloaded.download epub
  • Step 6. Find the ePub file.

#For Windows users: My Documents/My Digital Editions

#For Mac users: Finder/Documents/Digital Editions

Step 2. Remove the DRM from ePub for Easy Reading

Even if you have converted the ACSM file to ePub, you won’t allowed to read or share easily these ePub files since they are DRM-protected. In this case, you will need to remove the DRM from your ePub file. Also, here we introduce 2 ways to decrypt the DRM ePub from your ACSM files.

Method 1. Use The Best eBook DRM Remover

Epubor Ultimate is a powerful tool to manage your eBooks, such as converting eBooks to different formats for all kinds of eReaders, modify meta data and remove DRM from eBooks for easy reading. It is easy to use and help detect device or eBooks for smart importing. Also, it is available for both Mac and Windows PC users.

Main Features of ePubor Ultimate

  • Support converting eBooks in KFX, EPUB, PDF, AZW, AZW1, AZW3, AZW4, Mobi, PRC, TPZ, Topaz, TXT, and HTML;
  • Convert eBooks to ePub, Mobi, AZW3, TXT and PDF;
  • Batch and fast convert;
  • Edit and modify metadata (title, author, identifiers, publishing date, language, publisher, introduction, book cover) ;
  • Remove DRM from eBooks.

Steps to Remove DRM ePub from ACSM Files

  1. Download and install ePubor Ultimate on your mac or Windows PC; 
    Free Download ePubor Mac
     
    Free Download ePubor Win
  2. Run the program, it will detect all the ePub files you get from the ACSM and display in the left column.
  3. Drag and drop the DRM-protected ePub files to the right column for decryption. Done.remove drm from epub with epubor

Method 2. Use Calibre (Free)

If you read eBooks very often, you should have heard about Calibre, a versatile and simple program to manage eBooks, it allows you to:

Organize and manage your eBooks collection;

  • Read eBooks;
  • Download online eBooks;
  • Edit and modify metadata;
  • Share and backup eBooks;

Calibre itself doesn’t build in the feature to remove DRM from ePub or other eBooks, but allows users to install a plugin to do so, here we recommend DeDRM plugin to remove DRM in Calibre.

Steps to Remove DRM ePub from ACSM Files

  1. Download and install Calibre on your Mac or Windows PC;
  2. Download and install DeDRM plugin
  3. Run Calibre, go to Preferences>Plugins;cabilre preferences
  4. Click “Load plugin from file” and choose the DeDRM plugin you have downloaded onto your computer. Then click “Yes” to continue;load-plugins
  5. Click “Add books” to import eBook files to Calibre;add ebooks to calibre
  6. Once the eBooks are loaded into the program, the plugin will automatically remove DRM from ePub.

Conclusion

To convert ACSM to ePub on Mac or on Windows PC, there are 2 steps required, you have to open and export the ePub file from ACSM with Adobe Digital Editions first, then remove the DRM from ePub for reading or sharing on different devices. Each step require a professional and dedicated program to do the task. As long as we have picked the appropriate tool, we will be able to convert ACSM to ePub in an easy and effective way.

Related Post

By |2021-01-04T15:56:36+08:00September 26th, 2019|Tags: |
Go to Top