Owen Benjamin

About Benjamin, Owen

Chief editor from Voilabits.

6 Best Alternatives to Splice Video Editor for PC/Mac

GoPro Splice is a neat yet practical video editor, making it quick and easy to beautify videos. It boasts an array of editing tools such as transition, trim, crop, fast & slow motion, reverse video, sound effects, specific video blur, and more. But the Splice app is only available on the iOS device (iPhone, iPad), which doesn’t allow you to install it on your desktop devices. In this article, let’s get into it with the surprisingly best Splice video editor for PC or Mac.

The Most Effective Splice Video Editor for PC/Mac

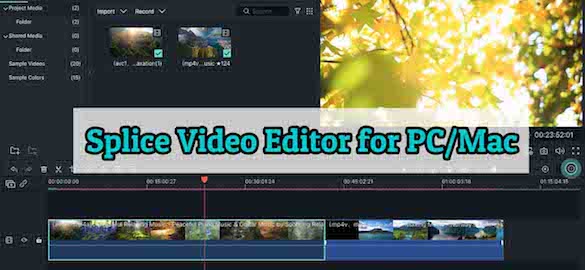
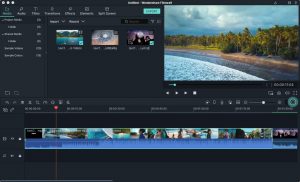
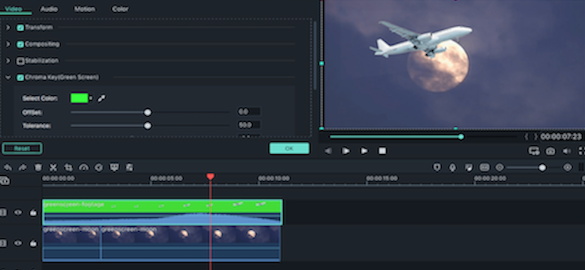
Wondershare Filmora Video Editor is a well-known and powerful alternative to Splice video editor for PC/Mac. It reigns as the savior of desktop video editors for novice and advanced users. It’s packed with comprehensive video editing functions, including trim, crop, split, zoom, cut, add music/text/voice-overs, etc. Also, the software offers wonderful video effects, like Green Screen, Face-off, PIP, etc. Compared to the most professional Splice movie makers for PC, Filmora is simpler to use and has a more user-friendly interface.

Main Features of Filmora Video Editor:

  • Splice videos in few steps
  • Support a wealth of import options, be it SD, HD, or 4K videos from camcorder, Internet and elsewhere
  • Modify video with classic editing tools like Split, Trim, Crop, Rotate, Color Correction, Contrast, Brightness, etc.
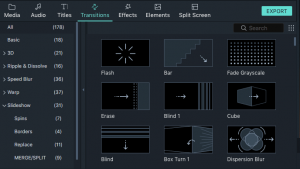
  • Apply transitions like 3D, warp, slideshow, speed blur, etc. between scenes/clips
  • Add visual effects (filters and overlays) & elements to enhance your videos
  • Add custom background music, text descriptions, titles to videos
  • Support several output formats and devices
  • Share videos to YouTube, Vimeo with the best settings, or burn them to DVD

How to Splice Videos with Filmora:

Step 1. Install the Best Splice Video Editor for PC/Mac

Download the software on your desktop. It’s compatible with both Windows PC and Mac devices. Then, install and launch it.

Free Download for Mac
 
Free Download for Win

Step 2. Load Source Clips

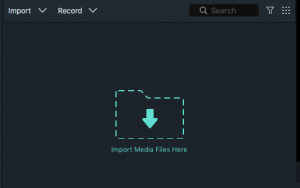
Choose “New Project” to create a new project. Once Filmora is opened, you have 4 ways to import files:

Way one: click “Import Media Files Here”.

import files way one

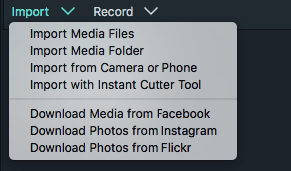
Way two: click “Import”, and you will be able to import files from the phone, instant cutter tool, Facebook, Instagram, etc.

import files way two

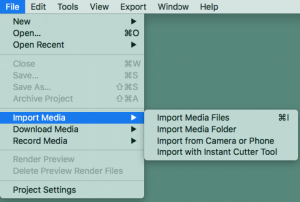
Way three: click “File”, and you will find the options as Way two shows.

import files way three

Way four: directly drag–n-drop your videos to the media library

Step 3. Splice Video on PC/Mac

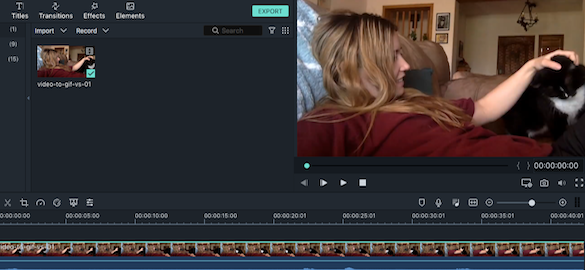
Drag the videos you desire to splice to the same video track in the timeline one by one. Now you can start to play the videos, and all of them have already been spliced seamlessly. It’s too simple. You only need to put them into the timeline together.

splice video on pc or mac

Note: A dialog might pop up asking, “Do you want to change your project settings to match”. The two options are both OK. It just depends on your demand.

Step 4. Insert Transitions between Each Clip

Click “Transitions” tab > double-click the transitions you intend to preview > drag-n-drop your favorite transitions to the start or the end of any video or add transitions between clips on the timeline.

add transitions

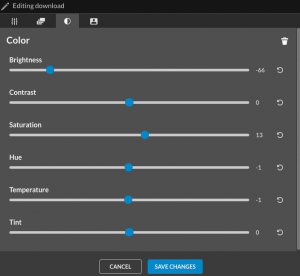
Step 5. (Optional) Edit and Enhance Videos

This alternative to the Splice app for PC/Mac provides tons of basic tools to edit and enhance your videos, e.g. you can add subtitles or copyright-free music for your videos.

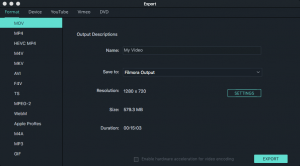
Step 6. Export Your Video

When everything is done, hit the “EXPORT” button to save your video. You can go to the “Format” tab and select a popular format like MOV, MP4, MKV, AVI, TS, etc. that compatible with your video player. If you wish to play the video on your mobile phone, click the “Device” and choose any iPhone or Android device.

export video

Know More Alternatives to Splice Video Editor for PC or Mac

# Lightworks

Support OS: Windows, Mac, and Linux

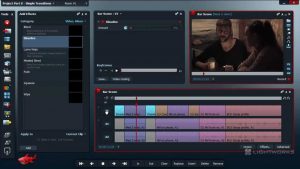
Lightworks is a fantastic alternative to Splice movie maker that’s been around for a long time. It was used to make Hollywood movies and has established a reputation in film history.

This Splice video editor for PC/Mac comes with many editing features to create videos for social media, 4K projects, YouTube and Vimeo. It’s now priced at $24.99/month, $174.99/year, and $437.99/outright. The license for a month doesn’t contain Boris Graffiti plugin package or Boris FX plugin package.

splice video editor for pc alternative 02

# Apple iMovie

Support OS: macOS, iOS

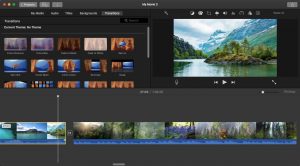
iMovie is a Splice video editor free alternative that’s packed with a set of useful tools, such as split, splice, speed, green-screen effects, stabilize, add narration & soundtrack, etc., and it also offers built-in trailers and themes. The program supports to import 4K resolution movies but not 360-degree ones.

You can export media files recorded at a speed of 60 frames per second. If you set the quality with “Best (ProRes)”, the output video will be saved as MOV format, otherwise, it will be MP4 format.

splice video editor for pc alternative 03

# OpenShot

Support OS: Windows, Mac, and Linux

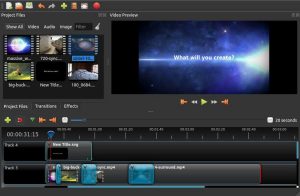
As a free, open-source alternative to Splice video editor for PC/Mac, OpenShot makes video editing extremely easy for beginners. It contains necessary functions for video cropping, splitting, slicing, rotating, combining, over-compositing, adding watermarks, etc. Plus, it works well with 3D animated titles and effects, like lens flares, snow, or flying text, and so on.

However, if your OS does not satisfy the system requirements for the software, you have to install add-ons. This Splice app alternative doesn’t have a very detailed help section as well.

splice video editor for pc alternative 04

# Blender

Support OS: Windows, Mac, and Linux

Blender is another open-source Splice movie maker alternative, using entire 3D-creation tools to produce movies, renders, simulations, animated films, motion tracking, etc. The software enables you to perform basic tasks, e.g. cut, speed control, keyframes, filters, luma waveform, real-time preview, etc.

As a public program made by hundreds of people from around the world, Blender is completely free. But to get high-quality training and all the open movie files & tutorials, you need to pay € 9,90/month.

splice video editor for pc alternative 05

# DaVinci Resolve

Support OS: Windows, Mac, and Linux

Developed by Blackmagic Design, Davinci Resolve makes it amazing to edit 8K videos, correct color, add visual effects, and produce audio. You can try the free version to enhance your videos via its formidable editing tools. But the free version has some limitations. It doesn’t support HDR or videos greater than 4K. In addition, this free alternative to Splice video editor for PC/Mac only allows you to use a single GPU (the rendering speeds with the studio version are quicker). To purchase the full studio version, you should pay around £300/$300.

splice video editor for pc alternative 06

Conclusion

Regardless if you’re deciding to create videos for daily work or for social media feed, the 6 best alternatives to Splice video editor for PC/Mac above that are able to get the job done. Wondershare Filmora is the best Splice app alternative that’s suitable for everyone. iMovie, OpenShot, and Blender are decent basic software for creators on a budget. The paid version of DaVinci Resolve is a brilliant choice for professionals.

Related Post

By |2020-04-01T14:16:38+08:00April 1st, 2020|

7 Best Face Changer Video Editors for Mac, Windows, and Mobile

A face changer video editor app allows you to swap face in videos between people, animals, and various emojis. Not only can you play jokes and pranks on your friends or family but also protect the privacy of others. This article has organized pieces of video face replacement software for various platforms (desktop, mobile phone, web-based tools included), which helps you replace face in video apps as quickly as possible.

The Best Face Changer Video Editor for Mac and Windows

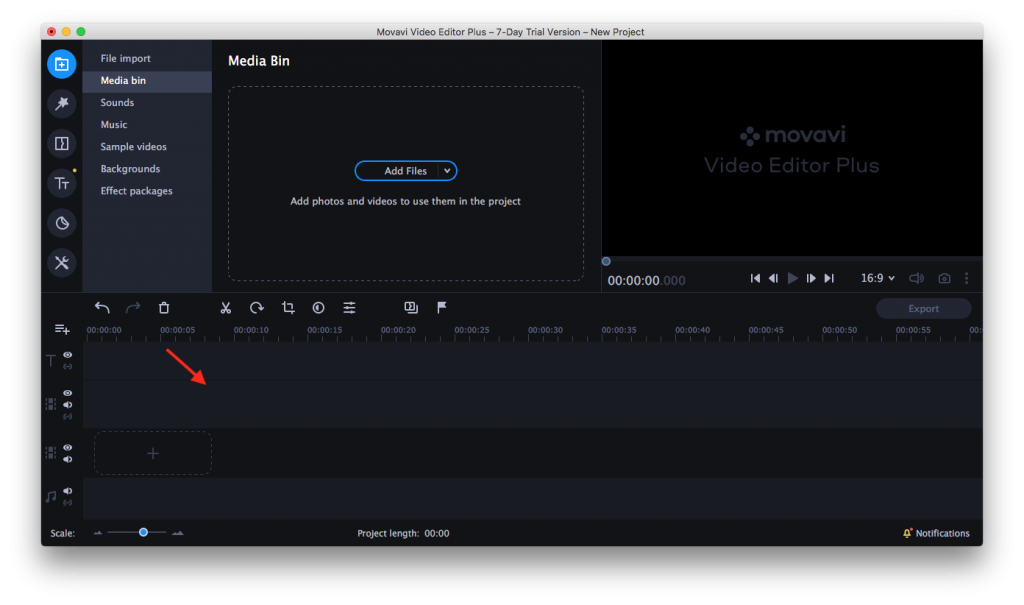
Movavi Video Editor Plus is an easy-to-use and powerful face changer video editor for Mac and Windows geared toward beginner and casual users. It provides a bunch of ready-made faces including emoji, animal, mosaic, etc. so that you can replace face in video app with one click. In addition, you are able to overlay face photos or videos to create a picture-in-picture video.

Main Features of Movavi Video Editor Plus:

  • Fully compatible with a wide range of input formats
  • Support 200+ built-in video effects (Filters), Transitions, Titles, Stickers etc.
  • Offer a substantial collection of editing skills: cut, merge, crop, rotate, pan & zoom, logo, chroma key, slow motion, etc.
  • Fine tune the color: simply select Auto mode with Easy option or tweak it as your requirement with Advanced option.
  • Support massive free resources of media, audio, backgrounds, stickers, title & subtitle, etc.
  • Export video to different resolutions, upload the video to YouTube/Vimeo or burn it to DVD.

How to Change Face in Video App on Mac/Windows:

Step 1. Import Source Video

Download Movavi face changer video editor on your desktop, then install and run it.

Free Download Movavi Mac
 
Free Download Movavi Windows

Create a new project and directly drag your video to the Timeline.

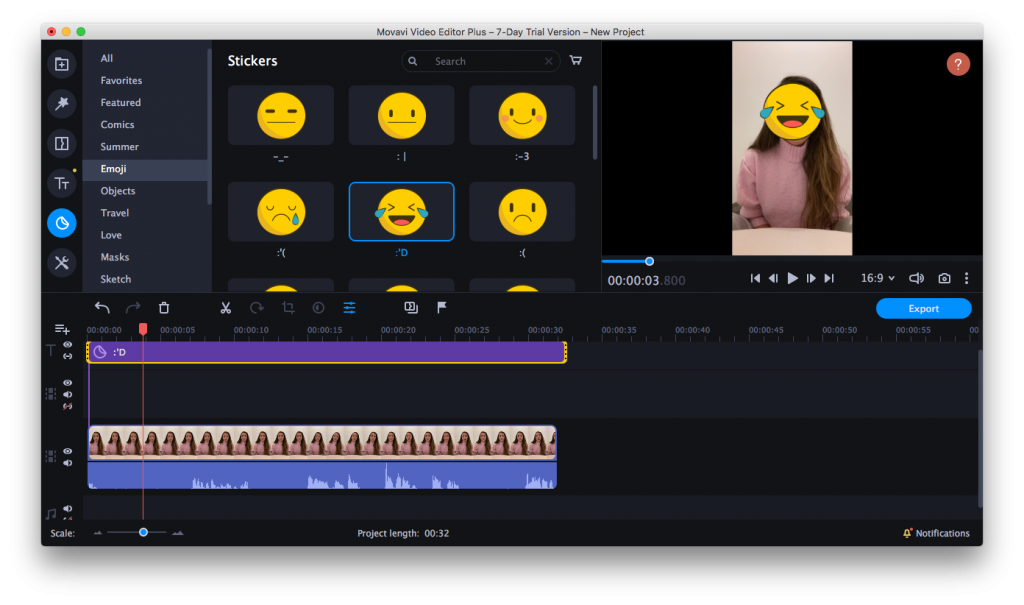
Step 2-1. Replace Face in Video App via Stickers (Recommended)

Highlight the video that you would like to put a face on and place the playhead to the target position.

Find Stickers tab on the left sidebar. There are various kinds of built-in stickers, such as Emoji, Mask, Shapes, Signs, etc. Drag the sticker you like to the timeline, and then you can adjust the sticker size and location as your requirement.

Double-click the sticker you added in the timeline, and a small window pops out displaying the Clip Editing setting. You can set the displaying duration of this sticker. Also, you could drag the edge of the Sticker in the timeline to tweak its duration.

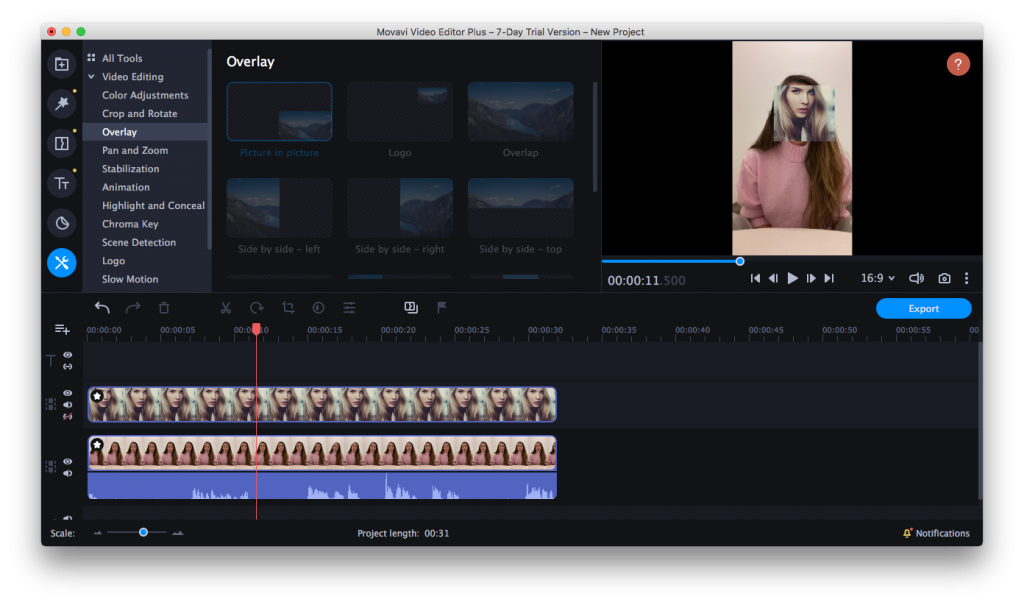
Step 2-2. Make Picture-in-picture Video

Import the image to the timeline as an overlay, select the picture-in-picture mode, and edit it.

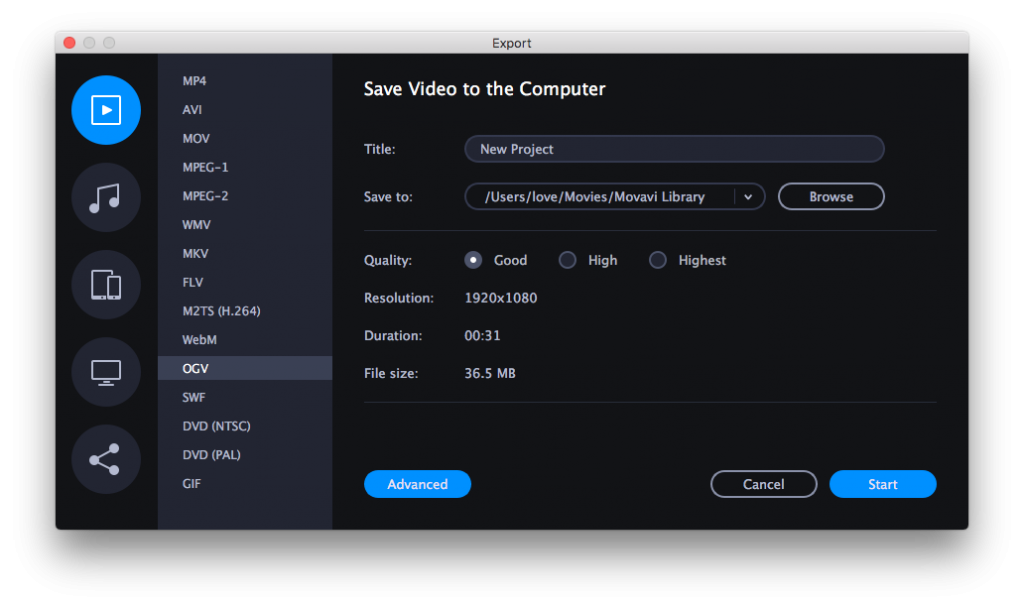
Step 3. Export Video with Changed Face

Click the “EXPORT” button, and the face changer video editor will show you output options. You can save your video to digital format (e.g. MP4, MOV, MKV, M4V, WebM, etc.) or to preset profile for device (e.g. iPhone, iPad, Xbox One, PSP, etc.)

Name your video, choose a location on your Mac/Windows PC to save the video. Click “Advanced”, If you need to do further settings with the video, such as resolution, frame rate, sample rate, etc. Then click “Start”.

There are also some other output options that enable you to post the video to YouTube or Vimeo directly or create a DVD for better preservation.

The Best Video Face Replacement Software for iPhone and Android

Face Swap Live, similar to Facebook’s MSQRD, is a practical face changer video editor available on mobile phones. It allows you to replace face with your friends or photos in real-time. You can record videos even if your faces swapped with a celebrity, baby, animal, etc. Not only does this video face replacement software support static images but also switch faces live from your camera’s video feed. Besides the face-changing feature, it helps you add photo filters as well.

How to Change Face in Video App iPhone/Android:

Step 1. Install the Software

After installing Face Swap Live, open it on your mobile phone and allow all permissions.

Step 2. Choose “Swap Faces”

You’ll be given two options- swap face with another person or use a pre-existing photo. To replace face in video, you should tap the “Swap Faces” option.

Step 3. Chance Face in Video on iPhone and Android

There are four ways for you to replace face in video app.

video face replacement software for iphone/android 01

  • Way one: using provided face

Switch to front-facing camera > pick an available face from the bottom of your screen > Tap the “MASK” icon (optional).

  • Way two by searching a face

Tap “Internet” > type the name of the person you desire to switch face with.

  • Way three: from your own pictures

Tap “Import” > take a photo with a camera or add one from your library

  • Way four: swap face with another person

Tap “Swap” in the lower right-hand corner

Step 4. Start to Record a Video

Tap the video camera icon to record video with changed face. Once completed, you can trim the video, generate a GIF or share it with others.

video face replacement software for iphone/android 02

The Best Online Face Changer Video Editor

I have tried many cloud-based services for replacing face in videos. But most of them only support swapping face in photos, such as changefaces.com, faceswaponline.com, photofunny.net, etc.

WeVideo.com is the one that can put a face on a video. You are capable of using animated text, audio (free music, sound effects, premium music), transitions, and backgrounds to add instant polish. However, the online video editor face changer just lets you edit and explore video with the free account. If you intend to finalize your video to keep a copy or share, you have to pay for it.

How to Change Face in Video Online:

Step 1. Visit https://www.wevideo.com/, sign up an account and get started.

Step 2. Click “My media” > “Import’ to add your video, and drag it down to one of the video layers.

Step 3. Place your playhead over the first frame of the video clip that you would like to put a face on.

Step 4. Import a face image, and drag it to another video layer. If you want the face image to show longer, then simply click the image in the timeline and drag it in parallel.

face changer video editor online 01

Step 5. Double-click the image, and you can adjust the transform, animation, color and color keying.

Step 6. Click “FINISH” to export your video.

face changer video editor online 02

Alternatives to the Best Face Changer Video Editors

# iMovie

OS Platform: macOS and iOS

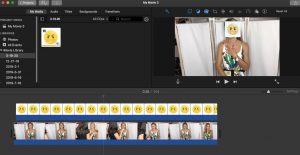
iMovie is a free video face replacement software that’s well-optimized for Apple hardware. It ensures you to add the built-in gallery of transitions, effects, filters to your videos as well as make a trailer for your home movies. When it comes to replacing face in iMovie video, you can add a background overlay and apply the Picture in Picture feature to conceal someone’s face.

imovie

# Snapseed

OS Platform: Android & iOS

Snapseed is a face changer video editor developed by Google. It’s equipped with an array of classic editing tools like tuning, cropping, straightening, etc. and contains advanced filters like glamour glow, grunge, lens blur, HDR scape, etc. You can easily blur faces and objects in videos with mosaic or overlay an image or sticker.

snapseed

# Face Changer Camera (F28)

OS Platform: Android

Face Changer Camera is a piece of video face replacement software that’s specially designed for putting various funny faces on your face. It features a face warp camera, enabling you to apply face warp effects on your video. You can also change faces between two persons, or use the animal live face filters, skeleton video face filters, face sticker and so forth.

face change camera

# DaVinci Resolve (DaVinci Resolve Studio)

OS Platform: Windows, Mac, and Linux

DaVinci Resolve, a professional face changer video editor, is now developed by Blackmagic Design. It’s packed with many functions such as trimming, slicing, changing lip color/skin tone/eye color, etc. You can perform different types of editing like Edit , Fusion, Color, and so on. To swap face in video, you should do it in “Edit” and you can also tweak the size and position of the face via built-in editing tools.

davinci

Conclusion

These are the best face changer video editors that work well on Windows, Mac and mobile phones. Some of them are free like iMovie and some are paid. You can try the free video face replacement software before making any purchases. If it can’t satisfy your needs, Movavi Video Editor Plus should be the most suitable choice for beginners to swap face in video easily and make your video more attractive.

Related Post

By |2020-08-07T15:25:21+08:00March 20th, 2020|

The Best Way to Read Google Play Books on Kindle

Google Play Books, formerly called Google eBooks, is the largest eBook store around the world. It’s available on the web, iOS, and Android. You can find over 5 million titles (eBooks, audiobooks included) on Google Play Books and upload up to 1,000 eBooks.

“Can I read Google Play books on Kindle?”, users may ask. The answer is yes. Follow the guides below, and you will know how to read Google Play books on Kindle Fire, Kindle Paperwhite, etc.

How to Download Google Play Books on Mac/Windows?

#1. Download Google Play Ebooks

Step 1. Open https://play.google.com/books in a web browser.

Step 2. Sign in your Google account.

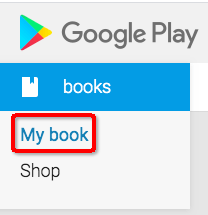
Step 3. From the left panel, click “My books” to show all eBooks you added or purchased.

go to my books

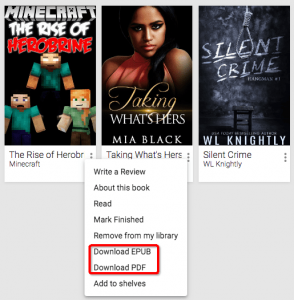
Step 4. Find the eBooks you want to download and click the three dots button in the lower-right corner.

Step 5. Select “Download EPUB” or “Download PDF” in the drop-down menu.

download google play ebooks

#2. Download Google Play Audiobooks

Step 1. Repeat the previous three steps above.

Step 2. Switch to the “Audiobooks” tab.

Step 3. Locate to the Google Play books you need to read on Kindle.

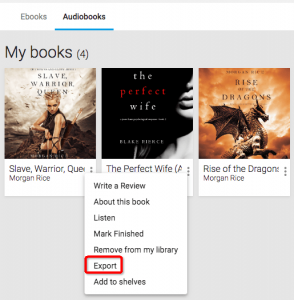
Step 4. Click the three dots icon and choose the “Export” option.

download google play audiobooks

Google lets you download free or purchased Google Play audiobooks in M4A format without DRM. They can be transferred to your Kindle device directly. However, the downloaded eBooks will result in ACSM (Adobe Content Server Message) files, neither PDF nor ePub. They are not the actual files but the links to eBooks, which allows programs like Adobe Digital Editions (ADE) to download the actual Google Play books.

How to Convert ACSM eBooks to Readable ePub/PDF?

Adobe Digital Editions helps you to manage, read and transfer Google Play books to Kindle. It supports the fulfillment of books across devices. That means when you fulfill one Google Play book, it will be automatically downloaded to all other devices that are using the same Adobe ID.

Step 1. Launch the software

Download, install and run Adobe Digital Editions (ADE) from Adobe Official site.

Step 2. Authorize computer with Adobe ID

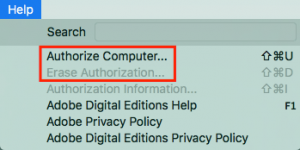
Click “Help” > “Authorize computer” to bring up the “Computer Authorization” dialogue box, or you can use the shortcut keys:

  • Mac: Command + Shift + U
  • Windows: Ctrl + Shift + U

To wipe out the formal authorization information, click “Help” > “Erase Authorization”, or press:

  • Mac: Command + Shift + D
  • Windows: Ctrl + Shift + D

authorize computer

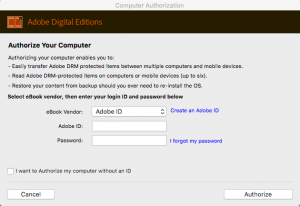
Enter your Adobe ID & password, and then click the “Authorize” button to activate it. If you don’t have an Adobe ID, just create a new one.

log in adobe id

Step 3. Add ACSM files to ADE

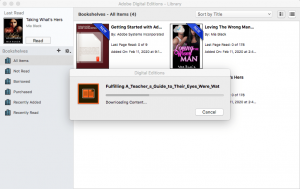
Drag ACSM files that you downloaded from Google Play Books to ADE. Alternatively, double-click the ACSM files and they will be opened in ADE by default.

fulfill ebooks

Step 4. Find the downloaded ePub/PDF books

Each ACSM file that opens with ADE will be automatically downloaded to your computer as an ePub or PDF file. You can find all downloaded ePub/PDF books in:

  • Mac: Finder/Documents/Digital Editions
  • Windows: My Documents/My Digital Editions

But the downloaded ePub/PDF files can only be read via Adobe Digital Editions as they are encrypted with DRM. If you wish to read Google Play books on Kindle Fire, Kindle Paperwhite, Kobo, Nook, Sony, etc., you have to remove the DRM protection at first.

How to Read Google Play Books on Kindle?

#1. Remove DRM Protection and Convert Books

Epubor Ultimate is a powerful DRM eBook converter to convert DRM protected Google Play books to common eBook formats supported by Kindle. It can smartly detect e-readers or e-reading apps such as Kindle Paperwhite, Kindle Voyage, Kobo, Adobe Digital Editions, etc. and load downloaded books. The software is easy to use and available on both Mac (OS X 10.8 or later) and Windows (XP, Vista, 7, 8, 10).

Key features of Epubor Ultimate:

  • Remove DRM for eBooks downloaded from Google Play books or other platforms
  • Support 13 input formats, like ePub, PDF, KFX, AZW, PRC, TPZ, HTML and more
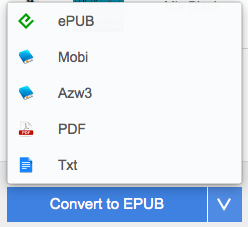
  • Support 5 output formats: ePub, MOBI, AZW3, TXT and PDF
  • Batch convert eBooks without losing quality
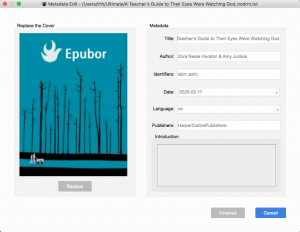
  • Modify metadata, including cover, title, author, identifiers, date, language, publisher, and introduction.

Steps to Remove DRM and Convert Google Play Books to Kindle:

Step 1. Install the software

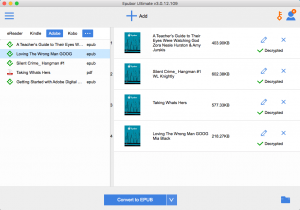
Download & Install Epubor Ultimate, and then run it. Epubor Ultimate will detect your downloaded Google Play books from Adobe Digital Editions and displayed them under the “Adobe” tab at the left column.

Free Download for Mac
 
Free Download for Win

Step 2. Remove DRM of Google Play Books

Drag the books from left to the right, and the ePub/PDF DRM will be removal successfully.

decrypt google play books

Step 3. Convert Books to Kindle Format

Click the folder icon in the bottom right corner and specify an output location.

Choose Kindle-supported MOBI (an exclusive format used by Amazon’s Kindle Store) as output format, and then click on the “Convert to MOBI” button.

convert to mobi

Tip: Edit Metadata of the Books

Before reading Google Play books on Kindle, you can customize their metadata with Epubor Ultimate. Simply click the pencil icon to open up the “Edit meta” window and modify the information.

edit metadata

#2. Transfer Non-DRM Google Play Books to Kindle

Step 1. Connect Kindle to your Mac or Windows PC via the USB cable.

Step 2. Double-click the Kindle drive to open it.

Step 3. Navigate to the Google Play books you need to transfer to Kindle.

Step 4. Drag books to the corresponding folder on your Kindle.

  • Books: DRM-free MOBI, AZW (.azw3), KF8
  • Music: MP3, DRM-free AAC (.m4a), OGG, WAV, MIDI, PCM/WAVE,
  • Audible: AA, AAX
  • Documents: TXT, PDF, PRC, DOC, DOCX
  • Pictures: JPEG, PNG, BMP, GIF,
  • Movies: MP4, 3GP, VP8 (.webm)

Step 5. Eject Kindle from your Mac/Windows computer.

Step 6. Start to read Google Play books on Kindle.

More FQAs about Google Play Books

#1. How to Upload File to Google Play Books?

Step 1. Visit https://play.google.com/books and log in to your Google account.

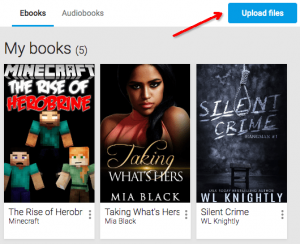
Step 2. Click “Upload files” in the upper right corner to browse your eBooks.

upload files

Step 3. Upload books from your computer or Google Drive account.

Step 4. Click the “Select” button.

#2. How Do I Buy Books on Google Play?

Step 1. Go to https://play.google.com/books.

Step 2. Search for your favorite eBook or audiobook.

Step 3. Click the cover of the book to open the detailed overview page.

Step 4. Click the price button and add your credit/debit card to buy the book.

Conclusion

There are several steps to read Google Play books on Kindle, especially for those eBooks. You have to download its eBooks on Google Play > open the ACSM files and download them via Adobe Digital Editions > remove files DRM by Epubor Ultimate > transfer all books to Kindle. Two dedicated tools- Adobe Digital Editions and Epubor Ultimate are required for you to read Google Play books on Kindle without hassle.

Related Post

By |2020-03-05T15:21:32+08:00February 12th, 2020|

4 Easy Ways to Share Audible Books with Family or Friends

Audible, an audiobook store owned by Amazon, collects the world’s largest selection of audiobooks and original audio shows. Once purchased, you can download audiobooks from Audible and listen to them on the device of your choice.

But it’s a little tricky when it comes to sharing Audible books, as they are protected by DRM. In this article, we will explore how to share Audible books with family, friends, or someone else so they don’t have to buy audiobooks repeatedly.

#1. Share Audible Books by Removing DRM

Epubor Audible Converter is regarded as one of the best DRM removal software for Audible books because it offers good value for its price. By applying an advanced DRM decryption function and unique technique, it lets you convert the encrypted AA/AAX to MP3 and M4B in a fraction of seconds. After the conversion, you can easily share audible books with others for free and without limitation.

How to Share Audible Books on Mac and Windows:

Step 1. Download and install Epubor Audible Converter on your device, and next open it.

Free Download for Mac
 
Free Download for Win

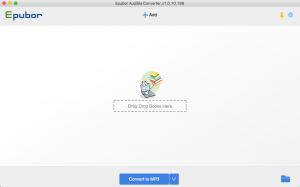
Step 2. Simply drag the DRM protected Audible books you want to share into the panel of the software. Alternatively, you can click the “Add” button in the top middle to import files.

epubor interface

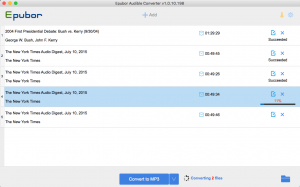
The Audible books will be listed with the book title, time, author, and book-length.

Step 3. Click on the “Convert to MP3” button (or choose “Convert to M4B” as instead) to remove DRM from Audible books. All the files can be processed in batches.

remove drm from audible books

Once completed, the folder in which the converted audiobooks are stored will pop up automatically. The whole process doesn’t ask for iTunes to run and Audible account to log in.

Step 4. Share your DRM-free Audible books with friends or children via email, Google Drive, Dropbox, etc.

Useful tip: split Audible books into chapters

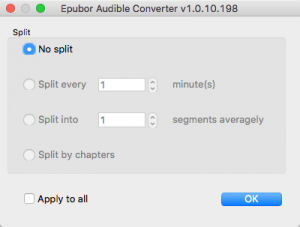
Epubor Audible Converter ensures you to share Audible books with chapters. After you add audiobooks into the software, click the “Option” button. Choose “Split by chapters” and click on “OK”. It also allows you to split Audible books into multiple segments averagely or by time.

split chapters

The split feature is only accessible for the paid ones.

#2. Share Audible Audiobooks via Amazon Household

Amazon Household is a feature that helps you share apps/games, eBooks and audiobooks. It was being abused and overshared before, thus since 2015, Amazon established some restrictions to avoid excessive sharing.

Limitations of an Amazon Household account:

  • Includes up to 10 members: 2 adults, 4 teens (13 to 17 years old), and 4 kids (12 and younger)
  • Two adults must have their own Amazon account
  • Can only share Audible books with another adult member
  • Each member needs to be in the same region/country
  • Share wallets for sharing digital content and choosing Prime benefits
  • Although you’ve left Amazon household, you can’t join a new one for the next 180 days

Steps to Share Audible Books with Family or Friends (for adults):

Step 1. Visit amazon.com and sign in to your account.

Step 2. From its homepage, click “Manage Your Content and Devices” at the bottom.

manage your content and devices

Step 3. Head towards the ” Preferences” > “Households and Family Library” > “Learn more about Households”.

learn more about Households

Step 4. On the new page, click the “Add Adult” button to invite someone.

add adult

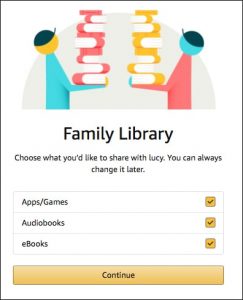
Step 5. Go to set country > enter the name and email > click “Agree and continue” > select the options you want to share, such as “audiobooks” and then click “Continue> send your invitation (should be accepted with 14 days).

choose sharing options

Step 6. Tell the invitee to verify the account and accept the proposal.

Step 7. Start to create your family library. Go to your family library page >choose the Audible books > tap on “Add to Library” to share them.

Steps to Show Shared Audiobooks on Portable Device:

Step 1. Repeat the first two steps above.

Step 2. Head to the “Device” tab.

Step 3. Click the triple dots button next to the device you intend to share audiobooks.

Step 4. Put a tick mark into the checkbox “Show [Name]’s Content”.

show shared audiobooks on portable device

#3. Share Audible Books through the Audible App

The “Send this Book” feature in the Audible app empowers Audible members to share a purchased audiobook with a totally of 10 people on iOS/Android/Windows 10. But each recipient can only get the first title for free. Audible will pay author or publisher for the free-shared audiobook.

How to Share Audible Books on iOS:

Step 1. Launch Audible app on iPhone or iPad.

Step 2. Go to your library and tap the three dots icon next to the audiobook title you wish to share. Or navigate to the player page, and tap the share icon at the top of the screenshot. Or directly visit the rate and review page.

Step 3. Tap “Send this Book” option on the pop-up menu.

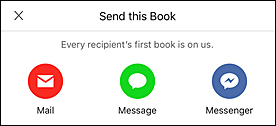
Step 4. Choose to share Audible books with family or friends via Mail, Message, Facebook Messenger, WhatsApp, etc.

Step 5. Select recipients you would like to send the audiobooks to.

Step 6. Tap “Send”.

share audible books ios

How to Share Audible Books on Android:

Step 1. Run the Audible app on your Android phone.

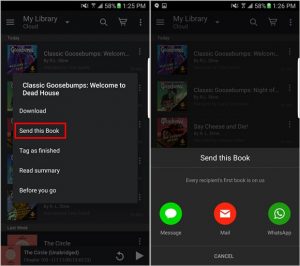
Step 2. From “My Library” (no matter in the “Cloud” tab or the “Device” tab), tap the vertical ellipsis icon next to the Audible book you desire to send.

Step 3. Tap “Send this Book” from the pop-up dialog.

Step 4. Picking a sending method.

share audible books android 01

But different Android systems and versions of the Audible app will present different options. Sometimes, you may not find the “Send this Book” option on your Android phone. Don’t worry! You still have the other two ways (similar to iPhone) to share Audible Books.

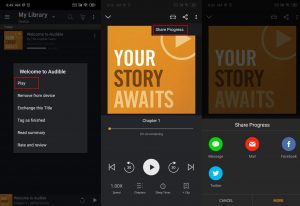
Way one: tap “Play” > tap the share icon > tap “Share Progress > choose a sharing method.

share audible books android 02

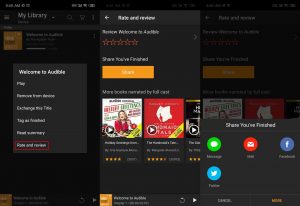
Way two: tap “Rate and Review” > tap “Share” > share your audiobooks via an app.

share audible books android 03

#4. Share Audible Account with Someone

You can share your Audible account with your family or friends so they are able to log into your account on various devices and get your Audible books. The audiobooks can be downloaded on up to 3 devices, including Apple devices, Android devices, Kindles, Sandisk MP3 Players, Garmin & TomTom GPS devices, etc. Plus, you can activate your Audible account on up to 4 computers, Mac and Windows included.

Nevertheless, it has certain downsides to share Audible books by signing into one account on multiple devices. When you are listening to the same Audible book with family or friends, it will tell you where others are each time you play or pause the audiobook and ask if you need to jump to that location.

Make sure your account is shared only with people you trust and know well because they can see your account ’s privacy and payment option.

Conclusion

These are 4 solutions on how to share Audible books with family or friends. All of them have pros and cons. Time and money are vital factors in picking a solution. Personally speaking, I prefer removing DRM of the audiobooks first and then share them with anyone without restrictions. I highly recommend Epubor Audible Converter, which is easy-to-use, affordable and makes things efficient.

Related Post

By |2020-01-10T10:26:46+08:00January 9th, 2020|

dupeGuru Review 2020: Is dupeGuru Safe, Free and Alternatives

We often copy and download the same file twice to different locations, or save the same document repeatedly just with the name changed. A large of copies would use up the memory space on our computers sooner or later. But sometimes we didn’t even realize that the computer is full of redundant copies.

Thanks to dupeGuru for Mac/ Windows, which can quickly retrieve and delete duplicate documents, music, pictures, etc. Now I will walk you through the dupeGuru reviews and alternatives, then you will know it better.

Dupeguru Review

  • What is dupeGuru?
  • dupeGuru Review: A Closer Look
  • Is dupeGuru Safe and Free
  • Top 3 Alternatives to dupeGuru

What is dupeGuru?

Dupeguru is an open-source, cross-platform GUI program that followed by many Reddit, Quora, advanced users, etc.. You can remove duplicate files on Mac, Windows, and Linux via Dupeguru.

It’s consisting of 3 application modes: Standard edition, Picture edition alongside the Music edition. Each mode contains 2~5 scan types, like Filename, Contents, TEXIF Timestamp and more. Some scan types in Dupeguru offer fuzzy-matching algorithm, which lets you find duplicate files without the exact name sharing.

Pros:

  • Multiple operational modes and scan types
  • The fuzzy matching algorithm helps to find similar files
  • Show Dupeguru results: filename, size, kind, match percent, bitrate (Music only) and dimensions (Picture only).
  • Display scanning process and details of scanned files
  • Preview duplicate files before deleting
  • Filter special files by keywords

Cons:

  • The interface is old-fashioned
  • The features are not clear at a glance
  • Not friendly enough for novices
  • Bad support for the newest system version
  • Failed to detect the identical text, music, etc. files at times

dupeGuru Review: A Closer Look

This part will mainly present the dupeGuru review for Mac. Since the software for Windows has similar functions and was created by the same developer with Mac version. We won’t repeat the introduction again.

Download & Installation

The original developer of dupeGuru- Hardcoded Software didn’t maintain the software anymore. You have to go to https://dupeguru.voltaicideas.net/ to download the program.

There are 4 download options in Voltaic Ideas: Windows (x64), Linux (ppa), OS X, and Source. The Windows and Mac ones are the most popular options.

System Supported OS Size
Windows Windows 98/Me/XP/Vista/Win 7/Win 8/Win 10, etc. 11.11MB
Mac OS X 10.8 or later 4.5MB

As a lightweight application, the installation of dupeGuru will not take up much space.

Interface

dupeGuru for Mac has an uncluttered and simple interface.

It’s divided into 3 sections. From the first section, you can see 3 application modes: Standard, Music, and Picture. Below shows the scan types, as we mentioned before, the types under each mode are varying. Continue to look down, it is the field used for adding scan folders.

You can scan folders in a batch, both of them display the name and state (normal, reference and excluded).

Interface

Preferences

Click dupeGuru in the status bar at the top > choose Preferences from the drop-down menu > the dupeGuru Preferences dialog will pop out.

In the basic tab, you can set the filter hardness from 0 to 100. The small value should get more results while the large one gets fewer. Besides, you are also able to define the font size, word weighting, ignore files smaller than appointed sizes, etc.

Swift to advanced tab, you can check or uncheck the boxes of more options, type your custom command and determine the behavior of Copy and Move operations.

To deeply understand each setting, please visit: https://www.hardcoded.net/dupeguru/help/en/preferences.html.

Preferences

dupeGuru Results

This dialog demonstrates the scanning results of your duplicate files.

  • Details– Empower you to look through the details in the text of a selected file. It’s helpful to check if a duplicate really is a duplicate.
  • Dupe Only– Once enabling this mode, the system will automatically filter duplicate files (displayed in orange color) to the front row.
  • Delta– Show the value relative to the duplicate’s reference. For example, if a duplicate is 31KB and its reference is 186KB, the size column will give you the value -155KB.
  • Preview- Let you look at the original file directly before handling it.

Besides, there is a gear icon on the toolbar that allowing you to do more operational of the scanned files.

dupeGuru Results

How to Use dupeGuru on Mac?

  1. Launch dupeGuru on Mac.
  2. Select a scanning mode and type.
  3. Click on the “+” button or “Load Results” button to add the folder to the scanning window.
  4. Start to scan duplicate files and wait for the process.
  5. Once completed, mark the duplicate files that you want to delete in the Results window, and verify the selections.
  6. Click the gear icon on the top left corner, and choose “Send Marked to Trash” option. All selected duplicates will be removed at once.

2 FAQs about dupeGuru

Q 1. Is dupeGuru safe to use on compatible platforms?

A: From my aspect, dupeGuru is super safe.

  • Download: It’s a green and reliable program that has been served for users for many years. To avoid downloading dupeGuru malware or virus, you should get the software on the official site or authoritative download sites.
  • Install: The installing process is very fast, secure, and no additional virus files or adware will be installed.
  • File deletion: Not only does dupeGuru allow you to inspect duplicate files before deleting them, but all the selected files to ignore list. So you will no need to worry about deleting important files by mistake.

Q 2. Is dupeGuru free?

A: I am sorry to say, dupeGuru is not 100% free. After erasing 10 copy files, you have to donate $9.99 to continue your work.

Top 4 Alternatives to dupeGuru

If you have a little trouble getting started with dupeGuru or it can’t meet your demands, take a shot at dupeGuru alternatives. The well-known tools- Gemini 2 and Easy Duplicate Finder are not specifically mentioned below, you can also take a crack at them.

#1 Cisdem Duplicate Finder (Windows and Mac)

Known to be one of the best duplicate file finders for Mac and Windows, Cisdem Duplicate Finder runs the task of detecting and deleting the copied files efficiently. It designs for people who desire to get rid of duplicates from a variety of file types, like videos, music, archives, pictures, documents, etc. Plus, this dupeGuru alternative can accurately and quickly scan the files in internal, external hard drive as well as similar images in Mac’s Photos and iTunes.

Cisdem Duplicate Finder (Mac)

Pros:

  • Ignore list to exclude files you don’t wish to scan
  • Reclaim an amount of storage space on the hard drive
  • Preview and compare scanned files in different filters
  • Works with most popular file formats

Cons:

  • Not free

Download for Mac | Download for Win

#2 Auslogics Duplicate File Finder (Windows)

Auslogics Duplicate File Finder, an intelligent dupeGuru alternative, offers free features to locate duplicates on Windows and free up space. It scans your specified folders for copies and sorts the results through images, music, videos or others. You are capable of removing duplicates permanently or keeping them in a rescue center. Also, you can configure the search parameters, such as types, file size, names, dates, and so on.

Auslogics Duplicate File Finder (Windows)

Pros:

  • Simple and intuitional interface
  • Fast to scan files, detect duplicates and provide results
  • Bring back accidentally deleted files via rescue center
  • Plenty of operational options for scanning, filtering, marking

Cons:

  • Might show inaccurate results
  • Can’t deeply dig out identical files

Free Download

#3 Duplicate Sweeper (Windows and Mac)

When speaking about the alternatives to dupeGuru, Duplicate Sweeper should be on the list. It assists you to add special folders to the search, including documents, music, photos, contacts, etc.. After you click the “Start Duplicate Search” button, you may get a bunch of duplicate files, which display in a graphical representation classifying into various types.

Duplicate Sweeper (Windows and Mac)

Pros:

  • Easy-to-navigate interface
  • Find hidden duplicates
  • The scanned duplicates are shown in groups
  • Offer preview screen

Cons:

  • Shareware, the free trial can only detect duplicates

Download for Mac | Download for Win

#4 Awesome Duplicate Photo Finder (Windows)

Famous for duplicate photo retrieving, this dupeGuru alternative undertakes an astonishing task in discovering copied images. With custom scanning, you can easily catch sight of the duplicate pictures in major formats (JPG, PNG, BMP, GIF, etc.). In addition, it’s able to compare compressed images or even images with corrected colors. Just preview the pictures to determine which one to remain, and which one to erase, finally remove the unneeded duplicates.

Awesome Duplicate Photo Finder (Windows)

Pros:

  • Support to compare images visually
  • Personalize the degree of similarity between items
  • Fast folder scanning speed

Cons:

  • Primarily applied to duplicate photo findings
  • Missing multi-selection to remove duplicates
  • Bad support on new Windows system

Free Download

Verdict

That’s the whole on dupeGuru Review. In short, it’s a piece of safe and effective software to find and eliminate duplicate files on Mac and Windows. dupeGuru contains some intricate parameters that make it uneasy to use for newbies. But fortunately, you have multiple dupeGuru alternatives when it comes to duplicate files detecting and removing. Anyway, pick the most suitable one for yourself and your system.

Related Post

By |2021-11-18T14:52:36+08:00January 3rd, 2020|

7 Best iTunes Duplicate Removers for Mac and Windows 2020 (Free Included)

Music enthusiasts may store an immense collection of songs in the iTunes music library, but inevitably there will be countless duplicate tracks, which take up much hard disk space and bore you with listening to music. Hence regularly deleting duplicate songs (or movies, podcasts, TV shows) from the iTunes library is a challenging and duty-bound task.

How to delete duplicates in iTunes? It’s impractical to manually remove duplicate songs. Fortunately, you can pull the job off with the best iTunes duplicate removers. Here we have listed top 7 iTunes duplicate remover for Mac and Windows, be it free or paid.

7 Best iTunes Duplicate Removers for Mac and Windows

#1. Gemini 2

Price: $19.95

Official Website: https://macpaw.com/gemini

Supported OS: macOS 10.10 or later

Download the FREE trial

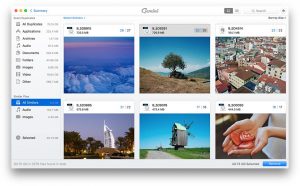
Gemini 2, developed by MacPaw, is a formidable and the best iTunes duplicate remover that quickly identifies the duplicate or similar files on Mac and external hard drive. It helps you scan the iTunes Music Library, Photos Library, Home Folder, etc., and weeds out space-guzzling copied files. You can sort the results of iTunes duplicates by various criteria, like Size, Name, Count, Selected Count, etc.

best itunes duplicate remover 1- Gemini 2

Quick Steps on How to Remove Duplicates in iTunes:

  1. Drag-n-drop all iTunes folders or just the Music folder to the software; alternatively, click on the “+” button to add folders from Finder.
  2. Click on “Scan for Duplicates” button.
  3. Once the scanning process completes, click the “Review Results” button to have an overall look.
  4. Click the “Smart Cleanup” button to delete duplicate songs.

Note: Gemini will require opening the iTunes app to detect duplicates in your Music Library.

Highlight Features

  • Identify duplicate songs, images, folders, downloads, documents, videos, etc.
  • Accurately find out the similar matches
  • Locate duplicate files on your Mac as well as external drive
  • Remove duplicate iTunes listings

Where It Falls Short

  • The free version only allows you to remove 500MB duplicates
  • No similarity threshold settings
Visit Gemini 2

#2. Easy Duplicate Finder

Price: $39.95

Official Website: https://www.easyduplicatefinder.com/

Supported OS: macOS 10.6 or later; Windows Vista, XP, 7, 8, 10

Download for Windows | Download for Mac

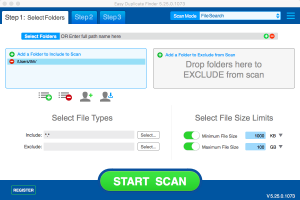
Easy Duplicate Finder (EDF) is a solid iTunes duplicate remover that’s specially designed for locating, organizing and deleting duplicate files. It boasts different scanning modes and compares the results by size, name, and content. You can get rid of duplicate files in a breeze from a vast assortment of sources, such as iTunes, Photos, Google Drive, Dropbox, Windows Media Player, or any directory of your choice.

best itunes duplicate remover 2- Easy Duplicate Finder

Quick Summary on How to Delete Duplicates in iTunes:

  1. Select “iTunes Scan” from the Scan Mode drop-down menu.
  2. Add folders (entire iTunes library or specific ones) to include to the scan.
  3. Click on the green “START SCAN” button.
  4. Click on the “GO FIX THEM” button to review the scanned results.
  5. Click the delete button.

Where It Excels

  • Find a large number of duplicates via over 10 scan modes (for various types of searches)
  • Define the minimum and maximum file size
  • Undo the action for emergency recovery
  • Offer a detailed report and file preview option

Where It Falls Short

  • The free version processes merely 10 duplicate groups
  • Sometimes it would show false positives
Visit Easy Duplicate Finder

#3. Cisdem Duplicate Finder

Price: $29.99

Official Website: https://www.cisdem.com/duplicate-finder.html

Supported OS: macOS 10.10 or higher; Windows 10 and 11

Download for Mac | Download for Windows

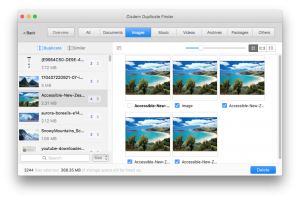
Cisdem Duplicate Finder is an uncluttered iTunes duplicate remover for Mac that uses MD5 value check-sum algorithm to compare files based on name, time, size, random parts of content, etc. It can rapidly find duplicates in iTunes or other programs with the app file structure kept. Also, this best iTunes duplicate remover will classify the detected duplicate files into 7 categories, including Music, Videos, Archives, Packages, Images, Documents, and Others.

best itunes duplicate remover 3- cisdem duplicate finder

Quick Steps:

  1. Come over to iTunes folders and select them. (First step is quite similar to Gemini.)
  2. Click on the “Scan” button.
  3. After scanning, you can check the duplicates in the preview window.
  4. Click the “Delete” button.

Highlight Features

  • Clean duplicates from iTunes & Photos (iPhoto) app
  • Find similar images and select them via 7 options (Smart, Newest, Oldest, Largest, Smallest, Highest Resolution, and Lowest Resolution)
  • Scan duplicates stored on internal & external storage media
  • Provide a few scanning, preview, filtering and removal options

Where It Falls Short

  • The free version only enables you to find iTunes duplicate (can’t take a test)
  • While scanning, it won’t tell you which location is being scanned
Visit Cisdem Duplicate Finder

#4. ManyProg iTunes Duplicate Remover Free

Price: Free

Official Website: https://manyprog.com/itunes-duplicate-remover.php

Supported OS: Windows XP, 7, 8, 10

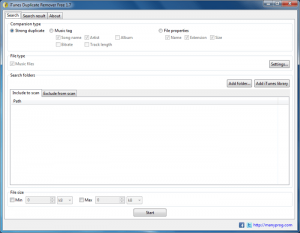
As its name suggests, ManyProg iTunes Duplicate Remover Free is the best free iTunes cleanup software for Windows that assists you to detect duplicate songs, images and videos in iTunes along with your local drives. It’s equipped with an unpolished yet intuitive interface which features 2 tabs- Search and Search result. The first tab is for adjusting parameters, the second one is used to take actions for scanned results.

4- ManyProg iTunes Duplicate Remover Free

Quick Steps:

  1. Choose one of the comparison types from strong duplicate, music tag, and file properties.
  2. Click on the “Add iTunes library” button and wait until the iTunes app launches.
  3. Hit the “Start” button.
  4. Switch to “Search result” tab and mark the dupes to be deleted.
  5. Navigate to “Action” > “Remove”.

Highlight Features

  • Specify the music file format types for duplicates searching
  • Add folder to include to scan or exclude from scan
  • Set the Min and Max file size in B, KB, MB, GB or even TB
  • Able to set 2 criterions for duplicates automatic selection
  • Support 13 UI languages

Where It Falls Short

  • Before you start to scan duplicates, it advises the program ManyProg PC Cleaner to you
  • Can’t dig out deeper duplicates and similar photos
Visit iTunes Duplicate Finder Free

#5. Tune Sweeper

Price: $25 for 2 Macs or 2 Windows PC; $15.99 for 1 Mac on App Store

Official Website: https://www.wideanglesoftware.com/tunesweeper/

Supported OS: macOS 10.8 or higher; Windows Vista, 7, 8/8.1, 10

Supported iTunes: iTunes 10 or later

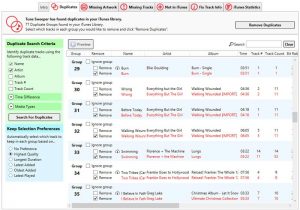
Tune Sweeper, a piece of thoughtful iTunes cleanup software, aims squarely at deleting repeated tracks (songs included) in iTunes library and repairing improper or missing track details. This best iTunes duplicate remover lists the duplicate tracks in groups and suggests which tracks to keep according to your preference: Highest Quality, Longest Duration, Latest added, Oldest Added, Latest Played, or No preference.

best itunes cleaner software 5- tune sweeper

Simple Steps:

  1. Click the “Search for Duplicates” button, your iTunes library will be scanned and the software will return all the duplicates founded in your iTunes library.
  2. Select which duplicates to keep automatically or choose dupes manually.
  3. Click on the “Remove Duplicates” button.

Highlight Features

  • Remove duplicates or lost tracks from iTunes library
  • Promptly load the missing artwork and information of tracks
  • Identify the tracks from Apple Music
  • Detect new tracks on the hard drive, which can’t be found in iTunes

Where It Falls Short

  • Poor performance
  • Confusing UI
Visit Tune Sweeper

#6. Dupe Away

Price: $19.99

Official Website: https://macroplant.com/dupeaway

Supported OS: macOS 10.6 or later; Windows 7, 8, 10 or later

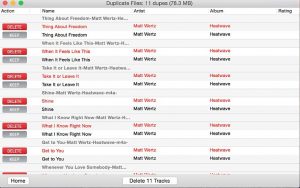
Dupe Away is lightweight yet elegant iTunes duplicate remover that empowers you to eliminate duplicates in iTunes music library (even on large iTunes library) and free up some disk space. It consists of 4 parts: Dupe Files, Missing Files, Playlist Dupes, and Abandoned Files. Each part performs different functions and gives you a surprise. Thanks to this best iTunes duplicate remover, we can deal with and manage iTunes items without the bloat.

best itunes cleaner software 6- dupe away

Quick Summary:

  1. Click the first icon- “Dupe Files” to start scanning duplicates from iTunes Library. Wait for a while, the software will show you the duplicates.
  2. Like Tube Sweeper, it automatically determines which dupes to remove. Or you can manually select the options.
  3. Click the “Delete Track (s)” button.

Note: Before launching the best iTunes cleanup software, be sure to run iTunes app > click on iTunes in the menu bar > click on “Preferences…” go to “Advanced” tab > check the option “Share iTunes Library XML with other applications”.

Highlight Features

  • Easy-to-understand interface
  • Remove duplicate tracks & playlist, lost files from iTunes Library
  • Recover the Music folder that is not in iTunes
  • Set the highest priority for iTunes tracks to keep

Where It Falls Short

  • Can’t actually clean duplicates with the free trial
  • Can only handle iTunes duplicate files
Visit Dupe Away

#7. MacFoot iTunes Duplicates Cleaner

Price: $14.95

Official Website: http://www.macfoot.com/itunesduplicatescleaner/

Supported OS: Mac OS X 10.5.8 or above; Windows (no further explanation)

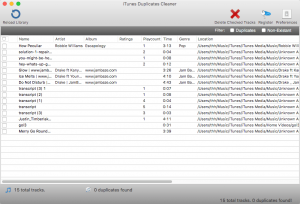
Packed with an open-and-shut UI and with most of the options displayed on the main window, MacFoot iTunes Duplicates Cleaner makes it simple to remove duplicates in iTunes library. It uses the fantastic linear sorting algorithm, which works on iTunes music libraries of any size. You can custom the conditions (Title, Artist, Album name, File Extension) for intelligently putting the duplicated tracks into groups.

7- MacFoot iTunes Duplicates Cleaner

Quick Steps:

  1. Click on the “Find Duplicates” button to scan your iTunes library.
  2. Click on the “Auto Mark Duplicates” button to check options for removing.
  3. Click the “Deleted Checked Tracks” button to clean duplicate tracks from iTunes.

Note: If it’s your first time to use MacFoot best iTunes duplicate remover, you’d better tweak the “General” and “Condition” settings in “Preference”.

Highlight Features

  • Find duplicated tracks in iTunes and sort them into groups
  • Automatically mark duplicates depending on the condition settings
  • Reload the iTunes library and render up all scanned results
  • few clicks to clean iTunes duplicates

Where It Falls Short

  • Can’t shut up the software thoroughly after uninstalling it on Windows 7
  • Only an iTunes duplicate remover, no more practical functions
Visit iTunes Duplicates Cleaner

4 FAQs about iTunes Duplicate

Why Does iTunes Duplicate Songs?

  1. iTunes will check the option to “Copy files to iTunes Media folder when adding to library” by default, which creates a new host of copies into the folder.
  2. When untagged tracks added, iTunes will regard all of them as Unknown Artist/Unknown Album and set the names to <Filename>.
  3. With so many tracks in the iTunes library, it’s hard to avoid importing songs over and over again in the older version of iTunes. (Personal reason)
  4. The new version of iTunes has the power to hunt for duplicate item names before adding them, but it can’t identify potential duplicates, like the same song with the different file name.

How to Stop iTunes from Duplicating Songs?

  1. Run the iTunes app, and go to preference setting > “Advanced” tab > clear the checkbox- “Copy files to iTunes Media folder when adding to library”.
  2. Mark the whole album as a compilation to avoid the multi-listing of the album involving one song each. (The recommendation from apple.stackexchange.com
  3. Use TagFromFilename script to fix the tags (from discussions.apple.com) before importing tracks into iTunes. Or use the best iTunes duplicate remover to get rid of those redundant files.

How to Find Exact Duplicates in iTunes?

Find basic duplicates in iTunes:

Mac: Open iTunes > pull down the “File” menu > choose “Library” > “Show Duplicate Items”.

Windows: Open iTunes > go to “View” > “Show duplicate items”.

Note: it will get the duplicates that cover songs with the same name but with various artists.

Find exact duplicates in iTunes:

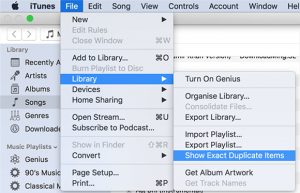
In the Mac computer, you should run iTunes > hold down the Option key > head over to “File” > “Library” > “Show Exact Duplicate Items”.

find exact duplicates in iTunes mac

If you are using Windows PC, open iTunes > hold down the Shift key > click on the “View” in the menu bar > “Show Exact Duplicate Items”.

Quick Way to Delete Duplicates in iTunes

To quick delete duplicates in iTunes directly, you should continue with the above steps. After you find out the (exact) duplicates, simply choose the song you want to remove > right-click it > choose “Delete from Library”. However, the built-in duplicates removing feature is not as powerful as the best iTunes duplicate removers, because it:

  1. Can’t eliminate “dead” iTunes files
  2. Merely matches tracks by the names
  3. Doesn’t sync across all of your devices successfully

Bottom Line

We’ve had a look at 7 of the best iTunes duplicate remover, along with 4 frequently asked questions about iTunes duplicate. Overall, we believe that Gemini (Editor’s choice), Easy Duplicate Finder, and Cisdem Duplicate Finder are the best all-round performer for various duplicate-deleting situations. If you only need a free iTunes duplicate remover to do a basic clean up on Windows, Manyprog iTunes Duplicate Remover Free is suitable for you.

Related Post

By |2021-11-18T14:19:08+08:00January 3rd, 2020|

Freedom App Review 2020: Complete Guides (6 Alternatives)

Apps and websites are too fascinating that make you easy to distract while studying or working. It’s reasonable to expect that you may need to block them, no matter for stripping out time-wasting apps & sites, protecting your privacy or preventing dangerous or explicit contents.

There are many anti-social apps (Internet blocker) and app blocker tools out there, one of which is Freedom- a cluttered app, can effectively eliminate your concerns. How does freedom app work? Does freedom app cost money? In this Freedom app review, I’m going to share my personal takes on using the program.

Quick Summary

Freedom app, available on multi-platforms (Mac, Windows, iOS, and Android), aims to block time-consuming websites & apps. With this app blocker or anti-social app, you can minimize the distraction and keep a good habit of using social media. It is marketed towards writers, editors, executives, students, researchers, etc. who desire a bit of assistance to get work done quickly.

Pros:

  • Comfortable design for interface and logo
  • Block apps, websites or the entire Internet
  • Start sessions on-the-fly or schedule beforehand
  • Create customized block lists without quantity limitation
  • Sync blocks across all your device

Cons:

  • Must work with the browser, not easy to operate
  • Too expensive for long-term users
  • Might be tired of the privacy issues around using its VPN and the price (Reddit feedback)

Freedom App Review

Download & Installation

Platform Download From How to Install Supported OS
Mac FreedomSetup.dmg Drag Freedom to the app folder 10.8 or higher
Windows FreedomSetup.exe Follow installer instructions Windows Vista, 7 or higher
iOS App Store Follow instructions 9 or higher
Android Google Play Store Follow instructions 5.1 or higher

Freedom app is absolutely safe to download. You can get the download from https://freedom.to/downloads. After installation, you are supposed to create an account on Freedom.to for Mac and Windows. While for the iOS version, you can sign up a new account within the application directly. But to block contents from most browsers and apps, you need to allow the VPN configuration.

Feature & Capabilities

Schedule a session in advance

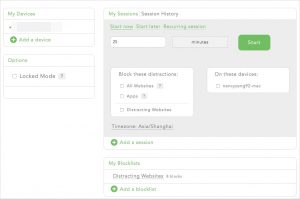
There are two options for you to schedule a session in advance, respectively are Start Later and Recurring Session. Start Later means scheduling a single session ahead. You only need to choose a start and end time for your session. As for Recurring Session, it means making a schedule for a recurring session which repeats on a specific day. You should pick a start, end time and the days you want the session to repeat.

Add a blocklist

To block annoying URLs, you need to open your dashboard and click “Add a blocklist” button to create Freedom app blocklist. The most distracting streaming sites and categories have been listed, like Facebook, Instagram, Snapchat, Social, TV/Video, Games, News, Adult, Shopping, etc., or you can enter the domain that hasn’t been shown in the list.

freedom-add-blocklist

Website exceptions

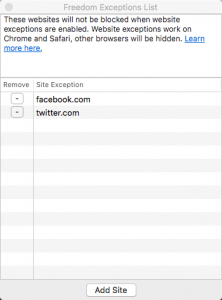
When you enable the website exceptions on Freedom app Mac, the sites added Freedom Exception List won’t be blocked. You can block all site sessions and sessions that merely use your customized blocklists. Both of them will be whitelisted.

But things to be noted are:

  1. Windows version doesn’t support website exceptions at the present;
  2. You are unable to add website exceptions during active sessions;
  3. Website exceptions only work on Chrome and Safari, and other browsers will be hidden during sessions.

freedom-website-exceptions

Locked mode

The locked mode feature of the Freedom app makes it tough to quit an active block session. You can’t remove blocklists or devices from the list when the locked mode is enabled.

Mac/Windows: go to dashboard > check the Locked mode under Options

iOS: tap the Settings tab > toggle Locked Mode

How Does Freedom App Work on Mac and Windows?

Scenario one: block apps on Mac/Windows

  1. Run the Freedom app and log in your account.
  2. Click the Freedom app icon in the menu bar.
  3. From the pull-down menu, choose “Manage Blocked Desktop Apps” option.
  4. A new dialog was brought up, just select the apps you intend to block.

Scenario two: block websites with Internet blocker

  1. Navigate to Freedom dashboard and log in.
  2. Add a site to block by entering the URL, or find the site from the list below. If you want to block all websites, choose “All Websites” when creating a session.how does freedom app block website on mac/windows
  3. Customize the session and start it.

How Does Freedom App Work on iOS?

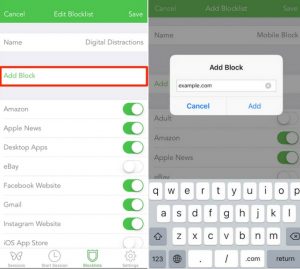
  1. Navigate to Blocklists tab on the bottom.
  2. Edit one of your blocklists or create a new one by choosing “Add a blocklist”.
  3. Toggle the pre-made filters to add the sites and apps, or tap “Add Block” option to add other items that you would like to block.
  4. Tap “Save” at the top-right corner to temporarily block apps/websites on iPhone/iPad.

how does freedom app work on ios

To know how to block apps/sites on Android, you can check https://support.freedom.to/getting-started/set-up-installation/installing-freedom-on-your-android-device. I won’t explain it in detail here.

FAQ about Freedom App

Does freedom app cost money?

Yes, it needs to cost money. Although Freedom app offers a free trial version, it has some limits. You can’t active the functions, like:

  • Locked Mode
  • Recurring Scheduling
  • Advance Scheduling
  • Freedom Perks
  • Unlimited blocking sessions

Monthly Yearly Lifetime
$6.99/month $29/year $129

How to Delete Freedom App Account?

  1. Visit billing management page: https://freedom.to/profile.
  2. Click “Delete Account” under Account Type: Trial.
  3. It will jump to a new page. Click “Delete Freedom Account”.

If you have purchased your subscription through the App Store, you will follow the same procedure, but the “Manage Billing” link will take you directly to Apple’s site where you can manage your subscriptions.

If you purchased your subscription through the App Store, the “Manage Billing” link will take you to Apple’s website straightway.

Top 6 Apps Like Freedom(Free Included)

#1. Cisdem AppCrypt (The most effective, easy to use for Mac)

Price: $29.99/lifetime

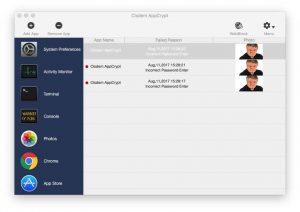
Cisdem AppCrypt is a remarkable, dedicated Freedom app alternative for Mac to block apps and websites. On the one hand, it can password protect your Mac privacy, no one having the ability to access your Mac apps without your permission. On the other hand, it will improve the productivity of your employees by blocking attractive websites and social software. More importantly, if you are a parent, Cisdem Freedom app alternative will help you prevent the kids from pornography, gambling sites, inappropriate games, and violent material

You can develop a long-term schedule to limit time spent online. If somebody else tries to open the locked apps or websites (with the wrong password), your Mac front camera will take a photo of the intruder.

freedom-alternative-1

Download the Free Trial of Cisdem AppCrypt >>

#2. FocusMe (Mac and Windows)

Price: £4.9/month, £29.99/year, £119.99/lifetime

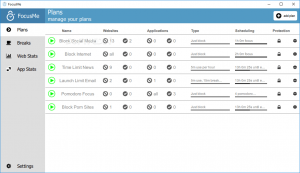
FocusMe is a feature-rich app like Freedom that blocks an unlimited number of websites and apps so you can concentrate on working. As same as Cisdem Appcrypt, it enables you to whitelist part of sites but block the rest. You can set a variety of schedules, such as morning routine, working routine and more. It has built-in Pomodoro technique which lets you stay focused and productive.

When it comes to FocusMe vs Freedom app, I would recommend FocusMe for desktop users. But for Mac-only users, Cisdem AppCrypt is more affordable with powerful functions.

freedom-app-alternative-2

#3. RescueTime (Mac, Windows, iOS, and Android)

Price: $9/month, $72/year

RescueTime is a piece of time management software mixed with a website blocker, cutting off your visiting to time-sucking websites. This Freedom app alternative runs in the background, monitoring all the apps and websites you have used during various times of the day and generating detailed reports. Although RescueTime has the ability to block websites on different platforms, it’s not as robust as some of other Freedom app alternatives, which still asks for a certain amount of self-restraint.

freedom-app-alternative-3

#4. FocalFilter (Windows)

Price: Free

FocalFilter is a free, simple app like Freedom that empowers you to tentatively block unproductive websites. It supports almost all the web browsers, including Chrome, Firefox, Safari and IE. You can add websites to the block list and configure a time interval, up to 12 hours. Once blocked, you will have no chance to access the websites. This Freedom app alternative works with hosts file, which means the blocks are system-wide.

freedom-app-alternative-4

#5. StayFocusd (Chrome)

Price: Free

StayFocusd is an extension alternative to Freedom app, making it incredibly easy to install and uninstall. It helps you boost productivity by restricting the time wasted on distracting websites.

Not only can this Freedom app alternative block specific subdomains and entire websites, but also control how long you can view certain sites.

#6. LeechBlock (Firefox)

Price: Free

LeechBlock is similar to StayFocusd, in that it’s an extension, but a Firefox extension. It’s also a good Freedom app alternative that forces you to focus on studying or working and keep away from addictive sites. Just limit the access by setting the amount of time on a given site.

Conclusion

I really appreciate Freedom app for its combination of multi-platform, power and elegant design. It enables you to fulfill the task efficiently with its basic functions- block websites and apps. These are also other Freedom app alternatives for you to keep focused. Some of them are more useful or affordable. You can try them out if you tend to find the most appropriate one for yourself. In short, productivity is a key factor in how much time and effort you applied to your works.

Related Post

By |2020-01-03T14:29:58+08:00January 3rd, 2020|

10 Best Tools to Burn MP4 to DVD on Mac (Including Free, Catalina)

As a compressed file format, MP4 contains abundant audio, video, and subtitles. In many cases, we need create DVD from MP4 on Mac, no matter for freeing up disk space, better preservation or watching on a big TV screen.

If you want to burn MP4 to DVD on Mac, a video DVD burning program is required. But the authorization license of premier app iDVD had expired on 25 March 2012. Users are looking for alternatives and their needs varied, some prefer open source software while others ask for burning MP4 to DVD Mac free without watermark. To help you sort through them all, here we have listed top 10 best MP4 to DVD burner for Mac.

Top 10 MP4 to DVD Burning Software for Mac

#1. Cisdem DVD Burner

License: Shareware ($49.99)

System Requirements: Mac OS X 10.10 and later

Cisdem DVD Burner for Mac is a well-designed, intuitive program that facilitates burning video files to discs. It enables you to convert, compress MP4 video to DVD 5 or DVD 9 with 1:1 outstanding quality. Besides, it supports both standard and HD formats like MOV, MKV, M2TS, MTS, MPEG, VOB, etc. You can even create your own menu with templates, elements, titles and background music.

cisdem mp4 to dvd burner

Pros:

  • Rotate, crop, deinterlace MP4 files maintaining the original quality
  • Professional parameter setting
  • Offer a full array of customization options

Cons:

  • Not free (a free trial is available)

Download Cisdem DVD Burner for Mac >>

#2. DVDStyler

License: Free and open source

System Requirements: Mac OS X 10.10 or higher

DVDStyler, working on Mac, Windows, and Linux, offers helpful MP4 to DVD burning features with a long compatibility list. You are able to change the font/color, add subtitles, audio tracks and place objects like button on the menu screen. Apart from burning MP4 to DVD on Mac, it also supports a heap of major video and image formats for DVD and photo slideshow creating.

DVDStyler

Pros:

  • Remarkably easy to use
  • Compatible with multiple platforms
  • Support multi-core processor

Cons:

  • Can’t make true HD DVD

#3. Express Burn

License: Shareware ($34.99)

System Requirements: Mac OS X 10.5 and above

Attractive interface and features earn Express Burn a ranking in this best MP4 to DVD burner review. Not only can it burn MP4 to DVD on Mac, but also convert AVI, OGM, WMV and other popular video formats with a DirectShow based codec to CDs, Blu-ray discs. The software comes with authoring tools that create a dedicated-looking disc, complete with chapter breaks and menus.

Express Burn

Pros:

  • Widescreen for MP4 to DVD burning
  • Can burn MP4 to recordable/re-recordable discs
  • Support DVD copying

Cons:

  • No CSS decryption options

#4. DVDFab DVD Creator for Mac

License: Shareware ($69/ lifetime)

System Requirements: Mac OS X 10.10 or higher

DVDFab MP4 to DVD creator for Mac focus on burning videos to high-quality DVD or standard ISO files. When you are going to burn MP4 to DVD on Mac, its extraordinary features will allow you to create and personalize the DVD menu into your favorite style with built-in templates. Plus, it’s capable of processing many MP4 videos simultaneously, and offers a preview video in real time.

DVDFab DVD Creator for Mac

Pros:

  • Adjust the playback order of MP4 videos for output DVD
  • Have dozens of features to enhance your DVD
  • Support hardware acceleration and multi-core

Cons:

  • Need pay extra money to active copy, ripper and converter modules
  • Take some time to master its features

#5. iFunia Video Converter

License: Shareware ($39)

System Requirements: Mac OS X 10.10 or later

Don’t be fooled by its name, iFunia Video Converter has everything you need for working with MP4 video, including MP4 video conversion, download, rip DVD to MP4 as well as burn MP4 to DVD Mac. It is the most cost-effective MP4 to DVD burning software for Mac I have ever encountered in tests. The program makes it delightfully straightforward to get things done quickly.

iFunia Video Converter

Pros:

  • Handle MP4 video with comprehensive functions
  • Create a home DVD from mobile phones, camcorders, etc.
  • Small in size, and neat

Cons:

  • Can’t burn photo to DVD

Download iFunia Video Converter for Mac >>

#6. Aimersoft DVD Creator for Mac

License: Shareware ($49)

System Requirements: Mac OS X 10.11, 10.10, 10.9, 10.8, 10.7 and 10.6

In our review of 10 best MP4 to DVD burner for Mac, Aimersoft DVD Creator made a decent performance. It’s equipped with a number of features, like enhancing your MP4 video, transforming photos to the slideshow, designing a DVD menu, and so on. You don’t have to get yourself a manual, as it is easy to burn MP4 to DVD on Mac for novices and veterans.

Aimersoft DVD Creator for Mac

Pros:

  • A wide range of input formats
  • 50+ free DVD menu templates
  • Extract ISO image from digital files

Cons:

  • Take a long time to burn a DVD
  • Feel tricky while handing the DVD customization

#7. Burn

License: Free and open source

System Requirements: Mac OS X 10.3.9 or higher

Burn is a well-known MP4 to DVD burning software for Mac, allowing the users to create standard Audio-CD discs and DVD-Video disc without hassle. It offers interactive menus, which can let you pick a theme for your MP4 movie before converting it to DVD on Mac. The software also assists you to copy discs or use disk images to recreate discs.

burn mp4 to dvd mac with with Burn software

Pros:

  • Support file conversion
  • Burn both CD and DVD on Mac
  • Copy DVD from DMG, CUE, BIN, ISO, etc.

Cons:

  • No DVD template customization option

#8. Simply Burns

License: Free and open source

System Requirements: Mac OS X 10.4 or later

Simply Burns is possibly one of the easiest open-source MP4 to DVD authoring software out there. It introduces five different operation modes, respectively are Data, Audio, 1:1 Copy, Rip Disc and Burn Image. You can burn MP4 to DVD on Mac, as well as images in ISO, DMG, CUE, BIN, etc.

Simply Burns

Pros:

  • Support five burning operations
  • Compatible with most popular virtual image formats
  • Can save the projects on hard disc

Cons:

  • The interface felt awkward and old-fashioned
  • Mainly works for image burning

#9. Finder

License: Free

System Recommendation: Mac OS X 10.11 and later

Before El Capitan (10.11.2), users can burn MP4 to DVD Mac with Disk Utility. But now it develops a new version and the instruction no longer works. To burn a DVD, you are able to turn to Mac Finder for assistance.

  1. Insert a blank DVD disc into the drive.
  2. Search and locate your MP4 video in Finder.
  3. Right-click the video, you will see Burn “XXX” to Disc option. Click on it, and start your MP4 to DVD burning on Mac.

 mp4 to dvd mac with Finder

Actually, it doesn’t have to be in Finder, even on the desktop, you can use the same method to burn a video, image, folder, etc. directly.

Pros:

  • No need to install additional software
  • Very easy to complete the task

Cons:

  • Can’t edit the MP4 video
  • Unable to choose DVD menu and templates
  • Lack of output parameter setting option

#10. DVD Creator Lite

License: Freeware

System Requirements: Mac OS X 10.6 or above

DVD Creator Lite for Mac empowers you to make DVD Disc/folder/ISO image from most video files, also including HD videos. You can finish basic MP4 to DVD burning process on Mac with the software. To remove watermarks and make further editing, you have to cost $25.99 to upgrade the software to Super DVD Creator version. If you are interested with the DVD Creator Lite, get it on Mac App Store or AnyMP4 official website.

DVD Creator Lite

Pros:

  • Burn MP4 to DVD Mac for free

Cons:

  • Create DVD with watermark
  • Lack of editing option

Tips to Burn MP4 to DVD Mac

Tip 1. How to choose the TV Standard

TV picture standard defines a video’s dimensions and frame rate. You need to select the standard before creating DVD from MP4 on Mac. There are two options, NTSC and PAL, which are used in various countries. Sometimes, SECAM could be in the choices as well.

TV Standard Followed By DVD Video Dimension
NTSC America, Japan, Canada, Mexico, etc. 720 x 480 pixels
PAL Europe, Asian, African, etc. 720 x 576 pixels
SECAM France, Poland, Russia, etc. 720 x 576 pixels

Tip 2. How to ensure the burning quality

If you intend to create a good quality DVD, first you have to make sure that the original MP4 video is in HD. Then burn MP4 to DVD on Mac with the authoring software at the slowest speed available (2x-4x). Beyond that, use the dependable blank media, brand names are better, such as Verbatim, Maxell, Taiyo Yuden DVD-R and so forth.

Tip 3. What should be considered while picking MP4 to DVD burner for Mac

  • Input file type: in addition to MP4, the tool also supports all lots of video and audio formats.
  • Editing function: the software should contain inbuilt editor for you to modify your MP4 video.
  • Template menu: you will be able to create a professional-looking DVD as quickly as possible.
  • Convert to DVD folder and ISO files: they can back up MP4 file in a proper way when you don’t have a blank DVD in hand.
  • Reasonable price: Mac MP4 to DVD burning software will typically cost between $20 and $70. Not only does expensive software be used to create DVDs, but CDs, Blu-ray Discs and other digital media. However, you still need choose the most cost-effective product depending on the specific situation.

Related Post

By |2020-09-02T15:56:56+08:00December 2nd, 2019|

inAudible Software Review: How to Use and Alternative

Audiobooks purchased and downloaded from Audible Store are protected by Digital Rights Management (DRM), which restricts you from playing them on various types of devices or in any applications.
inAudible software is a decent tool that helps you resolve the DRM issue. Is it safe or free? How to use inAudible converter and its alternative? Today, we will give an objective review of it.

inAudible Software Review

3 Things Need to Know about inAudible Software

#1. Is inAudible Converter Available?

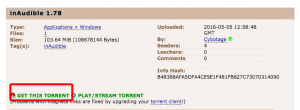
Yes, it still can be downloaded from some forums, youtube.com with an MZ link, and torrent sites like The Pirate Bay, Kickass Torrents.

It’s inconvenient to obtain the download address of inAudible converter, as it doesn’t have the official website. When you search inAudible software on Google, you will see a website- inaudible.software.informer.com. But there is no download link in it, which makes the user from answers.informer.com mistakenly think inAudible software not available anymore.

#2. Is inAudible Software Free?

Yes, it’s free.
inAudible software is compatible with both Mac and Windows. The versions you can find are low especially inAudible for Mac, as the software stopped updating long ago.

#3. Is inAudible Converter Safe to Use?

Not 100% safe (although the github.com proves it’s neither pirated nor illegal.).
First of all, there is no official website for you to download inAudible software with confidence. Whether the links provided by various forums and torrent sites are secure that needs to be verified.
Based on the test, the Mac version is safe to install and use, but the Windows one may not. The first time, when we gave a try on inAudible 1.97 download, it encountered a Trojan. We turned to install inAudible 1.95 for Windows as instead. The entire download and use process were great. However, the horrible Trojan occurs again when splitting audiobooks by chapters.

Overview

inAudible software is a practical audiobook converter that allows you to remove DRM from AA or AAX Audible files and convert them to applicable MP3, AAC/M4B, or WAV. It retains original metadata (author, cover, title, chapters, etc.) and ID3 tags of your audiobooks after conversion. inAudible software also supports to separate Audile files into multiple small segments by chapters.

Main Functions:

  • Transcodes Audible files to MP3, M4B, etc.
  • Keep ID3 Tags after audiobook conversions
  • Adjust output-tweaking aspects such as sample rate, CBR bitrate, VBR mode, etc.
  • Split audiobooks by silence detection, fixed duration or chapter maker (Win); split files into small clips using the default “Split by chapter” option (Mac)
  • Rip CD (Win)
  • Batch conversion for same files (Win)
  • Misc tools: Tag Editor, Renaming Tool, MP3/M4B Joiner, and Audio Editor (Win)

Pros:

  • Free and lightweight
  • Full-featured audiobook converter
  • Fast conversion speed

Cons:

  • Discontinue upgrading
  • Novices may be confused by the Win version

In a word, inAudible converter for Windows is packed with more powerful features than the Mac version. But every coin has two sides, the Windows version is not easy to master for new users.

inAudible Download

Methods 1. Download from a Reliable Forum

Thanks for the user from Github, you can get all inaudible download links here: https://github.com/rmcrackan/inAudible.

Mac version:

  • inAudible v0.09

Windows versions:

  • inAudible v1.702
  • inAudible v1.75
  • inAudible v1.802
  • inAudible v1.86
  • inAudible v1.91
  • inAudible v1.94
  • inAudible v1.95
  • inAudible v1.97

People also search the keyword “inAudible 1.98 download” on Google, but we didn’t find the version 1.98. If you know it, please share the download link in the comment.

Methods 2. Download from Thepiratebay.org

Mac version:

  • inAudible v0.09

Windows version:

  • inAudible v1.56
  • inAudible v 1.666
  • inAudible 1.78
  • inAudible v1.97

Step 1. Install a torrent downloader- BitLord, and run it.
Step 2. Head over to the inAudible download site on thepiratebay.org.
Step 3. Click on “Get this torrent”, and it pops out a prompt dialog, just choose “Open BitLord”.

get this torrent from thepiratebay.org
Step 4. Click “Start download” on Add Torrents window, and the software will be added to the download list of BitLord.

add inAudible software to download list

Test result: when we download the inAudible converter for Mac, it stuck at 0 KB/S, but all the Windows versions are successfully downloaded.

Input & Output Formats

The input file types that can be opened with inAudible software:

  • AA
  • AAX
  • ADH

The output codes of Mac and Win are different:
Mac:

  • AAC/M4B
  • MP3

Win:

  • “True Decrypt” output will be MP3 (Lossless)
  • AAC/M4B (NeroAAC)
  • MP3 (Lame)
  • WAV

How to Use inAudible Software to Convert Files like AAX?

On Mac:
Step 1. Click the button that looks like an ellipsis in the “Input” column, and import AAX file from your Mac.
Step 2. Choose an output location.
Step 3. Customize the transcoding options including selecting a target output format.
Step 4. Click on “Begin Conversion” button.

inaudible software for mac

On Windows:
Step 1. When you launch inAudible converter on your Windows, you will see the “Conversion Wizard” which enables you to load local AAX file.

load audible book
Step 2. Specify your output file location.
Step 3. Choose the output type and modify audio settings.

inaudible for win interface
Step 4. (Optional) Compared to the Mac version, inAudible Windows supports more chapter options. You can also click the “Adjust Chapters” button to open up the “Advanced Cutter/Chapterizer” window for more advanced customizing.

advanced cutter/chapterizer
Step 5. Start the conversion for the Audible file.

Best Alternative to inAudible Software- Epubor Audible Converter

Epubor Audible Converter, available on both Mac and Windows, is the most professional and popular inAudible software alternative. It devotes to unlocking DRM protection and converting Audible AA/AAX to MP3 or M4B formats. Better than an inAudible converter, Epubor Audible Converter can handle multiple files in various types at the same time.
With its intuitive interface, you can easily split the large audiobooks to small clips via a fixed time interval, average segments, and chapters. You don’t have to worry about the ID tags and metadata information, as they will be preserved.

Why we recommend Epubor Audible Converter:

  • Absolutely safe
  • 60X faster than competitors
  • Decrypt AAX or AA file with one-click
  • Deal with Audible files in a bulk
  • Split Audible books by multiple options
  • Support a few UI languages

How to Use the Best inAudible Software Alternative:

Step 1. Install Epubor Audible Converter
Download the free trial of Epubor on your Mac or Windows. The free version only lets you convert 10 minutes of each AA/AAX file. And you can’t use the split function. If you desire more helpful features, upgrade it to the purchased version.

Free Download for Mac
 
Free Download for Win

Step 2. Import audiobooks
Launch inAudible software. You can click on “+Add” to locate the folder stored your audiobooks, or directly drag-n-drop the downloaded files into the software interface. All the information like book title, author, and length of added Audible books will be displayed as well.

epubor interface

Step 3. Separate AA/AAX files into chapters
At the end of each book title, you can see an “Option’ button for opening the audiobook splitting window. Choose a split mode as you like and click on the “OK” button.

split chapters

Step 4. Process the conversion
Click the file icon in the bottom right corner and choose an output path.
Specify your target format as MP3 or M4B and start the conversion.

start conversion

Conclusion

As a free audiobook converter and DRM remover, inAudible software has proved its advantages over other similar tools. But if you prefer using a 100% safe and dedicated program, Epubor Audible Converter should be one of the best alternatives to inAudible converter.

Related Post

By |2020-02-12T11:31:06+08:00November 22nd, 2019|

4 Best Ways to Convert AAX to MP3 on Mac and Windows

Summary: In this article, we will figure out how to convert AAX to MP3 on Mac and Windows with professional software or online AAX to MP3 converter.

Audible.com is a monthly subscription service that boasts large database of audiobooks. However, the audiobooks authorized by Audible are in AA or AAX formats, which are protected by DRM (Digital Rights Management). Even you bought the audiobooks but you can’t play them on most non-audible-approved devices as you like. In this case, you’d better convert Audible to MP3 (the most common audio format) for playback audiobooks on Kindle, iRiver, iPod, and any MP3 players.

Best Solution to Convert AAX to MP3 on Mac and Windows

Epubor Audible Converter is a formidable and reliable DRM audiobook converter that’s specialized designed to convert Audible (AA & AAX) to MP3 or M4B. It comes load with an uncluttered UI, which supports to switch between 6 languages, including English, Italian, French, German, Japanese and Simplified Chinese.

Meanwhile, Epubor AA/ AAX to MP3 converter empowers you to split audiobook into small segments averagely or by duration/chapters. Due to the innovative encoding it used, the software can convert Audible to MP3 Mac and Windows at fast speed with original parameters (codec, bit rate, channel, etc.) retained. You don’t have to authorize iTunes or any audible manager on your device to help to remove the DRM.

How to Convert AAX to MP3 on Mac/Win with Epubor:

Step 1. Install the software

To convert Audible to MP3 player, you need install Epubor Audible Converter to your computer. Just download it here or click on the button below. After installation, run the software on Mac or Windows system.

Free Download for Mac
 
Free Download for Win

Note: The free trail version lets you convert 10 minutes of each audiobook. And the split feature is not active for the free version.

Step 2. Add AA/AAX audiobooks

Way one: Drag Audible AA, AAX files directly into the main interface of Epubor Audible Converter.

Way two: Click the “+Add” button to bring up a pop-out window > choose the downloaded Audible books from your location> click on “Open” button to import files. 

epubor interface

Step 3. Split audiobooks into chapters (Optional)

If you desire to convert AAX to MP3 with chapters, click on the “Option” icon to open up the “Split” window.

There are 3 split modes: split every X minute (s), split into X segments averagely, split by chapters. Choose one of the methods > check the box “Apply to all” > click on “OK” button.

split chapters

Step 4. Convert Audible to MP3

The software supports two different out formats: MP3 and M4B. But MP3 is the default output format by Epubor Audible Converter, thus you only need to click the “Convert to MP3 button to remove DRM and convert AAX to MP3 Mac and Windows.

convert-aax-to-mp3-epubor

Now you can share audible books with family without DRM protected.

Convert Audible to MP3 Using Freeware

inAudible software for Windows allows you to remove DRM from AAX files and convert Audible to MP3, M4B, WAV, etc. for free. It can split audiobooks by chapters and keep the quality as well as all the metadata information after AAX to MP3 conversion. But it’s not an official program (not easy to find inAudible download link) and too complicated to understand for novice users. Based on the test from virustotal.com, there are Trojan horses in inAudible software.

Actually, it also developed the Mac version (sometimes called minAudible), but the inAudible converter for Mac is only capable of converting encrypted Audible .aax files to MP3 and M4B format.

Steps to Convert AAX to MP3 on Windows with InAudible software:

  1. Add Audible AAX file from file dialog box. If you wish to handle multiple files, hold down the Shift key and choose the audiobooks.
  2. Select MP3 from “Output Type”, and customize audio parameters.
  3. Choose an chapter option to split audiobooks.
  4. Set an output path and click on the “Begin Conversion” button to convert AAX to MP3 with chapters.

inaudible software to convert aax to mp3

Another open-source software named OpenAudible can also remove DRM and convert Audible to MP3 free as well. “The code to decrypt audible files it uses is the open source “ffmpeg” library, which was contributed by inAudible software’s author”, Reddit user said. OpenAudible is compatible with Mac, Windows and Linux. When I tried to launch the software on Mac, its icon just keeps beating on the dock but it doesn’t open.

Convert AAX to MP3 Online for Free

Online-audio-converter.com is a sought-after audio tool that supports to convert an array of input formats including video formats to MP3, M4R (iPhone ringtone), WAV, M4A, FLAC, OGG and more. You can convert multiple AAX files to MP3 simultaneously and save them in a ZIP archive. According to the result of my test, however, when I played the converted MP3 Audible file, I hear nothing but only the brief murmur.

Steps to convert Audible to MP3 online:

  1. Upload AA/AAX files from your computer, Google Drive, Dropbox, or add them with an URL link.
  2. Select MP3 as output format.
  3. If necessary, change the quality of audiobooks; edit advanced settings (bitrate, sample rate, channels, etc.) and track information (title, artist, album, year, genre).
  4. Click on the “Convert” button.

convert aax to mp3 online

I also test some other familiar online audio converters, such as Convertio.co, Online-convert.com, Zamzar.com, Files-conversion.com, etc. both of them failed to convert AAX to MP3 online. Even some converters like Zamzar are incapable of importing AA/AAX files.

Record AA/ AAX to MP3 with Audio Recorder

Apowersoft Streaming Audio Recorder is an all-in-one tool for Mac and Windows to record any streaming audio including downloaded Audible files. It can deliver output files in MP3, WMA, M4A, WAV, FLAC, OGG, etc. format. Also, it ensures you to play and edit audiobooks before conversion. The recorder has online version named Free Online Audio Recorder.

Note: The free trial version comes with limited functions. You can only record 3 minutes Audible audio and identify information for 3 tracks.

Steps to Record AA/ AAX to MP3 on Mac/Win:

  1. Install Apowersoft Streaming Audio Recorder, launch it and hit the “Record” button.
  2. Play your downloaded AA or AAX files with Audible app, iTunes or Windows Media Player. Once the audiobooks start to play, Apowersoft Streaming Audio Recorder will detect and record it automatically.
  3. When finished, navigate to the “Library” tab to find your recorded audio tracks. You can check each of them with the built-in audio player.record aax files
  4. Click on the “Convert” button to open up the “Audio Converter” window.
  5. Choose MP3 as output format and click on “Convert” button again to save recorded AA/AAX as MP3 format.convert recorded aax to mp3

FAQs about Audible File & Conversion

Q1. AAX VS AAXC, What’s the Difference?

AAXC, the new format for Audible books, is basically as same as AAX format.

Audible app for Android/iOS released on June 20, 2019 or later only empowers you to download audiobooks as AAXC. It can’t be converted to any other audio formats, as AAXC added the address copyright protection. If you need to convert Audible to MP3, you should download audiobooks in AAX format through website or Audible App for Windows.

Q2. Can I Convert AAX to MP3 with iTunes?

You can’t do it directly, since iTunes is not an AAX to MP3 converter. But you can burn audiobooks to CD with iTunes, and then rip CD to MP3 files.

Audible authorize iTunes to burn each audiobook. Because of the DRM protected, you can merely burn the CD once.

Final Thoughts

People want to convert Audible to MP3 so that they can put audiobooks on Kindle Paperwhite, Kindle Fire or the MP3 players. We introduce 4 solutions here to help you convert AAX to MP3 on Mac and Windows. The most practical way I would recommend is to use Epubor Audible Converter. It’s easier-to-use and safer than inAudible software. And it’s able to convert Audible to MP3/M4B with chapters and without quality loss, which the online converter can’t do.

Related Post

By |2020-01-09T11:37:36+08:00October 17th, 2019|
Go to Top