Microsoft PowerPoint is one of the most popular presentation apps. Sometimes we need to insert PDFs, Word documents and other types of files into PowerPoint for reference or other purposes. This guide will show you how to insert PDF into PowerPoint on Mac and Windows different ways for different needs.
It will cover:
- Method 1: How to insert PDF into PowerPoint as an object
- Method 2. How to insert PDF into PowerPoint without losing quality
- Method 3. How to insert PDF into PowerPoint as image with high quality
- Tip: Rotate inserted PDF in PowerPoint
How to insert PDF into PowerPoint as an object
Windows
This is known as the most common way to add PDF file to MS PowerPoint. It’s very easy to operate thanks to the Insert function. The steps below will show you how to do it on Windows PC. Things will be different for Mac users, which will also be covered.
Important: Before you get started, please be sure that the PDF file is not open on your computer.
Step 1. Open your presentation file in PowerPoint for Office 365, PowerPoint 2019, PowerPoint 2016 or PowerPoint 2013, etc. Select the page (commonly known as slide) on which you want to embed a PDF.
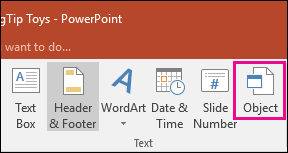
Step 2. To insert PDF into PowerPoint as object, from the toolbar, select Insert > Object.
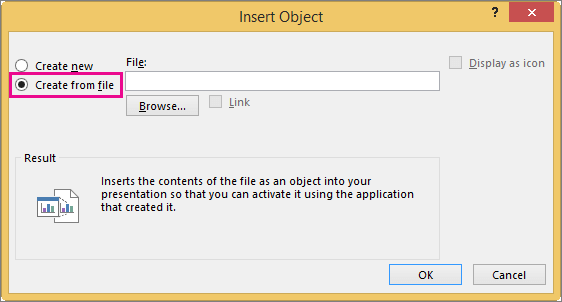
In the Insert Object window, select Create from file. Click the Browse button and add the PDF file.
Step 3. Click OK. The first page of the PDF will appear in your PowerPoint presentation as image.
To access the rest part of a multiple page PDF, you need to double-click the image, and the entire PDF file will be opened by the associated app (like Acrobat Reader) on your computer.
Note: The inserted PDF page (displayed as image) will lose quality, so it may end up looking blurry. To perform the embedding without losing quality, please check out the second method.
Pro tip: Insert PDF into PowerPoint as icon or link
You can also choose to display the inserted PDF as icon or link instead of as a preview image of the first page.
After you finish the second step in the section above, find the two options: Display as icon and Link. If you select the former option, the embedded PDF file will appear as a PDF icon. You can drag it around and place it anywhere you want in a slide.
To embed a PDF link into PowerPoint, select the checkbox next to Link. It will create and insert a link pointing to the PDF file location on your computer. If the PDF is deleted, moved, or if the PowerPoint file is opened on a different device, the link will be broken.
Mac
PowerPoint for Mac also provides the Insert function. However, the object inserting is relatively limited in the macOS version. When you try to insert PDF into PowerPoint on Mac using Insert Object, an error message will pop up. The good news is there is a workaround.
Step 1. Add a new slide to your presentation.
Step 2. Drag the PDF file into PowerPoint for Mac. And a new window will appear, asking you to select the specific PDF you want to add. Enter the page number.
Step 3. Click Insert. The selected PDF page will display on the newly created slide as an image.
Note: Unlike with the Windows version, nothing will happen if you double-click the image. The advantage is that you can add entire PDF by repeating these three steps.
Alternatively, users of PowerPoint for Office 365/2019/2016/2011 for Mac can also choose to add a link to the PDF file to your presentation.
How to insert PDF into PowerPoint without losing quality
This method comes with the following main benefits.
- Allow you to do the embedding without quality loss
- Easily insert specific, multiple pages of a PDF into PowerPoint
- Add selected PDF text, image, form and other contents into PowerPoint
- Keep the original formatting, image quality, etc.
- Make it possible to edit PDFs (including scanned PDFs) in PowerPoint
It will involve use of software like PDF Converter OCR (Mac), Enolsoft PDF Converter with OCR (Mac) and Nitro Pro (Windows). Here we will take the app PDF Converter OCR for example and show you how to insert step by step.
Step 1. Download and install PDF Converter OCR on Mac. Launch it.
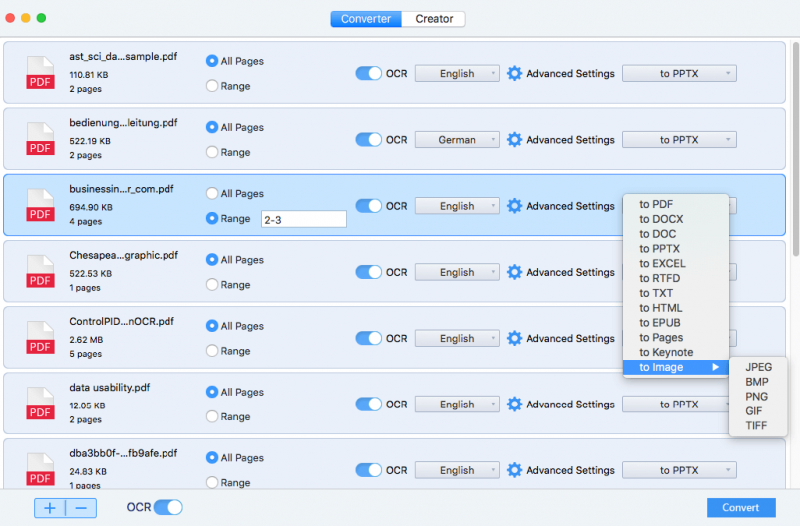
Step 2. Drag one or more PDF files into the app. Click the output format dropdown list next to Advanced Settings. Select to PPTX. Click Convert.
Tip: If you only need to add certain pages from PDF to PowerPoint, you can select Range and specify page range.
Step 3. To insert PDF into PowerPoint on Mac, open the converted file in PowerPoint and switch to Normal view. Among the slide thumbnails, select the slides you want to insert into your presentation, control-click and select Copy. Alternatively, you can also select Edit > Copy in the toolbar.
Step 4. Open your presentation. Control-click the slide below which you want to add the PDF page(s) and choose Paste.
Now the PDF pages you need have been successfully added to presentation.
Pro tips
- You can rearrange slides based on your need by dragging slide(s) to desired location.
- Instead of inserting entire PDF pages, you can add specific text, graphic, table, image, etc. by coping from the converted PDF file and pasting to PowerPoint.
Note: If you directly copy contents from the original PDF, it can result in garbling of text, losing of formatting and other issues, as shown in the screenshots below.
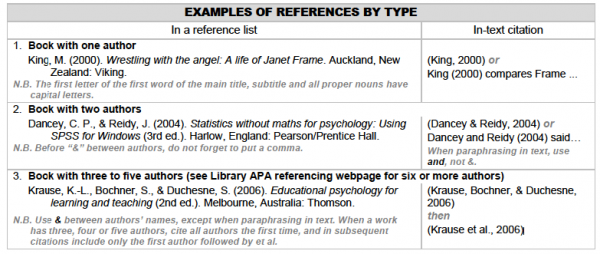
A table in the original PDF file
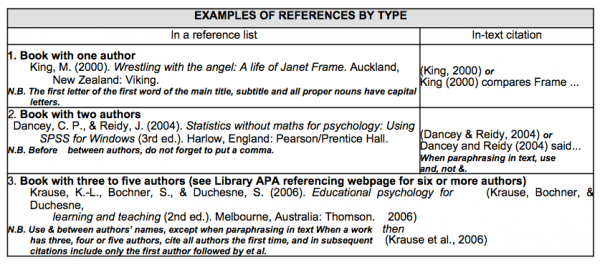
This is how the table looks like once inserted into PowerPoint after the PDF is converted to PPTX with the app PDF Converter OCR. The formatting is retained.
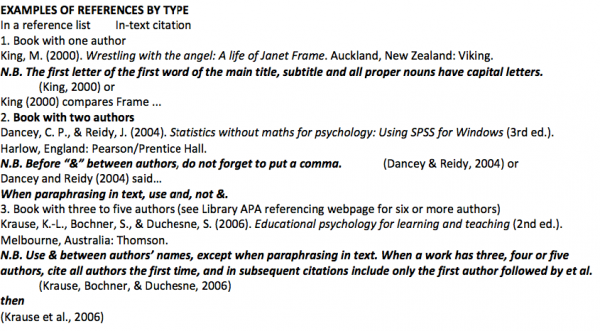
Directly copy and paste the table from PDF to PowerPoint. The formatting is lost.
How to insert PDF into PowerPoint as image
It’s also possible to insert PDF content into PowerPoint as a clear image.
Important: Don’t minimize your PDF reader. Make sure that the content you need is clearly visible in the current PDF window.
Step 1. Open the PDF in Adobe Acrobat Reader or Preview or any PDF viewer you prefer.
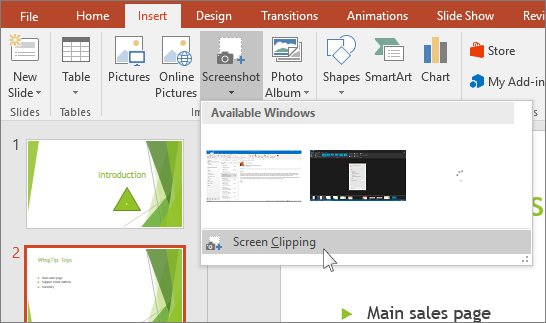
Step 2. Open PowerPoint and choose the slide where you need to add the PDF content. From the toolbar, select Insert > Screenshot.
You should find your PDF file being the first in the Available Windows list.
Step 3. Below the Available Windows section, select Screen Clipping. And the window of your PDF reader will show up.
Step 4. Select the specific PDF content like you would do with a normal screenshot. Once done, the selected content will appear on the slide of your presentation as a clear picture.
Tip: Rotate inserted PDF in PowerPoint
Above are the three common ways to insert PDF into PowerPoint on Mac and Windows. In reality, we may often need to rotate the inserted PDF pages.
I’m turning a 4-page PDF into a folding brochure and need to turn pages 1 and 4 upside-down on the first of two PowerPoint slides. ― A question from Microsoft Community
Microsoft PowerPoint only allows users to change slide orientation between landscape and portrait. Note that the orientation change will be applied to all slides in a presentation.
To rotate the inserted PDF to any angle, the best way is to add PDF contents as image. This way, you can easily rotate or flip a picture using the rotation handle or the Drawing Tools.
Conclusion
Hopefully this article helps you with how to insert PDF into PowerPoint. All the methods are easy to operate. And they can meet most of the needs. For those who deal with PDFs, PowerPoint presentations and similar files a lot, it’s a good idea to use professional software like PDF Converter OCR due to its versatility and support for various formats.
Related Post
How to Convert AZW3 to PDF and Remove DRM (Free Online Included)
With the easy availability of eBooks on the websites today, we prefer to view books on Kindle device. While with [...]
Calibre DRM Removal: Tutorial and Alternative
Calibre is known as a powerful and easy to use e-book manager. You can use it to edit books’ metadata, [...]
Kindle DRM Removal 2020: How to Do It on Mac and PC
This article talks about how to do Kindle DRM removal on Mac and Windows. Kindle books purchased from Amazon are [...]






In fact, I want to insert the PDF as editable text, it seems that I have to convert first.